
Overview
- The Shipping Settings Screen is comprised of 7 different screens which set the options and parameters needed in the SEOM Shipping module.
- The user must have submitted a Stone Edge Shipping API and Postage Meter Application Form in order to use the new SEOM Shipping process.
- If it is the first time into the Shipping application and the API key has not yet been entered, in order to open the Shipping Settings page, the user will need to go to Main Menu -> Ship My Orders -> Ship My Orders to launch the Shipping Setup screen to enter the API Shipping key.
- The Shipping set-up screen can be accessed at any time after the key has been entered by going to Main Menu -> Settings –> Shipping Functions –> Shipping Setup.
- Access to the shipping set-up screen is also available from the Search and List Views in the Shipping and Packing screens.
Company Information
- The Company Information Screen can be accessed through the Shipping Settings screen. Go to Settings-> Shipping Functions -> Shipping Setup -> Choose Company Information
- The information that is in this form is used for the return address section on the shipping labels.
- Company information can be entered on a cart-by-cart basis where some may have their own unique company information per cart or the default company information may be used for all or some of the carts.
Description of the Company Information Screen
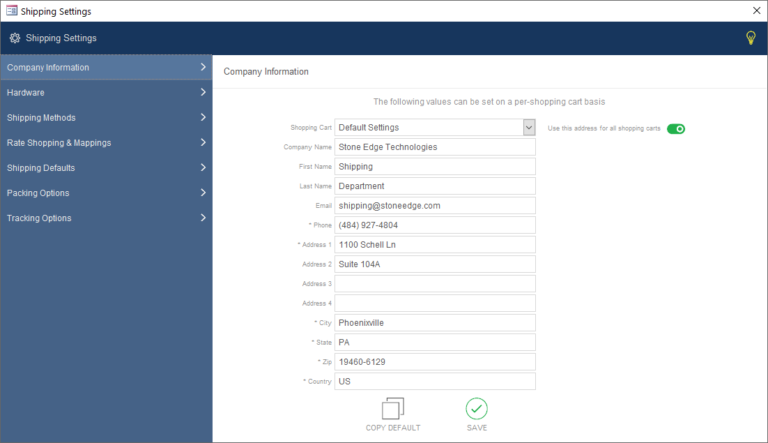
Shopping Cart
- The drop-down list will prefill with all shopping carts that are defined in the system.
- Default setting selection in the shopping cart dropdown will define the default company information
- If all carts share the same shipping information, fill in the company information for the default shopping cart, then switch on the “Use this address for all shopping carts” option. This action will lock the shopping cart’s information to stay at the default company that was entered. See Use this address for all shopping carts below, for an explanation of this option.
- If some or all of the shopping carts will use different company information choose each shopping cart and fill in the appropriate information for each cart. See Copy Default below, to quickly enter the default company for selected shopping carts.
Use this address for all shopping carts
- When this switch is ON (GREEN) the default setting for company information will be used for all shopping carts. Each individual shopping cart company information screen will remain grayed out and will not be editable unless the switch is turned OFF (NOT GREEN) on the Default shopping cart and the SAVE function has been selected.
- When this switch is OFF each shopping cart can also be defined with their own company information or have the default information copied to their screen.
Company Name
- Name of the Company to be used on the shipping labels.
- The name of the Stone Edge store will be pre-populated in this field and can be edited.
- System Parameter is ShipCompanyName.
First Name
- First Name of the sender from the Company to be used on the shipping labels.
- System Parameter is ShipFirstName.
Last Name
- Last Name of send from the Company to be used on the shipping labels.
- System Parameter is ShipLastName.
- Email address of the Company to be used on the shipping labels.
- System Parameter is ShipEmail.
Phone
- Phone number of the Company to be used on the shipping labels.
- This field is a required field and must be filled in.
- System Parameter is ShipPhone.
Address 1 – 4
- Address 1-4 fields of the Company entered as it should be seen from where the order originated to be used on the shipping labels.
- The Address 1 field is a required field and must be filled in.
- System Parameters are ShipAddress1, ShipAddress2, ShipAddress3, and ShipAddress4.
City
- City field of the Company to be used on the shipping labels.
- This field is a required field and must be filled in.
- System Parameter is ShipCity.
State
- State field of the Company to be used on the shipping labels.
- This field is a required field and must be filled in.
- System Parameter is ShipState.
Zip
- Zip field of the Company to be used on the shipping labels.
- This field is a required field and must be filled in.
- System Parameter is ShipZip.
Country
- Country field of the Company to be used on the shipping labels.
- This field is a required field and must be filled in.
- System Parameter is ShipCountry.
Copy Default
- This function will copy the default company information to specific shopping carts. Select the cart that will use the default information and choose copy default and the information will quickly copy to the selected cart.
- This function would be used if only some of the carts but not all of the carts will be using the default information, thus the “Use this address for all shopping carts” switch would be OFF.
Save
- This function saves your Company Shipping Information to the database.
Hardware
- Hardware options are available to configure a scale (configured for the current workstation only) and printers (configurable for each shopping cart).
- Scale setup must be performed on the PC to which the scale is directly connected. Additional configuration instructions can be found here.
- ZPL is a standard printer language for most label printers. A popular and recommended model is the Zebra ZP 450. Older Zebra models, including the LP2844, use the EPL printer language, which is not supported. Please confirm your label printer utilizes the ZPL language and all drivers are up to date. It is also recommended that a ZPL printer be connected directly to the PC via USB. Although network printers work, their setup tends to be more difficult.
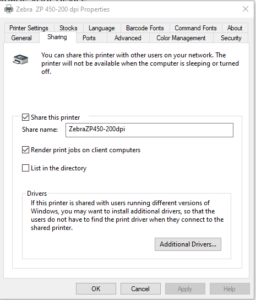
- A ZPL printer must also be configured as a shared printer. To share the printer, open the settings -> devices and printers’ settings on your PC, right-click the printer, and select Printer Properties. Select the Sharing tab and enter a Share name. The best practice is to enter a name without any spaces or special characters. Apply your changes. Additional information on printer sharing can be found here. See below on the Additional Setting needed to be completed on the Printer Port Field, the share name will be needed. An example is shown here:
Description of Hardware Screen
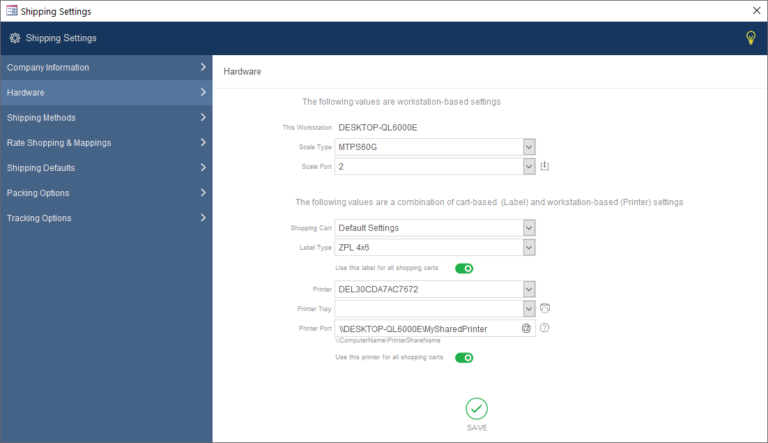
Workstation based Scale settings
This Workstation
- This automatically displays the workstation’s computer name – Settings/System/About.
- This name is used in the Printer port area if using a printer from your workstation.
Scale Type
- Drop down the list to choose the scale type. Make and model of scale for weighing purposes.
- System Parameter – ScaleType
Scale Port
- Drop down the list to choose the scale port. This is the com port that the scale is connected to. Values are None, 1-10. Select a Port even for a USB device.
- System Parameter – ScalePort
Test the scale setup icon
- To test the scale setup, use this icon located next to the scale port field to see if the scale has been properly set up. If you place something on the scale your reading on the scale should be equal to what you see in the pop-up window in the scale test.
Label and Printer settings
Shopping Cart
- Label type can be on a per-shopping cart basis.
- The drop-down list will prefill with all shopping carts that are defined for the system.
- Default setting selection in the shopping cart dropdown will define the default Label Type information.
- If all carts share the same Label Type information, fill in the Label Type information for the default shopping cart, then switch on the “Use this address for all shopping carts” option. This action will lock the shopping cart’s information to stay at the default Label Type that was selected. See Use this label for all shopping carts for an explanation of this option.
- If some or all of the shopping carts will use different Label Type information choose each shopping cart and fill in the appropriate information for each cart.
Label Type
- Supported types are ZPL, PDF, and Integrated Packing Slip
- ZPL is a printer language for most label printers, need to confirm your label printer utilizes the ZPL language and all drivers are up to date, also recommended the ZPL printer be connected directly to the PC via USB. Also needs to be connected to a shared printer.
- Labels printed in pdf format only certain shippers/shipping services can use this option. If using this option Adobe needs to be on the workstation.
- The integrated packing slip is a 4in. x 6in. shipping label integrated within an 8.5in. x 11in. report. Can choose a packing slip (default) or invoice. Orientation can be set to either vertical or horizontal. The use of this type of label requires special paper not provided by Stone Edge.
- System Parameter is ShipLabelType.
Label Format
- The option will only display when Label Type = Integrated Packing slip
- Drop Down will prefill with a Packing slip or invoice. Choose which format you need.
- System Parameter is ShippingLaserLabelSubreport.
Use this label for all shopping carts
- When this switch is ON (GREEN) the default setting for the label will be used for all shopping carts. Each individual shopping cart label field will remain grayed out and cannot be edited unless the switch is turned OFF on the Default shopping cart and the SAVE function has been executed.
- When this switch is OFF (NOT GREEN) each shopping cart can be defined with their own label information.
- System Parameter is ShipUseDefaultLabel.
Printer
- Dropdown choice of printers that are defined at your workstation to print. This drop-down includes a list of printers registered to in Windows’ Printers and Scanners menu.
Printer Tray
- If the printer supports multiple trays, select the appropriate entry in the list.
Printer Port
- If using a thermal printer and it is connected to one of this PC’s LPT ports, enter the printer port name. If using a USB Connection on this PC or using a shared printer, enter the UNC path to the printer (i.e. \\ComputerName\PrinterShareName) this text is also displayed by the icon next to the Printer Port field. The computer name is from the computer that the printer is plugged into.
- Choose the @ button to automatically set the \\PCName\portion of the port. You will need to manually enter the printer’s share name.
Test Print
- A test print can be performed by selecting the printer icon. This option uses a live shipping label that will be immediately voided.
- Funds from your account will be used to print the test label. Once the void is processed the funds will be returned. If choosing the carrier USPS for the first time, you will encounter a message that is notifying you of the fact that it’s the first time your account will be charged with the allotted fund transfer.
- This function can be done multiple times.
Use this printer for all shopping carts
- When this switch is ON (GREEN) the default setting for the Printer/Printer Tray/Printer Port will be used for all shopping carts. Each individual shopping cart Printer/Printer Tray/Printer Port field will remain grayed out and cannot be edited unless the switch is turned OFF on the Default shopping cart and the SAVE function has been executed.
- When this switch is OFF (NOT GREEN) each shopping cart can be defined with their own Printer/Printer Tray/Printer Port information.
- System Parameter is ShipUseDefaultPrinter.
Shipping Services
- This is the section of set up that will define all shipping services that your company will be using during your shipping process. All available shipping services available under your account are listed on the left. Select those that you wish to use within Stone Edge and add them to the list on the right. These shipper-defined services can then be mapped to your user-defined methods on the Rate Shopping & Mappings screen.
- Changes on this screen are saved immediately.
Description of the Shipping Services Screen
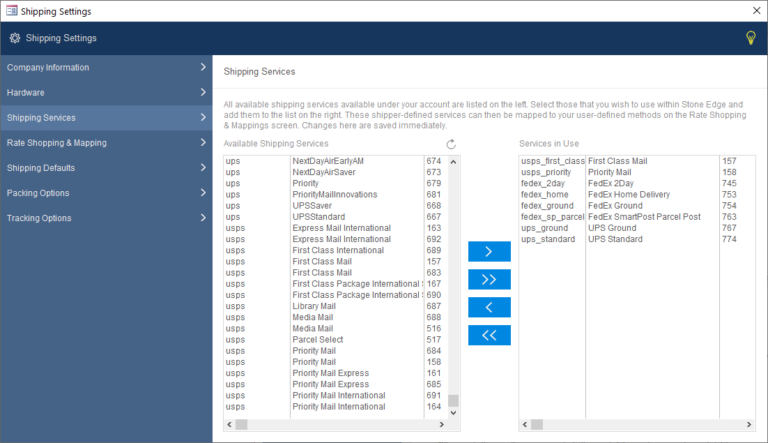
Available Shipping Services
- Left Data Screen which prefills with the shipping services available under your account. Scroll down to choose the services that you will be using during the shipping process. Using the blue directional buttons will move your selection to the right data screen to become a service in use.
- Use the Refresh icon to refresh the services available at any time.
Right/Left Directional Blue Buttons
- The single directional button >< will move the selected data to the direction to which it points.
- The double directional button >><< will move all data from the window panel to the direction to which it points.
Services in Use
- Select a shipping service from the left panel and use the single right directional blue button or double click to select a shipping service that your company will be using. The services selected into the right data Screen will be available to be mapped to the Public shipping method in the Rate Shopping & Mapping Screen. These services will be those services that the Rate Shop function will use to find the best shipping rate for your package.
Rate Shopping & Mapping Screen
- The Rate Shopping and Mapping screen allow you to map your published shipping methods that you previously setup in the Store Setup Wizard under shipping (Setup->System Functions->Store Setup Wizard->Shipping) to the Shipping Services that were chosen in the Shipping Services window.
- Your published shipping methods listed under My Methods can be found and modified using the List Maintenance feature under Data Functions, as well as, at this current screen.
- Make a selection from the My Method list, and then make a selection from the Shipper Services that will be mapped together as a group and move the shipper service to the rightmost column, Services Mapped to My Method. You can continue mapping more Shipper Services to this same group by again choosing another Shipper Service and again, moving that service to the right-most column.
- You can verify your grouping by selecting the My Method in the left-most column and seeing its group member(s) in the right-most column.
- The default for each My Method is “Any”.
- Changes on this screen are saved immediately.
Description of the Rate Shopping & Mapping Screen
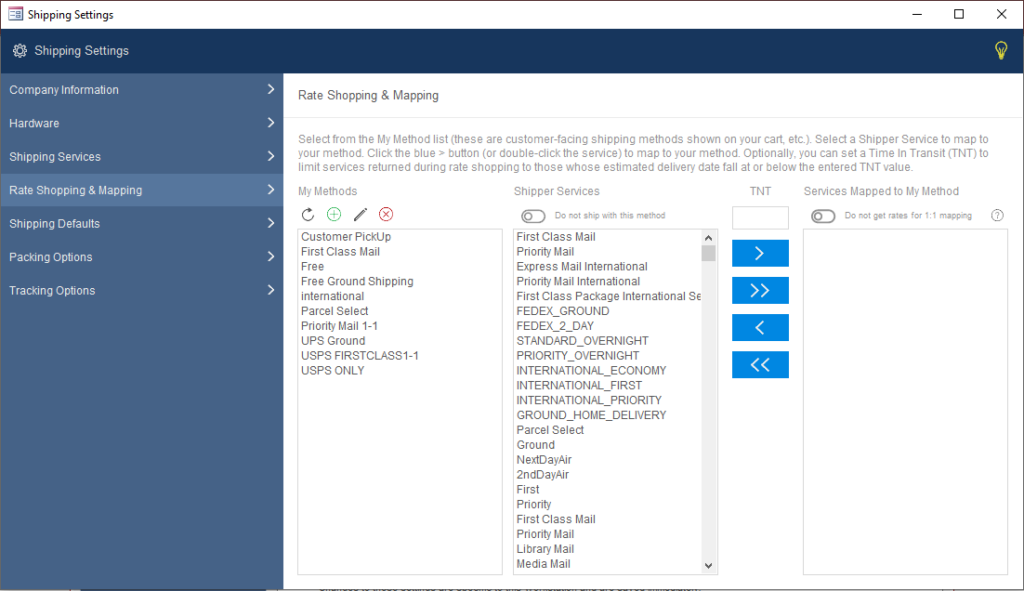
My Methods
- Left Data Screen that prefills with the public-facing or customer-facing methods that appear on your shopping cart. Selecting a My Method, then choosing a Shipper Service(s) will allow you to create shipping defined Methods for your orders which will allow for a quicker and more seamless system to process shipping labels.
Edit Functions to the My Methods Screen
- Refresh icon
- Add new published method
- Edit published method
- Delete published method
Shipper Services
- These are the Shipper Services that were chosen to have the option for use from all available services based on the account in the “Shipping Services” Screen.
- Do Not Ship With This Method
- Choose this option when you want to assign a method to an order that you do not want to process through the shipping screens. An Example of this is a “My Method” of “Customer Pickup”. Selecting “Customer Pickup” in the “My Methods” panel then choosing the “Do Not Ship With This Method” toggled to ON/RED, will fill in the “Services Mapped to My Method” value of “Do Not Ship”.
- Any order with a method of Do Not Ship as a service will not be able to be packed or shipped in the Shipping/Packing Screens. Application Messages will provide information that the order cannot be shipped.
- The order can, however, be shipped through the Process My Orders screen, Print Shipping Label. Using this shipping screen, it too will provide an informational message that the order has been marked with Do Not Ship but will allow the order to be shipped. This step is considered an override to the normal system.
TNT
- A TNT number can optionally be set to limit the services returned during rate shopping to those whose estimated delivery date fall at or below the entered TNT value.
- This value counts in business days.
Right/Left Directional Blue Buttons
- You need to select a My Methods variable, then choose a shipper service you wish to map to.
- The single directional button >< will move the selected data to the direction to which it points.
- The double directional button >><< will move all data from the window panel to the direction to which it points. Please note the << direction will take ALL mapped services and move back to the Shipper Service window for the particular My Method selected.
Services Mapped to My Method
- By selecting a public-facing method in the left panel then the selection of a shipping service from the center panel and by using the single right directional blue button to select a shipping service that your company will be used by moving it to the right panel will result in a mapping of the public-facing method (My Methods) to the different shipper services. One My Method can be mapped to many different shipping services (One to Many) or can map to a single mapping (one to one). With this configuration, the software will rate shop against only those shipper services the method has been mapped to.
- If no shipping services are selected, you will see the value of “Any” appear. With this configuration, the software will rate shop against any and all available shipping methods that you have configured to use within Stone Edge.
- Do not get rates for 1:1 mapping
- Set this parameter to TRUE to prevent the system from getting shipping rates for orders with a published shipping method, “My Method”, mapped to a single shipper’s method, “Shipper Service”.
- This assumes you DO NOT need to know the shipping rate prior to printing a shipping label and a shipping rate of $0.00 will be displayed prior to printing a label.
- Currently, this system will only work if you have weights and dimensions pre-filled in your inventory table for the items you are rate shop/shipping.
- System Parameter: ShipDoNotRateShop1to1.
- Turning OFF/FALSE the system parameter will allow the rate shop of a 1:1 mapped method.
Shipping Defaults
- The Shipping Defaults screen offers several options to configure the shipping functionality.
- These settings are company-wide and will affect all users on all workstations.
Description of the Shipping Defaults Screen
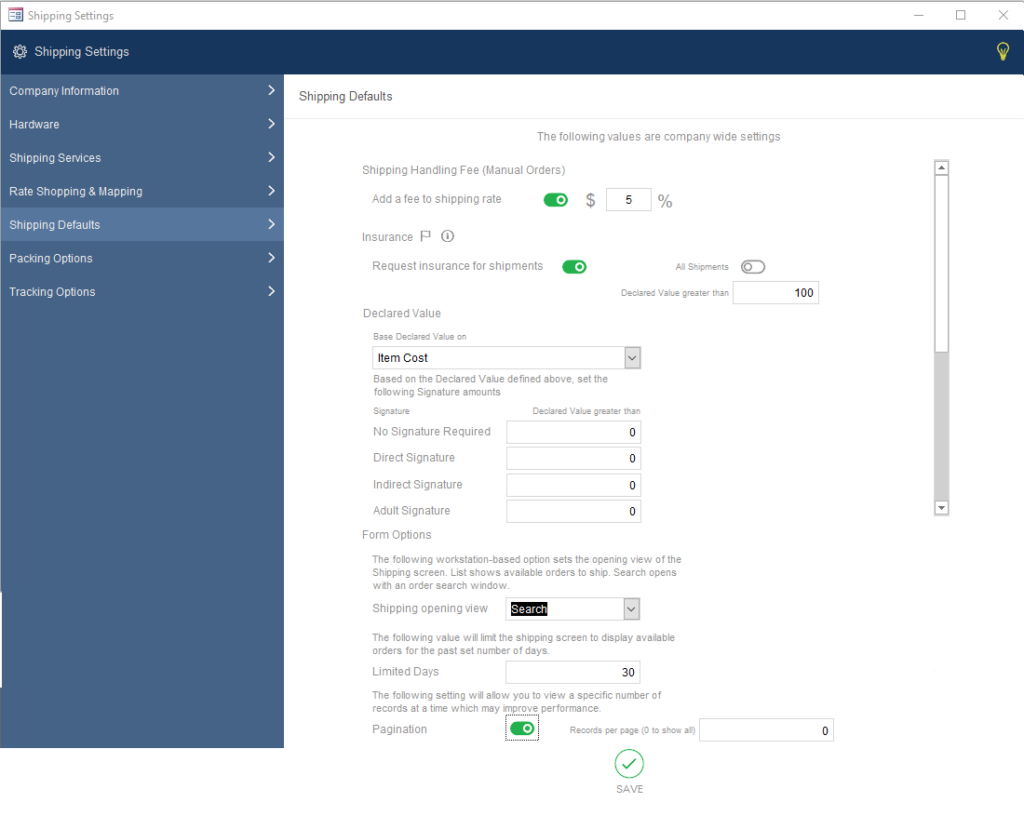
Shipping Handling Fee (Manual Orders)
- Turning this option ON to “Add a fee to shipping rate” at the shipping setup/Shipping Defaults screen allows for the fee to be added in the manual orders screen.
- This fee can be added as a flat dollar value or as a percentage value added to the shipping rate.
- This fee will be already included in the rate shop return (also Rate field) and broken out at the bottom of the screen displayed as S & H (Shipping Rate + Set Handling Fee).
- Parameters for this option are ShipHandlingFeeType (None, Percent, FlatAmount) and ShipHandlingFeeAmount.
Insurance
- Stone Edge 7.714 offers shipping insurance. A customer can sign up for this on their initial request form for the API shipping key or by contacting sales@stoneedge.com.
Request insurance for shipments
- To turn Insurance On, toggle the “Request insurance for shipments” to ON/GREEN. This enables insurance to be used on the shipping screen.
- Once insurance is activated, ON/TRUE, there is a choice between having insurance applied to “All Shipments” or “Declaring a value greater than” to which any shipment greater than that value will insure the package. Please note that these two selections are either-or, not both. Therefore, if “All Shipments” is chosen, “Declaring a value greater than” cannot be chosen, and visa-versa.
All Shipments
- When the All Shipments toggle is on, the Insure field on the Shipping/RateShop Screen will automatically be set to ON/GREEN. If the Declared Value is not set to automatically calculate, the initial value of the Insure field will be $0.00.
- The use of Insurance can be toggled off at the rate shop/shipping panel manually by turning the “Insure” toggle to OFF. However, if shipping an international shipment, the Declared Value is required to ship.
- The Declared Value MUST be set either defaulted at the Shipping Settings Screen OR manually set at the Shipping Screen. If there is no Declared Value, there is no basis for the insurance to be calculated and thus will not be applied.
- The Insure field at the Shipping/RateShop screen is not editable.
Declared Value Greater Than
- If “Declared Value Greater Than” is set to either NULL (Blank) or zero, this option will be the same as choosing “All Shipments” as the SE shipping system calculates that as Declared Value > $0.00.
- The shipping system will only turn ON insurance automatically when it’s greater than the Declared value. Best case use if you only want insurance coverage past a certain threshold, for example, $100.00. If you don’t need it for every shipment over $100.00 you have the ability to manually turn the insurance OFF.
- If needing insurance on certain shipments, this option can be set high, thus it is always on but not being applied to every package. It gives the ability of it NOT being applied to every shipment, but have the ability to turn it ON manually at the Shipping/RateShop Screen in those times it is needed.
Declared Value: Base Declared Value on
- Set the Declared Value Basis to a value that will allow SE to auto-calculate the Declared Value if you have the values set in the inventory table. The ability to manually enter this is available at the Shipping/RateShop Screen. This will benefit the Insurance, Signature Requirements, and International Shipping
- Declared Value options as displayed in the drop-down list are No Default Value, Item Cost, Order Product Subtotal, Retail Value (manufacturer’s suggested selling price).
- “No Default Value”: SE system has no defined calculation basis for the Default Value. When a Declared Value basis is set to No Default Value, insurance, international shipping, and Signatures all need a Default Value to be entered manually at the rate shop/shipping panel on the Shipping Screen. The Insure field will remain OFF until a “Default Value” has been entered.
- “Item Cost”: System will SUM (CostPerUnit * QuantityShipped)
- “Product Subtotal”: System will display the FinalProductTotal field value
- “Retail Value”: System will SUM (priceperunit*QuantityShipped)
Signature Default
- Allows you to set a minimum value based on the Declared Value in order to require a signature for delivery.
- If the basis for a Declared Value is set to “No Default Value” and a Signature is needed for a package, the ability to set any of the below-mentioned Signature options exists at the rate shop/shipping panel on the Shipping Screen via a drop-down window.
- Based on the Declared Value a value can be set for the following four signature options. When the Declared Value is greater than the amount entered the corresponding signature will be needed.
- No Signature Required
- Direct Signature: Anyone at the address may sign
- Indirect Signature: Anyone at the delivery address, from a neighbor or building manager, obtain authorization from the recipient to release the package without anyone present
- Adult Signature: someone who is at least the age of majority (no longer a minor, US is 21 years of age) ID must be shown to prove age.
Form Options
Limited Days
- The value in this field will limit the shipping screen in list mode to display the available orders for the past set number of days. Available orders are approved orders without tracking numbers already assigned to them.
Pagination
- This option will allow a limit to view a limited number of records at a time. For large databases, setting this pagination option may improve performance. This option is for the list view.
- Default is 30 orders per page, if 0 is entered this will display all available orders.
- This switch option is GREEN when it is enabled to ON.
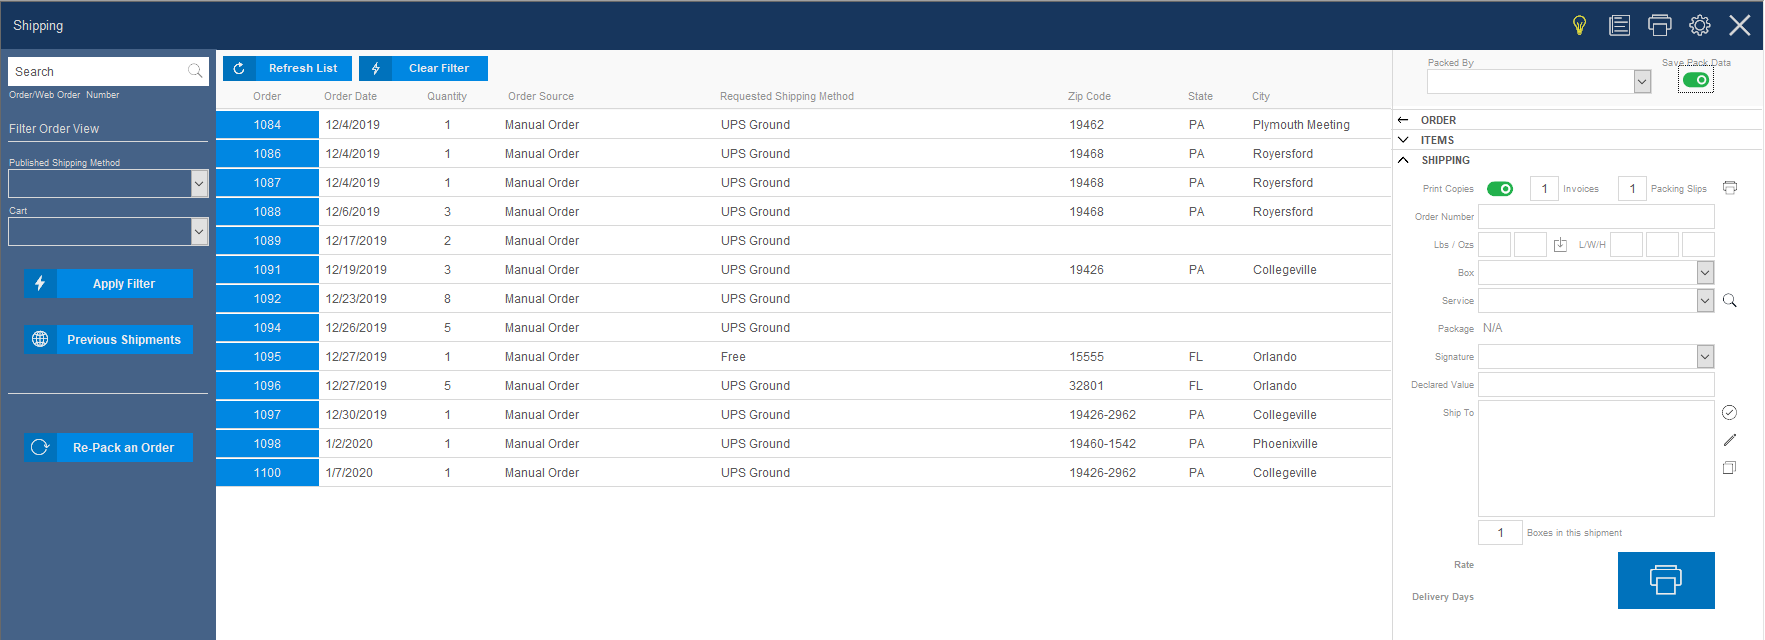
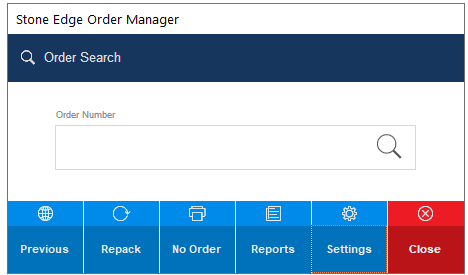
Shipping Screen view options
- There are two view options for the shipping screen, List or Search as displayed in the drop-down window. The list displays all available orders for the past number of days, and Search which is the default, is a pop-up search box that you can use to enter or scan an order number.
- These two view screens are explained in more detail in the How to Ship View and How to Pack View of the knowledge base.
- The following is the list view for Shipping:
- The following is the Search View for Shipping:
Packing Options
- Packing options are available to control packing features available to the local workstation only, Saving Packing Data, or global settings that affect all workstations.
- The packing system is used to log which items go into which boxes during the shipping process. It will keep a log of what was packed and prompt the user if they try to pack an item that doesn’t belong with that order.
Description of the Packing Options Screen
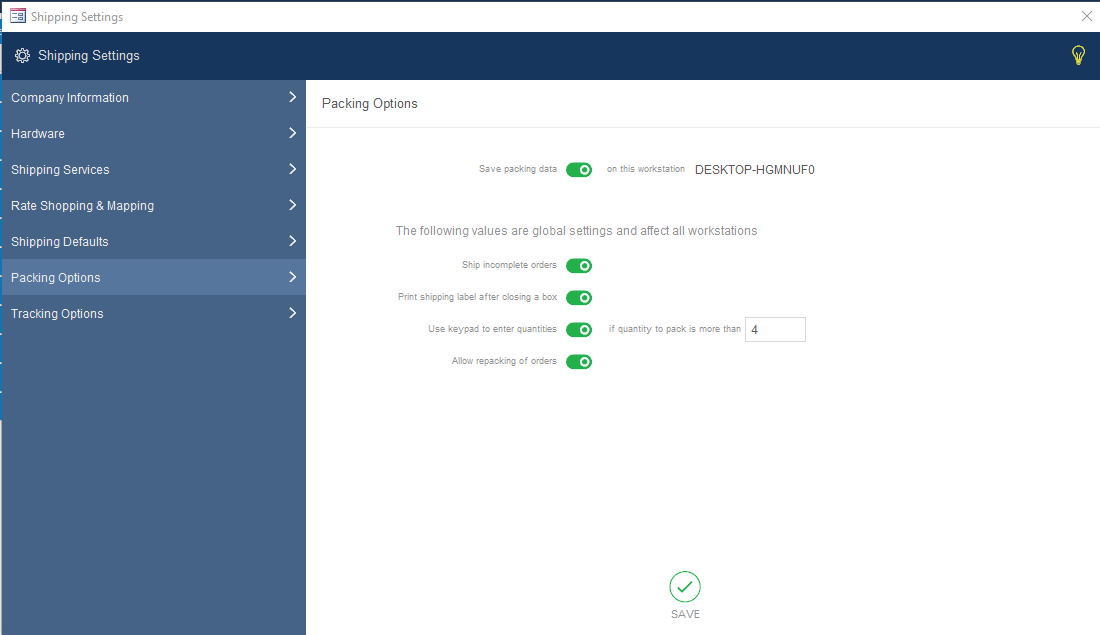
Save Packing Data
- Saves packing data to this workstation. Displays the computer name of the workstation.
- This data is saved in the special parameters table under the ParameterName = ShipUsePack. TRUE (-1) FALSE (0)
Ship Incomplete Orders
- IF TRUE/ON will allow orders that are incomplete to be shipped. If FALSE/OFF will not allow you to ship a package that does not include all expected items.
- The System Parameter is PackingAllowShipIncomplete
Print Shipping Label after closing a box
- IF ON/GREEN will allow orders with complete data to be sent to be printed as soon as you scan the order number a second time to close the box or click Ship Incomplete or start another box. If this is OFF you have to click the Print Label button to print each label after the box is closed.
- The System Parameter is PackingAutoShipWhenCloseBox.
Use Keypad to enter quantities
- IF ON/GREEN when you pack a line item with a quantity greater than the value you indicate, a keypad will appear where you can say how many were packed. Otherwise, you have to scan each item individually or enter the quantity manually on the form.
- The System Parameter is PackingUseKeypadForQuantity.
Allow Repacking of orders
- If ON/GREEN True, the Shipping Screen will include a button that lets you delete all packing data for an order and re-pack it.
- The System Parameter is PackingAllowRepack.
Save
- This function saves your Packing Options to the database. If you do not Save changes made to the parameters they will not be updated in the database.
Tracking Options
- Tracking options offer fields that store shipper links in order to track packages. These links are determined by the shipper (FedEx, UPS, USPS).
- This screen also offers fields to specify an email template to send to the customer when their packages ship based on each shipper.
- From time to time the shipping carriers change the location of their package tracking system. When this occurs, you must manually update the tracking link information stored in the program in two locations. Refer to How to Change Tracking Links.
Description of the Tracking Options Screen
![]()
Email Template
- The drop-down window allows for the selection of various email templates to send to the customer when their package ships based on each shipper.
Track Button Prefix
- Prefix information is the first part of the tracking URL and is Pre-populated with the required information for the pre-defined shipping carriers.
Track Button Suffix
- Suffix information is the last part of the tracking URL and may not be required for all of the carriers tracking systems.
Save
- This function saves your Tracking Options to the database.