
Overview
- Stone Edge Version 8.002 introduced an enhanced customs form for international shipping for non-USPS carriers.
- Form prefills and displays the variables needed within a confirmation screen if defined in the inventory.
- Variables can be overwritten if required and then printed to the Customs Form
- Inventory Fields required for Autofill include:
- Item Name
- Retail Price
- Published Weight
- Actual Weight
- Length
- Width
- Height
- HS Tariff Code
- An 8.5 x 11” printer is required for international invoices defined in shipping settings to print customs forms.
- Main Menu -> Shipping Functions -> Shipping Settings -> Hardware
- Parameters that need to be set for the default selection on the confirmation window:
- ShipDefaultTermsofSale
- ShipDefaultReasonForExport
Shipping Screen
Description of only fields required for international shipping in addition to the customarily required fields.
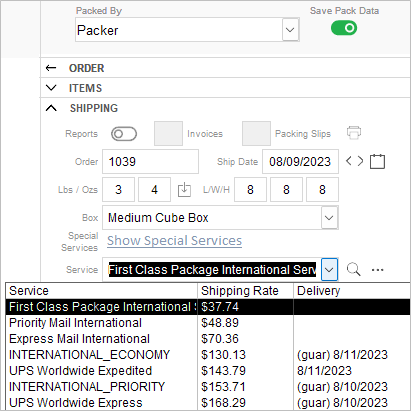
Service
- The dropdown of services available for specified method after rate shopping
- Click the magnifying glass to rate shop if the weight and size of the package are entered.
- Click triple dots to rate shop all possible services
- Click HERE for more info about rate shopping and mapping
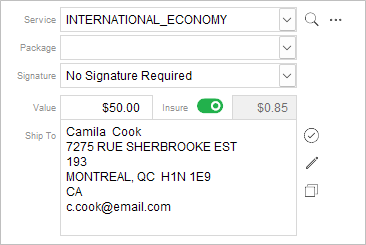
Declared Value
- It can be auto-calculated or manually entered.
- Setup under the “Shipping Defaults” tab of shipping settings.
- Insurance can be enabled per package once the values are set.
International Shipment Confirmation Window

- The screen lists all items in the current order and is designated in the package if multiple boxes are used.
Quantity
- The number of items in a current row for a package.
- The field can be manually edited.
Description (40 characters max)
- The Item Name field from the inventory table.
- Also displays the first 40 characters of the name as the description.
- It can be manually edited on this screen.
- It will be displayed in the “Detailed Description of Contents” section on the Custom Form.
Length
- The length of the item is defined in the inventory table.
- The field can be manually edited.
Width
- The width of the item as defined in the inventory table.
- The field can be manually edited.
Height
- Height of the item as defined in the inventory table.
- The field can be manually edited.
Weight
- Weight of item as defined in the inventory table
- The field can be manually edited.
Value
- Cost of the item as defined in the inventory table.
- The field can be manually edited.
Tariff Code
- The number used in the task of identifying and categorizing traded goods.
- The field can be manually edited.
- Not a required field for the form.
- Please note: It may be required for shipping to some countries.
Terms of Sale
- A dropdown list including abbreviations for how customs fees and taxes will be collected.
- The default set with the parameter “ShipDefaultTerms of Sale.”
Reason For Export
- A dropdown list of options.
- The default set with parameter “ShipDefaultReasonForExport.”
The weights displayed are in
- Click the “Pounds” or “Ounces” button for the unit of measure.
- Green = selected option.
- The default set with parameter “UnitOfMeasureWeight.”
X Icon
- Click to delete the row item
- It cannot be undone
- Need to “Cancel” the screen and re-choose the “Print Label” button to repopulate the screen with default values.
Cancel
- Closes International Confirmation Window and returns to Rate Shop/Shipping screen without producing a label and completing the shipping process.
Confirm
- Click to confirm data from Shipment Confirmation.
- Custom Form is populated, and the form and shipping label are automatically printed.
- If packing is OFF, the -> shipping window will close to the search/list view.
- If packing is ON, and there are still items to be packed, -> packing window will continue to display.
Customs Form
- After the International Confirmation Window is approved, -> Customs Form populated and printed.
- It is up to the merchant to ensure that the printed customs form contains all the information needed for the particular shipment.
- The first page of the Customs form can list five rows of items -> additional items listed on the next page(s).
1st Page of the Customs Form
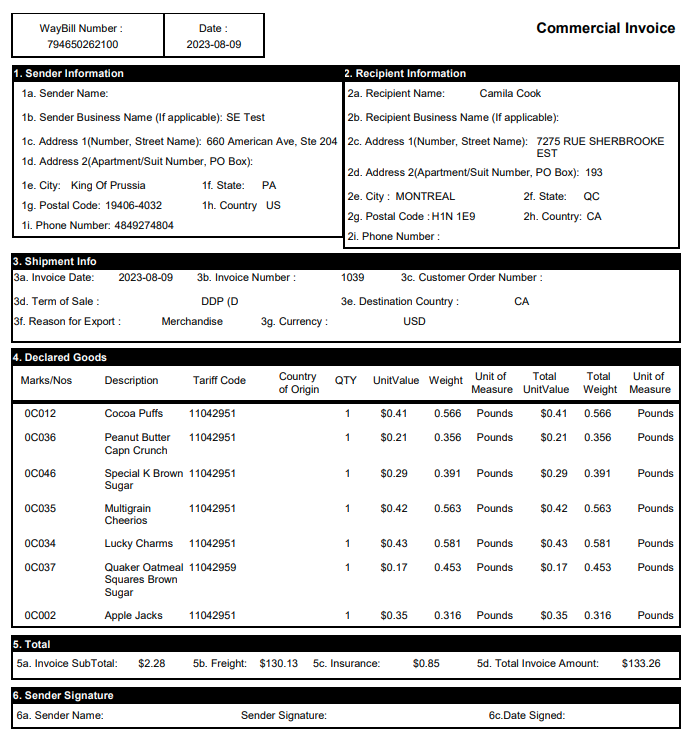
- Data from the Order
- Ship-From Company information
- Ship-To information
- Package contents
2nd Page of the Customs Form
A second page will be created when there are too many items for a single page.
International Shipping Setup
Below are parameters and other items or fields that should be set to gain the most efficient shipping process for those international orders. This should all be done before receiving international orders.
- Set “Printer for International Invoice”
- Main Menu -> Shipping Functions -> Shipping Settings -> Hardware
- Define specific fields in inventory -> can be done using “Import my Inventory – File” or manually updating inventory items.
- Item Name
- Retail Price
- Published Weight
- Actual Weight
- Length
- Width
- Height
- HS Tariff Code
- Defining international shipping methods
- Parameters that need to be set to
- ShipDefaultTermsofSale
- ShipDefaultReasonForExport
- UnitOfMeasureWeight
International Shipping Process
- Approve international orders.
- Go to “Ship My Orders” and pull up the international order.
- Pack order if packing is enabled.
- Complete weight and dimensions to rate shop.
- Add insurance if needed.
- Add extra package specifics if needed.
- Click the “Printer” icon.
- An international shipment confirmation pop-up appears.
- Edit item values if needed.
- Setting up values beforehand will speed up the process.
- Click “Confirm.”
- The shipping label will print.
- Custom forms will print.