
Overview
- The Packing Screen is one way in which the program “ships” items.
- The Packing Screen requires the user to confirm the correct items are packed in shipping containers which results in an audit trail (packing table) of packing data for orders processed through this screen.
- The Packing screen is accessible when the “Save Pack Data” field is selected ON/GREEN in the Shipping Set-up -> Shipping Settings ->Packing Options screen. This option can also be updated immediately at the Packing as well as the Shipping screens located in the top right corner next to the Packed By field. Changing this field on either of the screens updates the switch immediately and will re-draw the screen to either Packing ON or OFF.
- The Packing Screen has two available views: List View and Search View. These are set in the Shipping Settings screen->Shipping Defaults->Shipping Opening View. For more information on Shipping List and Search View, Go to How To – Shipping/Packing Views. List View displays all the available approved orders on its listing screen. Using the filter option, a list or batch of orders can be built. Search view allows for searching on individual approved orders.
- On the Packing Screen, there is a right and left ORDER toggle, (<-ORDER, ->ORDER) on the Shipping/RateShop right side of the screen. This toggle controls two displays when enabled (packing). The Left Toggle <-ORDER will display the packing screen, and the Right Toggle ->ORDER will display the Order Detail Screen.
- To Access the Packing Screen, Go To Main -> Ship My Orders, or through the Accordion, “Ship My Orders”.
- Version 8.002 adds ability to hide packed items with parameter “HidePackedItems”.
How to Use the Packing Screen
- Verify the Save Pack Data option is ON/GREEN. This option should have initially been set-up during the Shipping Set-Up Screen. See Overview for additional information.
- Open the Packing screen by going to “Ship My Orders” either through Main Menu or through the Accordion.
- Select or scan your order to open on the Packing screen either by the Search Orders view or the List Orders view, Go to How To – Shipping/Packing Views for more information.
- If the System Parameter ShipSetPackerToCurrentUser is set to TRUE and security is enabled, the Packed By field will automatically be populated with the ID of the current user. If it is set to FALSE, the name of the packer can be set by selecting the name from the drop-down list.
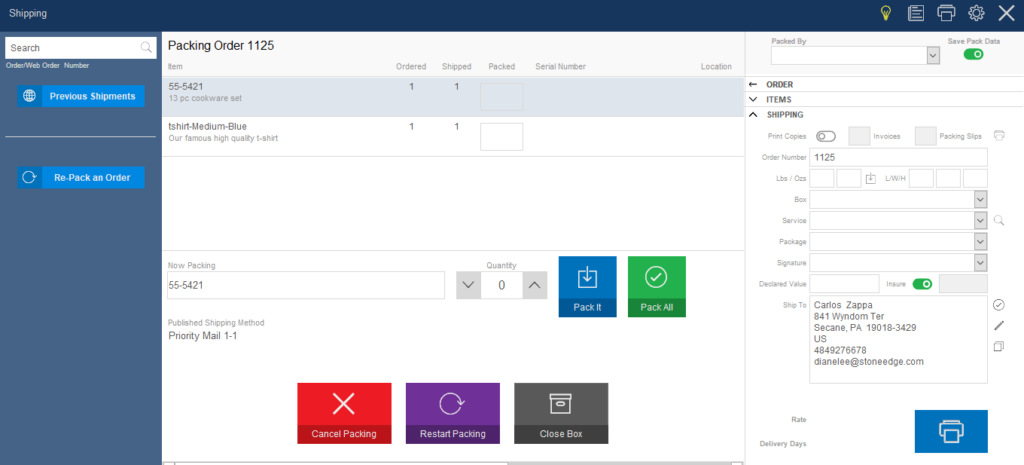
- Each item for the order will be listed in the main part of the Packing screen.
- As each item is selected, the screen indicates the item name in the Now Packing field at the bottom of the screen.
- To pack the items individually, select each item, then enter the quantity to be packed by using the arrow keys. Choosing the Pack-it button which will pack the selected item and update the Packed total field to the quantity that was entered.
- Choosing the Pack All button will pack the entire ordered amount of the item chosen.
- Once all the items have been fully packed, the system will display a response window to confirm that the order is complete (see below). Selecting the OK on this screen will begin the Rate Shop process.

- Choosing OK to the above screen fills in the Rates on the right-side panel of the screen.
- The SE packing system allows for multiple boxes to be packed for one order number. However, it will require that there are separate labels, with their own unique tracking number for each shipment. The system will stay open with the current order on the screen as long as there are items still needing to be packed.
Description of the Packing Screen
- For a complete description of the Packing List View Screen and/or description of the Filter/Search functionality please Go to: How to Shipping/Packing Views.
Previous Shipments
- Opens the previous shipments screen. For more information on this screen go to How To – Previous Shipments Screen.
Re-Pack an Order
- Opens the Re-Pack an Order response window. For more information about this function Go to: How To – Re-Pack Function.
Packing Screen
Item
- Displays the “Local SKU” and the “Item Name” from the inventory table.
Ordered
- Quantity ordered
Shipped
- Indicates the number of items of the product that the program has allocated to the order.
Packed
- Indicates the number of items of the product that are currently marked as packed.
Serial Number
- If the merchant has chosen to record serial numbers they will display here.
Location
- Displays the storage location of the product.
Options
- Displays the possible attributes of a product if stored as an option.
Now Packing
- Displays from your list, the “Local SKU” of the item that is currently selected to be packed.
Quantity
- Number of items that were ordered and will be shipped.
- Scan the item’s barcode, use the Up and Down arrows, or manually enter the number of units being packed
Pack It
- Click this button to record packing information for the current line item using the “Quantity” value shown for the item displayed in the “Now Packing” field.
Pack All
- This option will pack all items for the selected row (Now Packing).
Published Shipping Method
- My Methods from the Shipping Setup->Rate Shopping & Mapping screen which came from the customer-facing shipping methods shown on your cart.
Cancel Packing
- Selecting Cancel will cancel the packing that was done on the current order and close the screen and open the display to the List Screen or Search Screen to choose another order.
Restart Packing
- Selecting Restart Packing will display a message-box that gives 3 options for the Restart of Packing.
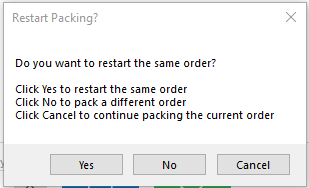
- Option 1 – Yes to restart the same order. Restarting the same order, keeps you on the packing screen but clears out the packed total numbers.
- Option 2 – No to pack a different order. This choice will reopen the shipping select order view that you initially came in on – Either Search or List view, to choose a new order to pack.
- Option 3 – Cancel to continue packing the current order. Continues in the Packing screen with the current status from where the restart packing option had been selected.
Close Box
- This option will close the current box of packed items and allow you to print a label for that box or continue to a new box of items. Brings up the following response window:
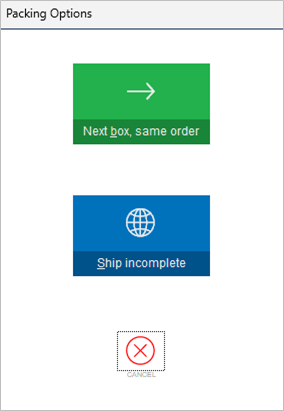
- Next box, same order to close and ship the current box, then continue packing the current order in a new box.
- Ship incomplete to close and ship the current box and stop working on the current order; this is only allowed if the parameter PackingAllowShipIncomplete is set to TRUE.
- Cancel
Shipping and Rate Shop Section
- The right section of the Packing screen, titled “Shipping”, is known as the Shipping and Rate Shop Function Section of the Window. This is the “Brain” of the SE Shipping System.
- Information about the Shipping and Rate Shop Functionality/Screens can be found at How to: Ship and Rate Shop Screen.