
Overview
- The multi-record & price editor is a tool for quickly editing large amounts of products.
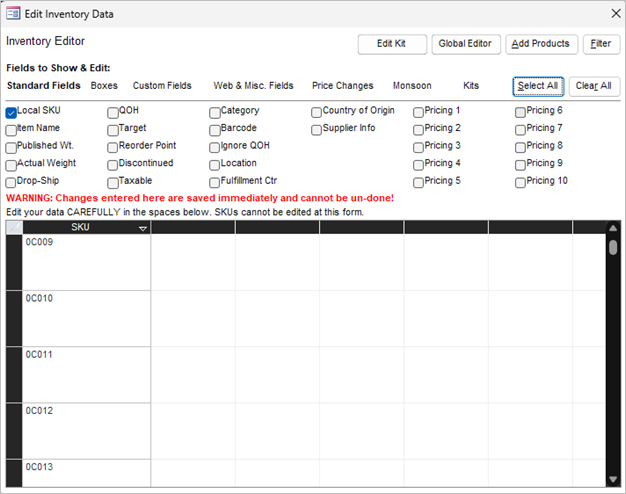
- When the “Edit Inventory Data” pop-up opens, the SKU will show automatically in a table (it is impossible to hide this field).
- Clicking the button next to a field will cause it to show in the table and be available to edit.
- By using the filter button in the top-right corner, you can shrink the selection of products displayed in the table.
- Navigate the table by using the tab or enter to go to the next cell (prioritizes going right before down).
- You can also use the arrow keys to navigate.
- NOTE: Changes made using this tool take effect immediately and cannot be reversed! Use at your own risk!
Filtering Products
- Click the “Filter” button in the top-right corner.
- The Pop-Up called “Select Items” will be displayed.
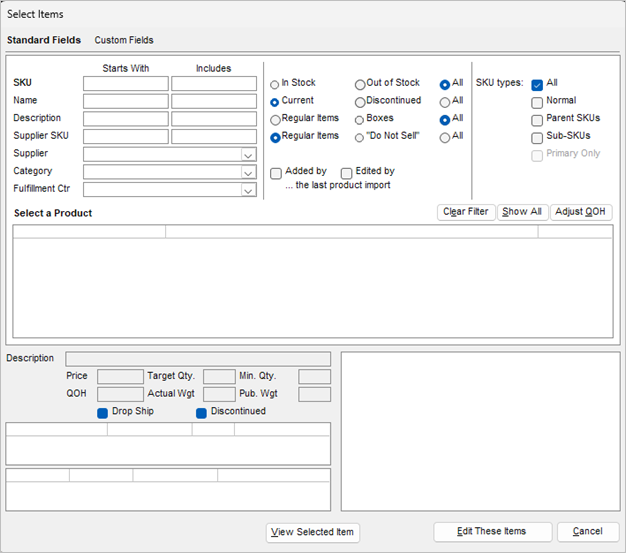
- Enter Criteria to find products with shared traits.
NOTE: Click out of the box OR press tab/enter to start the filtering.- SKU -> can use partial SKUs (not case sensitive)
- Name -> can use partial names (not case sensitive)
- Supplier -> from existing suppliers
- Category -> from existing categories
- “Radio Buttons” (choose one option from each row)
- In Stock vs. Out of Stock vs. All
- Current vs. Discontinued vs. All
- Enter Criteria to find products with shared traits.
- The products that satisfy the filters will populate in the list below as information is entered into the filters.
- Click on a product to see basic product information.
- Once a product is highlighted, it is possible to use the “Adjust QOH” button to the top-right of the list.
- After the list is filtered as needed, click “Edit These Items” to go back to the “Multi-record & Price Editor.”
- If you made a mistake when filtering, click “Clear Filter” to remove all products from the list.
NOTE: This does not reset any radio buttons choices - Double-clicking an item in the list does the same thing as the “Edit These Items” button
- You cannot manually select products from the created list as you are filtering, and the entire list will be selected to edit on the “Multi-record & Price Editor” screen.
- If you made a mistake when filtering, click “Clear Filter” to remove all products from the list.

Editing Existing Product Records
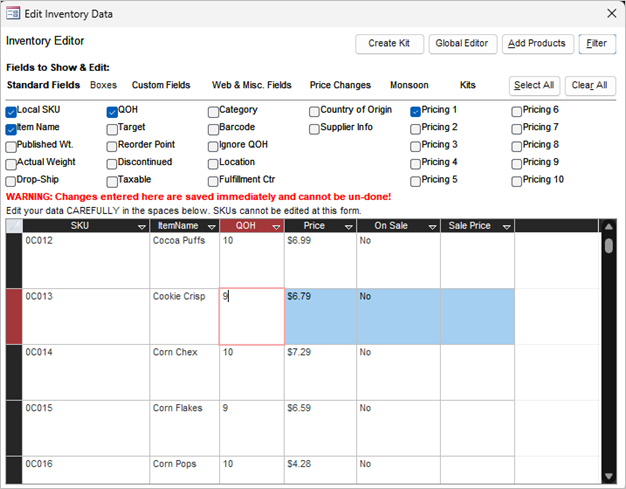
- Select the fields needed to identify the product or products you wish to edit.
- Use the filter button in the top-right to view specific product groups if needed.
- Select fields that you wish to edit.
- Click the cell you wish to edit (based on column = field and row = product)
- Edit the cell with appropriate information (price fields should contain monetary values, QOH should be a number, etc.)
NOTE: Changes take effect immediately! - Continue to edit desired cells while navigating with the tab/enter key and arrow keys.
- Click X when finished to leave the editor.
Adding New Product Records
- Click the “Add Products” button in the top-right corner.
- The data in the table will show blank cells for you to enter the new product.
NOTE: Before entering the new product information, choose the fields to show in the table.
NOTE: Start under the “Standard Fields” category for choosing fields. - Required Fields (Only the SKU is required, but you may get errors without the following fields):
- Local SKU
- Item Name
- Primary Supplier (Supplier Info)
- Cost (If parameter TrackInventoryFIFO = True; found under Supplier Info)
- Pricing
- Other Useful Fields:
- QOH
- Category
- Taxable
- Once you go to a new row, the previous row’s information will be saved as a new item.
NOTE: Clicking out of the row while creating a new item will cause the record to be created. - Click X when finished.
NOTE: Filling out partial information in a row may cause errors or create an incomplete item.
Editing Prices Of Records
- Use the filter button in the top-right to view specific product groups if needed.
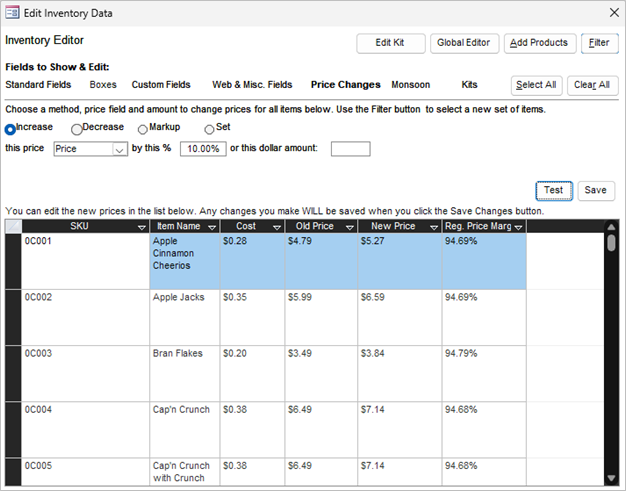
- Choose a method to change the price (by a flat dollar amount or percentage)
- Increase -> old price + the increase amount
- Decrease- > old price – the decrease amount
- Markup -> cost + amount
- Set -> new amount (only measured in dollar amount or price ± percentage or dollar amount)
- Click “Test” to see hypothetical changes and show columns:
- Cost
- Old Price
- New Price
- Price Margin
- Press “Save” to keep the changes.
Editing Kits
- All kits will be shown in the table (as a row) with the following columns.
- Kit SKU -> kit SKU (cannot be changed)
- PartSKU# (1 – 10) -> the SKU of 1 item in the kit
- PartQty# (1 – 10) -> how many of the item is in the kit
- Change PartSkU using the dropdown or by typing in the new SKU
NOTE: If you enter an SKU that does not exist, it will cause an error. - Change Part Qty to any numeric value.
- Click “Save” to keep the changes.
Tips and Tricks
- It is possible to use the filters to find 1 product to edit.
- It is easier to edit the item individually on the view inventory screen.
- Entering New Products using the Multi-Record & Price Editor is best used when entering multiple SKUs
- It is easier to use “Add” from the view inventory screen for only a few new products.
- The “Clear All” button in the top-right (Multi-record editor) allows you to remove all fields selected except the SKU.
- Clicking the dropdown to the right of each column header allows you to sort the products in increasing and decreasing order dependent on the field type.
- To see any changes, the “View Inventory” screen will need to be refreshed by exiting the page and reopening it.
- For uniformly changing item fields in bulk, look at the Global Editor.