
Overview
- Sub-SKUs are used to track inventory based on product attributes, or options. A sub-SKU is normally comprised of a Parent SKU, a delimiter, and the option, or options, in which the product is offered.
- For example, a merchant sells numerous types of T-shirts on their Website. The T-shirt product itself is identified by a Parent SKU of 1234. Any option that the customer can select, such as color or size, is added to the Parent SKU. The Parent SKU and various options are separated by a delimiter, typically a dash (-). This produces a unique SKU, e.g. 1234-Red-Large.
- Do not use a “space” or “blank” as a delimiter. It is best to use a printable character such as an underscore, dollar sign or colon, etc.
- If your shopping cart supports order options, you can import your inventory with the options defined at the cart and create the appropriate sub-SKUs in the Order Manager. When orders are imported, the program translates the web SKU with order options into the corresponding sub-SKU, making it easier to process orders and track inventory more accurately.
- Depending on the method by which sub-SKUs are built, the program uses the UseForBuild field differently.
-
- If sub-SKUs are created through the order and product import processes, the program automatically sets the UseForBuild field in the OptionLists table to TRUE (the box is checked) when there is no web delimiter information (WebOptionCodeDelimiter, AddToSubSKUIfNoCodeDelimiter) in the XML. This field is displayed at the Attributes & Options tab of the Inventory interface. You can control whether the program uses the option information in those lists when building sub-SKUs with system parameter HonorUseForBuildForOrderImport.
- If sub-SKUs are created manually through the Attributes & Options tab of the Inventory interface or through the batch process, the UseForBuild field is only evaluated and applied if system parameters UseModStopInventoryTrk or UseVikingCodersInventoryMgr = TRUE. These applications provided inventory tracking capability at the sub-SKU level before Miva Merchant introduced their native support. System parameter HonorUseForBuildForOrderImport does not apply in these situations.
Critical Concepts
- Backup your data file before building sub-SKUs. If you are not satisfied with the way they are built, it is easier to restore your backup then to delete all of the newly created sub-SKUs.
- All inventory items must be present and identical in both the shopping cart and SEOM.
- After you create sub-SKUs, they become unique inventory records.
- After you create sub-SKUs, the System Parameters used to create them must remain unchanged in order for the Parent SKU to be replaced by the sub-SKU on incoming orders.
System parameters affecting the building of sub-SKUs
Most of the parameters mentioned below are in the Order Options parameter group. HonorUseForBuildOnOrderImport is in the Order parameter group.
Go to Main Menu>Settings>System Functions>Set System Parameters.
Set the following parameters as needed to match your business process:
- BuildSubSKUs – If TRUE, the program checks imported orders for products marked “Parent SKU” in the Inventory table which include order options (product options). The program uses the Parent SKU, the SKU Delimiter and the order options to build a sub-SKU, and then replaces the Parent SKU in the order with the sub-SKU. The QOH of the sub-SKU is tracked by the program and can also be sent to shopping carts which support real-time inventory tracking at the attributelevel.
- BuildSubSKUDelimiter – the character SEOM uses between attributes when creating sub-SKUs
- Example: where “-” is the Delimiter (without quotes)
Parent SKU 1234ABC with options XL and Black
Results in sub-SKU 1234ABC-XL-Black
- Example: where “-” is the Delimiter (without quotes)
- WebOptionCodeDelimiter – the program takes the value to the left of this delimiter and adds it to the sub-SKU, ignoring what is to the right of the delimiter
- Example: Where “:” is the web option code delimiter.
The web options might be XL:Extra Large, L:Large, Fast:Add(+$20), Slow:Add(+$10) - Parent SKU 1234ABC with options XL and Regular Shipping
Results in the sub-SKU 1234ABC-XL-Slow
- Example: Where “:” is the web option code delimiter.
- WebOptionPriceDelimiter – this parameter designates the character which separates the base price of the item from its price modifier in the order option (for Yahoo, the price delimiter is “(+ “, without quotes)
- Example: Where “(+” is the web option price delimiter.
The web options might be XL:Extra Large, L:Large, Fast:Add(+$20), Slow:Add(+$10) - Parent SKU 1234ABC with options XL and Regular Shipping
Results in the sub-SKU 1234ABC-XL-Slow, price = [regular price] + $10
- Example: Where “(+” is the web option price delimiter.
- WebOptionNameDelimiter – this parameter designates the character which separates the name of the option from the option value
- Example: Size = Large
“Size” it the name of the option
“=” is the WebOptionNameDelimiter
the value of the option is “Large”
- Example: Size = Large
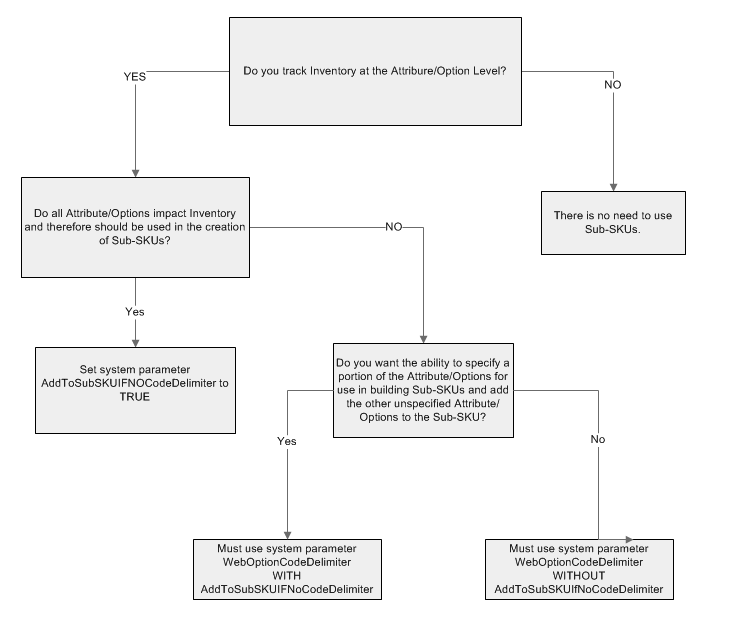
- AddToSubSKUIfNoCodeDelimiter
- If this parameter is set to FALSE and the order option information in the XMLdoes not contain the WebOptionCodeDelimiter (or no WebOptionCodeDelimiter defined in the program) and BuildSubSKUs is TRUE, the value of the option is not added to the sub-SKU when it is built. The option value is added to the option fields seen at Process Orders (or as separate line items if OptionDestination is set to “line items”). This is to accommodate shopping carts that have Text fields (or areas) where customers can enter their option details. A WebOptionCodeDelimiter cannot be added to these option values and most users would not want customer text added to the SKU.
- If this parameter is set to TRUE and if a selected order option information in the XML does not contain the WebOptionCodeDelimiter (or no WebOptionCodeDelimiter defined in the program) and BuildSubSKUs is TRUE, the option’s entire value is added to the sub-SKU when it is built.
- HonorUseForBuildOnOrderImport
- if the imported XML does not contain web delimiter information (WebOptionCodeDelimiter, with or without AddToSubSKUIfNoCodeDelimiter), the program sets the UseForBuild field in the OptionLists table to TRUE
- if this parameter is set to FALSE, all option lists and all option values where Don’t Use = FALSE are added to the sub-SKU when it is built
- if this parameter is set to TRUE, only the option lists where UseForBuild = TRUE and option values where Don’t Use = FALSE are used to create sub-SKUs
Building sub-SKUs using all Options without a Delimiter present
The simplest way to create sub-SKUs is to base them on all of the options available for an individual product. This method uses the all of the option text to build a sub-SKU.
Set these system parameters to the following values:
- AddToSubSKUIfNoCodeDelimiter = TRUE
- BuildSubSKUDelimiter = – (dash)
- BuildSubSKUs = TRUE
Example:
Item Name= Tshirt SKU=1234
Options:
Color: Blue, Red, White
Size: Large, Medium, Small
The resulting sub-SKUs would be:
- 1234-Red-Large
- 1234-Red-Medium
- 1234-Red-Small
- 1234-White-Large
- 1234-White-Medium
- 1234-White-Small
- 1234-Blue-Large
- 1234-Blue-Medium
- 1234-Blue-Small
Building Sub-SKUs using Selected Options with Delimiter
Another way to create sub-SKUs is to use a WebOptionCodeDelimiter. A WebOptionCodeDelimiter allows you to specify which Option and what part of the Option text is used to create sub-SKUs. The WebOptionCodeDelimiter can be set to a character of your choice. In the example below, it is set to use a colon (:). Anything to the left of the colon is used to build the sub-SKU.
Set these system parameters to the following values:
- AddToSubSKUIfNoCodeDelimiter = FALSE
- BuildSubSKUDelimiter = – (dash)
- BuildSubSKUs = TRUE
- WebOptionCodeDelimiter = : (colon)
Example Item:
Item Name= Tshirt SKU=1234
Options:
Color: B:Blue, R:Red, W:White
Size: L:Large, M:Medium, S:Small
The resulting sub-SKUs would be:
- 1234-B-L
- 1234-B-M
- 1234-B-S
- 1234-R-L
- 1234-R-M
- 1234-R-S
- 1234-W-L
- 1234-W-M
- 1234-W-S
Building Sub-SKUs using all Options with Delimiter present
This method of creating sub-SKUs is useful for building sub-SKUs that include both an option name and an option code.
Set these system parameters to the following values:
- AddToSubSKUIfNoCodeDelimiter = TRUE
- BuildSubSKUDelimiter = – (dash)
- BuildSubSKUs = TRUE
- WebOptionCodeDelimiter = : (colon)
Example:
Item Name= Tshirt SKU=1234
Options:
Color: Blue, Red, White
Size: L:Large, M:Medium, S:Small
The resulting sub-SKUs would be:
- 1234-Blue-L
- 1234-Blue-M
- 1234-Blue-S
- 1234-Red-L
- 1234-Red-M
- 1234-Red-S
- 1234-White-L
- 1234-White-M
- 1234-White-S
Fields that are copied from the parent record when building Sub-SKUs
- SKU is set to the new sub-SKU, of course.
- Item Name
- Reorder Point
- Reorder Quantity
- Description
- Cost
- Price
- Taxable
- Weight
- Drop-ship
- Parent SKU
- Barcode may be set to a new barcode, if system parameter AutoGenerateBarcodes=TRUE
How to Build Sub-SKUs for a Single Inventory Item
-
Go to Main Menu>Manage My Inventory>View & Manage My Inventory.
-
Navigate to the appropriate inventory record.
-
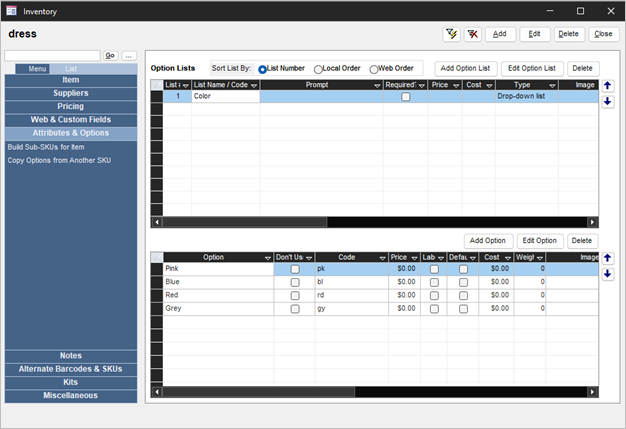
Select the Attributes/Options tab.
-
Select Build Sub-SKUs for this Item in the Accordion.
-
The program prompts for confirmation before proceeding with the changes. Select OK to continue.
How to manually build Sub-SKUs in batch mode
- Create inventory items in your shopping cart.
- Import the inventory items into SEOM.
- Configure SEOM system parameters to create sub-SKUs.
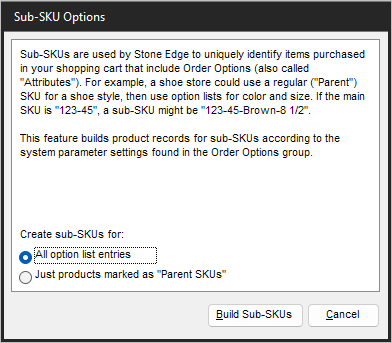
- Go to Main Menu>Settings>Inventory Functions>Build Sub-SKUs.
- Make the appropriate radio button selection in the right-hand pane and select Build Sub-SKUs.
Note: For Yahoo, select “All options list entries” since it does not mark SKUs as “Parent SKUs”
Build Sub-SKUs (DeleteOrphanedSubSKUs=FALSE)
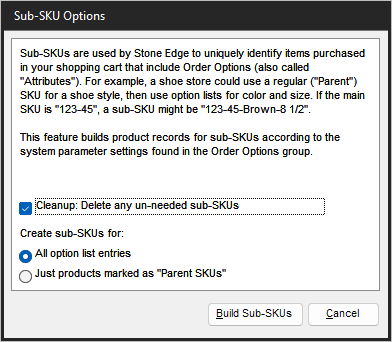
Build Sub-SKUs (DeleteOrphanedSubSKUs=TRUE)