Overview
- SEOM’s Accounting Export Setup screen is the mechanism by which the user transfers sales, deposit, receiving and invoicing data from SEOM to an external accounting application, such as QuickBooks.
- QuickBooks is the only accounting software package that Stone Edge Technologies Inc. has tested in conjunction with SEOM.
- QuickBooks must be installed on the computer where the Accounting Export is executed. The QuickBooks Company file can be located anywhere on the LAN, but SEOM must access it by the identical path used by QuickBooks.
- Other accounting applications may be able to work along the same lines as QuickBooks, however Stone Edge Technologies Inc. has no knowledge of the internal workings of those applications and therefore is unable to provide support for them outside of the guidelines that are documented here for QuickBooks.
- Before this feature can be utilized, there is a bit of planning that must be done to ensure that both SEOM and QuickBooks have the proper accounts defined and mapped appropriately.
- Print a list of the necessary and recommended accounts and be sure to read the comments for SEOM’s Accounts Receivable and Sales Tax accounts.
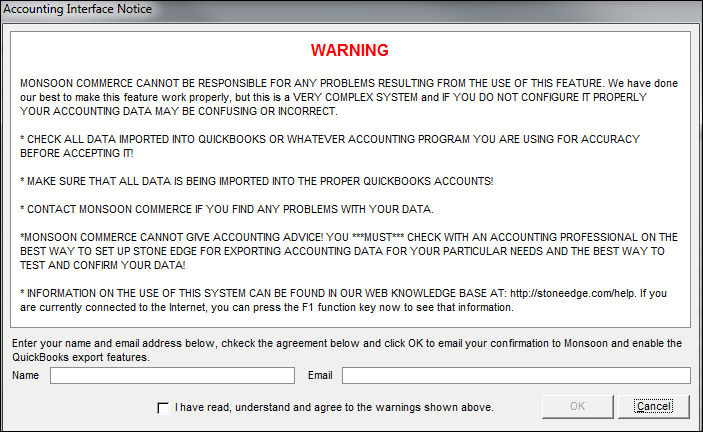
- Accounting Interface Notice
- You also have to choose one of three possible methods for transferring the data: via an .iif file, a simple text file or by XML.
- Before you can use the Accounting Export interface, the program requires you to acknowledge you have read the warnings and agree to the terms of its use.
Accounting Interface Notice - Before you can export sales, deposit, receiving, and invoicing data from SEOM to import into your accounting application, you must complete the following steps. Go through each section below in the order presented for setup instructions:
- Set the AccountingApplication Parameter in SEOM
- Create the Necessary Accounts in Your Accounting System
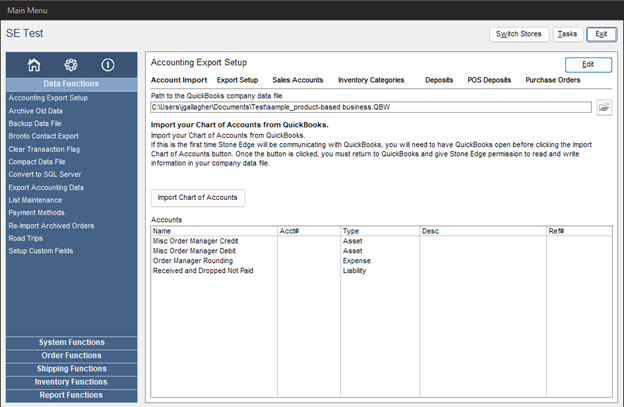
- Import Your Chart of Accounts into SEOM
- Assign Accounts and Data Export Options in SEOM
Set the AccountingApplication Parameter in SEOM
- Go to Main Menu>Settings>System Functions>Set System Parameters and set the AccountingApplication system parameter (in the Program Parameter Group) to the appropriate export method that you wish to use:
- None – Choose this option if you will not be transferring data to an accounting application.
- QuickBooks File Transfer (.iif) – Accounting data exported to a user designated .iif file (QuickBooks’ native file format). This options allows the user to review the data in the .iif file prior to importing the file into QuickBooks.
- QuickBooks Direct Transfer (XML) – Accounting data exported directly into your QuickBooks company file.
- Simple Text – Accounting data exported to a user designated .tab delimited .txt file
Create the Necessary Accounts in Your Accounting System
Required Sales Accounts
Create the following accounts in your accounting application:
| Account | Purpose | Account Type | Suggested Account Name |
| Default accounts receivable account | Used as either the debit account or the credit account for most exported data. If using QuickBooks, this CANNOT be the standard QuickBooks A/R account. Why? | Other Current Asset. | Accounts Receivable Order Manager |
| Sales tax account | Used for sales tax collected through SEOM. If using QuickBooks, this should not be the standard QuickBooks Sales Tax account. Why? | Other Current Liability | Sales Tax Order Manager |
| Rounding Errors Credit Account | Used for rounding errors due to percentage calculations (taxes, discounts, etc.) | Expense | Order ManagerRounding |
| Miscellaneous Sales Debit Account | Used for sales data not having a sales Debit account defined (should never really be used) | Asset | Misc. Order Manager Debit |
| Miscellaneous Sales Credit Account | Used for sales data not having a sales Credit account defined (should never really be used) | Asset | Misc. Order Manager Credit |
| Coupon Account | Account used to track coupon redemption amounts.
Can be used as debit or credit account |
Income OR Expense |
Coupons |
| Discount Account | Account used to track discount amounts. Can be used as debit or credit account | Income
OR Expense |
Discounts |
| Surcharge Account | Account used to track surcharge amounts. Can be used as debit or credit account | Income
OR Expense |
Surcharges |
| Sales Account | Default account used for product sales | Income | Merchandise |
| Shipping Account | Account used to track shipping charges paid by your customers | Income | Shipping & Handling |
Required Deposit Accounts
Create the following accounts in your accounting application:
| Account | Purpose | Account Type | Suggested Account Name |
| Default Deposit Account | Bank or sweep account used to record deposits collected in SEOM that do not have a specific payment method defined | Bank | Undefined Deposits |
Required Purchasing Accounts
Create the following accounts in your accounting application:
| Account | Purpose | Account Type | Suggested Account Name |
| Purchase Order Liability Account | Account that maintains the value of products received (drop-ships ordered) that have not been paid for | Other Current Liability | Received and Dropped Not Paid |
| Purchase Order Freight Charges | Maintains shipping charges applied to purchases (assuming charges not rolled into COG) | Expense | PO Freight |
| Purchase Order Discount Account | Maintains discount amounts applied to purchases (assuming charges not rolled into COG) | Expense | PO Discounts |
| Purchase Order Surcharge Account | Maintains surcharge amounts applied to purchases (assuming charges not rolled into COG) | Expense | PO Surcharges |
Optional Accounts
Create the following accounts in your accounting application (optional):
| Account | Purpose | Account Type | Suggested Account Name |
| Category Sales Account(s) | One or more accounts used to track product sales based on inventory category | Income | n/a |
| SKU Sales Account(s) | One or more accounts used to track sales of an individual product | Income | n/a |
| Deposit Account(s) | One or more bank accounts used to track deposits | Bank | n/a |
Standard Accounts
Ensure that these accounts exist in your accounting application:
| Account | Purpose | Account Type | Suggested Account Name |
| Cost Of Goods Sold | Used to track the total cost of products sold | Cost Of Goods Sold | n/a |
| Inventory Asset | Used to track the dollar amount of in-stock inventory | Other Current Asset | n/a |
| Accounts Payable | Used to track payments to vendors for purchases | Accounts Payable | n/a |
- If using the QuickBooks Direct XML Transfer method, you must identify the location of the QuickBooks Company file, using the same path that QuickBooks uses to open the file. This is the method that is recommended by Stone Edge Technologies Inc.
- If using the QuickBooks File Transfer method, you must export your Chart of Accounts from QuickBooks into SEOM using an .iif file.
- If using the Simple Text method, you must export your Chart of Accounts from your accounting application into a tab delimited text file.
Direct XML Transfer Method with QuickBooks
.iif File Method with QuickBooks
Simple Text Method
Assign Accounts and Data Export Options in SEOM
The images provided in this section are merely to illustrate the fields on Accounting Export screen tabs. The account names in the images are not required names, nor should they be misconstrued as accounting advice. You are encouraged to consult with your accountant before creating (as outlined above) and mapping accounts in the SEOM Accounting Export screen.
- In SEOM, go to the Main Menu>Settings>Data Functions>Accounting Export Setup. The Accounting Export Setup screen opens:
- Select Edit Settings.
- Complete the following information on the Export Setup tab:
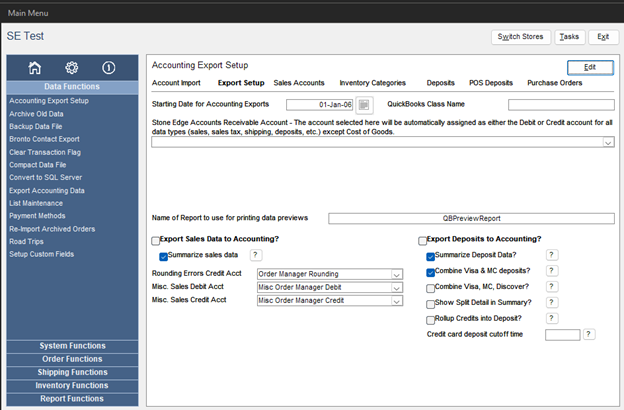
- Start Date for Accounting Exports – Allows the user to set a start date for the beginning of all exports. This is designed for users who already have some historical data that they may not want to export. This date restricts the system to only export information from this date forward (this date is included in the export!)
- SEOM Accounts Receivable Account – Select the “Other Current Asset” account set up to be used as the “Accounts Receivable” account used by SEOM. For QuickBooks users, this list is restricted to an asset account. You can no longer select a QuickBooks AR account.
- Output file name and path (unavailable if using Direct Transfer method) – Specify the path and file name where you want SEOM to write the accounting data. Should this file exist at time of export,SEOM prompts you to either “Archive” or “Delete” the existing file (system does not support appending new data to the file). If the option to archive is selected, the file is moved to the “Archive Path” location. If using the QuickBooks .iif method, the file name MUST end with a “.iif” extension. If using the Simple Text method, the file name MUST end with a .txt extension
- Archive path (unavailable if using Direct Transfer method) – Set the path where old .iif or .txt files will be moved.
- Name of report for Printing Previews – Default set to “QBPreviewReport” this setting allows the user to substitute a different custom report when printing data from an Export Preview.
- Export Sales Data to Accounting – Select this option to include sales data in the accounting export. Sales data includes product retail sales amounts, cost of goods, taxes, shipping, discounts, surcharges coupons and returns.
- Summarize Sales Data – select this option if you want the split data to be summarized by account (i.e. sales, taxes, shipping, etc.). Leave this option unchecked to show sale detail in the splits against the daily transaction.
If you use the QuickBooks Direct Transfer Method, it is highly recommended that you use the Summarize Sales Data option if you process more than 100 orders daily. If you do not use the summarize option, you may receive an error from QuickBooks should the number of splits against the daily transaction be excessive. This does not appear to be an issue when using the .iif file method.
- Rounding Errors Credit Account (Required) – It is inevitable that there will be rounding errors when summarizing sales data for export. Should there be differences, this account will be used to record the “credit” side of the transaction. The Accounts Receivable will represent the Debit side. Older versions of SEOM created an account automatically called “Order Manager Rounding”. This will remain as the default account but can be changed by the user if needed.
- Misc. Sales Debit account (Required) – This account is only used in the absence of all other “sales” accounts for recording product retails sales. In reality it should never be used because the system requires the selection of a “default” sales account at a minimum. Should be set to an Asset account or the Order Manager Accounts Receivable. Older versions of SEOM automatically create this account with the name “Misc Order Manager Debit” which will remain the default for this account. User can change this if needed.
- Misc. Sales Credit account (Required) – This account is only used in the absence of all other “sales” accounts for recording product retails sales. In reality it should never be used because the system requires the selection of a “default” sales account. Should be set to an Asset account. Older versions of SEOM automatically create this account with the name “Misc Order Manager Credit” which will remain the default for this account. User can change this if needed.
- Export Deposits to Accounting – Select this option to export all payment transactions to QuickBooks.
- Summarize Deposit Data – Select this option to summarize the deposits by day and payment method otherwise the system will show each payment separately.
- Combine Visa & MasterCard – (Only available when “Summarize Deposit Data” is selected.) Select this option to combine daily Visa and Master card deposits into a single deposit.
- Show Split Detail in Summary – (Only available when “Summarize Deposit Data” is selected.) Select this option to have the system break out each deposit as a “split” against the daily summary deposit.
- Rollup Credits into Deposit (Only available when “Summarize Deposit Data” is selected.) – Some accounting applications do not permit “negative deposits” when you issue a credit to a customer. This option allows you to include “credits” within a daily deposit provided the total of the credits for that payment method do not allow the deposit to equal or fall below zero. Should credits cause the deposit to reach or fall below zero, they will be recorded separately as “checks” (QuickBooks).
- Credit Card Deposit Cutoff Time – Transactions recorded in SEOM after this time are recorded with the following day’s business.
4. If you selected the option to export sales data to QuickBooks, proceed to the Sales Accounts tab.
For some sales categories, the Debit or Credit account may be preset by the program and cannot be changed by the user. If you click in a field that cannot be changed, the background of the debit or credit account columns will turn gray indicating that the choice is restricted to the Accounts Receivable account.
5. Complete the following information on the Sales Accounts tab:
- Start Date for Accounting Exports – Allows the user to set a start date for the beginning of all exports. This is designed for users who already have some historical data that they may not want to export. This date restricts the system to only export information from this date forward (this date is included in the export!)
- Order Manager Accounts Receivable Account – Select the “Other Current Asset” account set up to be used as the “Accounts Receivable” account used by SEOM. For QuickBooks users, this list is restricted to an asset account you can no longer select a QuickBooks AR account.
- Output file name and path (unavailable if using Direct Transfer method) – Specify the path and file name where you want SEOM to write the accounting data. Should this file exist at time of export,SEOM will prompt the user to either “Archive” or “Delete” the existing file (system does not support appending new data to the file). If the option to archive is selected, the file will be moved to the “Archive Path” location. If using the QuickBooks .iif method, the file name MUST end with a “.iif” extension. If using the Simple Text method, the file name MUST end with a .txt extension
- Archive path (unavailable if using Direct Transfer method) – Set the path where old .iif or .txt files will be moved.
- Name of report for Printing Previews – Default set to “QBPreviewReport” this setting allows the user to substitute a different custom report when printing data from an Export Preview.
- Export Sales Data to Accounting – Check this option to include sales data in the accounting export. Sales data includes product retail sales amounts, cost of goods, taxes, shipping, discounts, surcharges coupons and returns.
- Summarize Sales Data – check this option if you want the split data to be summarized by account (i.e. sales, taxes, shipping, etc.). Leave this option unchecked to show sale detail in the splits against the daily transaction.
If you use the QuickBooks Direct Transfer Method, it is highly recommended that you use the Summarize Sales Data option if you process more than 100 orders daily. If you do not use the summarize option, you may receive an error from QuickBooks should the number of splits against the daily transaction be excessive. This does not appear to be an issue when using the .iif file method.
- Rounding Errors Credit Account (Required) – It is inevitable that there will be rounding errors when summarizing sales data for export. Should there be differences, this account is used to record the “credit” side of the transaction. The Accounts Receivable will represent the Debit side. Older versions of SEOM created an account automatically called “Order Manager Rounding”. This remains the default account but can be changed by the user if needed.
- Misc. Sales Debit account (Required) – This account is only used in the absence of all other “sales” accounts for recording product retails sales. In reality it should never be used because the system requires the selection of a “default” sales account at a minimum. Should be set to an Asset account or the Order Manager Accounts Receivable. Older versions of SEOM automatically create this account with the name “Misc Order Manager Debit” which remains the default for this account. User can change this if needed.
- Misc. Sales Credit account (Required) – This account is only used in the absence of all other “sales” accounts for recording product retails sales. In reality it should never be used because the system requires the selection of a “default” sales account. Should be set to an Asset account. Older versions of SEOM automatically create this account with the name “Misc Order Manager Credit” which remains the default for this account. User can change this if needed.
- Export Deposits to Accounting – Select this option to export all payment transactions to QuickBooks.
- Summarize Deposit Data – Select this option to summarize the deposits by day and payment method otherwise the system will show each payment separately.
- Combine Visa & MasterCard – (Only available when “Summarize Deposit Data” is selected.) Select this option to combine daily Visa and Master card deposits into a single deposit.
- Show Split Detail in Summary – (Only available when “Summarize Deposit Data” is selected.) Select this option to have the system break out each deposit as a “split” against the daily summary deposit.
- Rollup Credits into Deposit (Only available when “Summarize Deposit Data” is selected.) – Some accounting applications do not permit “negative deposits” when you issue a credit to a customer. This option allows you to include “credits” within a daily deposit provided the total of the credits for that payment method do not allow the deposit to equal or fall below zero. Should credits cause the deposit to reach or fall below zero, they are recorded separately as “checks” (QuickBooks).
- Credit Card Deposit Cutoff Time – Transactions recorded in SEOM after this time are recorded with the following day’s business.
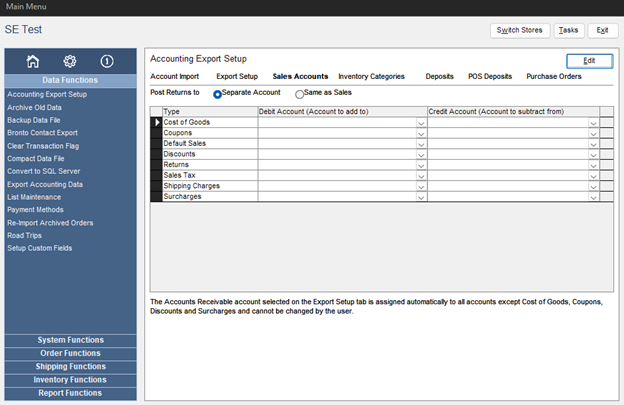
- Post Returns to – Select “Same as Sales” to subtract returns from your regular Sales account(s). Select “Separate Account” if you want amounts for returned items to be posted to a separate “Returns” account in QuickBooks. This option provides a separate line entry called Returns in the list where you can assign a debit account different from your standard sales account.
- Cost of Goods – Select both a Debit Account and a Credit Account for tracking Cost of Goods Sold. The Debit account should be set to your Cost of Goods Sold account. The Credit Account should be set to your Inventory Value/Asset account.
- Coupons – You can select both a Debit and Credit account, however, the Order Manager A/R account MUST be one of the two accounts. Normally The Order Manager A/R account would be assigned as the Debit Account to show the loss in receivables. If you instead want to include the coupon as a receivable, set up the Order Manager A/R as the Credit Account. This way you can reduce funds to another account such as Manufacturer Discounts.
- Default Sales Select a Credit Account to track product sales. Product sales can be tracked at the individual SKU by selecting a credit account at the Orders screen on the Product Info tab or by assigning the product to an inventory category. Any items not assigned to their own account in the Inventory screen or assigned to an inventory category account will have their sales data driven through this account.
- Discounts – You can select both a Debit and Credit account, however, the Order Manager A/R account MUST be one of the two accounts. Normally the Order Manager A/R account would be assigned as the Debit Account to show the loss in receivables. If you instead want to include the discount as a receivable, set up the Order Manager A/R as the Credit Account. This way you can reduce funds to another account such as advertising.
- Returns (will not be available if Post Returns To is set to Same as Sales) – Select an appropriate Debit Account that will be used to track product returns.
- Sales Tax – Select the Credit Account that you set up in QuickBooks to track sales taxes collected from your customers.
- Shipping Charges – Select the Credit Account that you set up in QuickBooks to track shipping fees paid by your customers
- Surcharges – You can select both a Debit and Credit account, however, the Order Manager A/R account MUST be one of the two accounts. Normally the Order Manager A/R account would be assigned as the Debit Account to show the increase in receivables. If you instead want to exclude the surcharge as a receivable, set up the Order Manager A/R as the Credit Account. This way you can increase funds in another account such as Insurance.
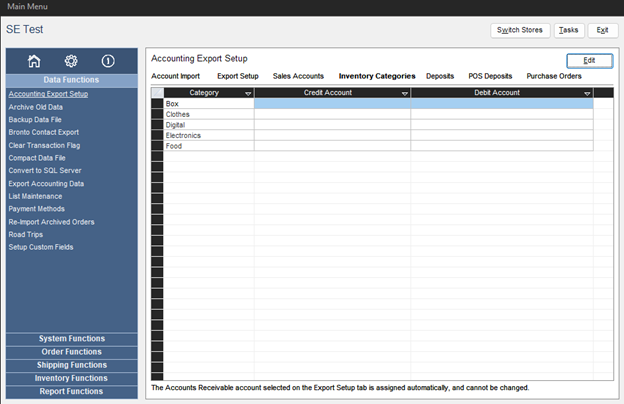
6. If you selected the option to export sales data and you want to isolate sales data based on the categories of inventory sold, proceed to the Inventory Categories tab. This tab lists the inventory categories you set up using the List Maintenance screen. Select the appropriate Credit Account you wish to use for each inventory category. The Debit Account cannot be changed.
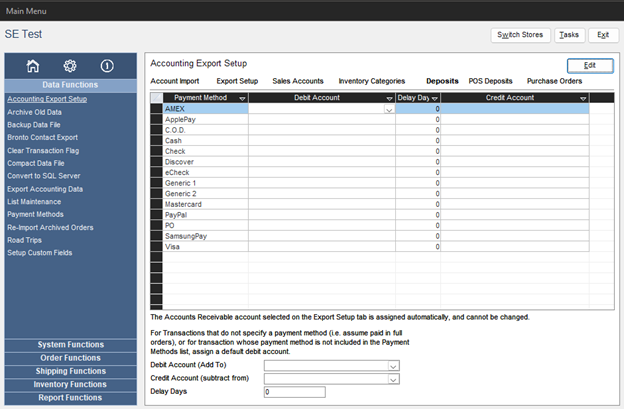
7. If you selected the option to export deposits, proceed to the Deposits tab. This tab allows you to define the destination accounts for payments for Web Orders and Manual Orders.
You will see a list of payment methods used by the program (enter additional methods using the Payment Methods screen). Note that the Credit account cannot be modified and defaults to SEOM’s Accounts Receivable account. Select the appropriate Debit Account (for QuickBooks must be of type Bank) used to track deposits for the given payment method. If you do not want to export data for certain payment methods then leave the Debit Account blank.
If there is some delay between the time the deposit is recorded in SEOM and the time it actually is credited to your bank account, you can enter a number of Delay Days which causes SEOM to modify the transactions date by the delay day amount as the deposit is being exported. For example: If you take a Visa payment on the first of the month and then do an accounting export and the Visa payment method is set up with 3 delay days, SEOM will export the transaction on the first of the month, however, will date the transaction in the output as being on the 4th of the month.
8. If you selected the option to export deposits, use the Point-of-Sale (POS) screen, and want to track point of sale deposits then select the POS Deposits tab. This tab uses the same concept as the Depositstab, however, it only applies to transactions recorded by the Point-of-Sale system. Select the appropriate debit account for each payment method you wish to track.

9. SEOM can export data regarding products received (or drop-shipped) and also allows you to record vendor invoicing which is then passed to the accounting export as a payable. If you wish to export purchasing data, select the Purchase Orders tab and set the following options:
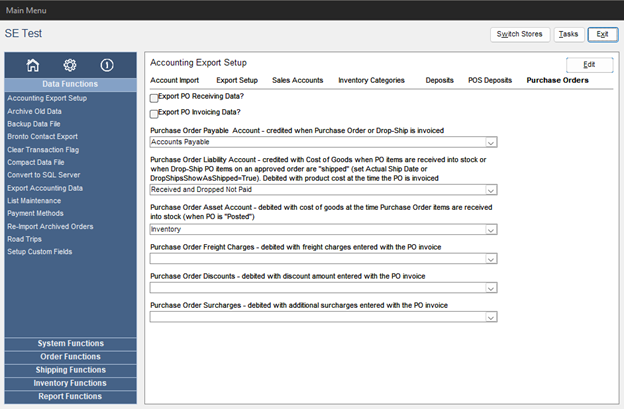
- Export PO Receiving Data – SEOM can record adjustments to an inventory value account (Debit) and a liability account (Credit) at the time you post the products received on a purchase order. If you want this information exported, select this option.
- Export PO Invoicing Data – If you intend to use the Purchase Order Invoicing system to record invoices from your vendors, you can select this option to have SEOM export the invoices as payables. In essence, the payable hits the liability account from the receiving system above (Debit) and your Accounts Payable account (Credit).
- Purchase Order Payable Account – Select the name of your Accounts Payable account used to track purchasing.
- Purchase Order Liability Account – Select the name of a liability account that will maintain the amounts for products received (or shipped for drop-ship items) for which you have not paid the vendor.
- Purchase Order Asset Account – Enter the name of the asset account which you use to track your on-hand inventory value.
- Purchase Order Freight Charges – Select an expense account that you will use to track shipping fees charged to you by the vendor.
- Purchase Order Discounts – Select an expense account that you will use to track discounts applied to your supplier invoices.
- Purchase Order Surcharges – Select an expense account that you will use to track any additional surcharges applied to your supplier invoices.
10. To retain all of the changes made to the Accounting Export Setup screen, select Save Changes. If you do not want to keep any of the changes made, select Cancel Changes.
11. When Save Changes is selected, you are asked to acknowledge the changes are made. Select OK.
Note: You can re-enter the Accounting Export Setup screen at any time to make adjustments to your setup. If you find that the exported data is hitting the wrong accounts, you can easily change the settings here and re-export the same batch of data. Keep in mind that running the export again may cause duplicate data to appear in your accounting application. Make sure to back out errant data from your accounting system prior to exporting an existing batch of information.
ADDITIONAL IMPORTANT INFORMATION:
1) SEOM DOES NOT record inventory adjustments (manual adjustments in quantity on hand) nor does it record receiving history at either of the the following screens:
Main Menu>Manage My Inventory>View & Manage My Inventory>Receive
Main Menu>Manage My Inventory>View & Manage My Inventory>Scan Non PO Items into Inventory
Manually-entered inventory adjustments or receiving performed using the screens listed above WILL NOT be exported to your Accounting System. You must make these adjustments manually in your accounting program.
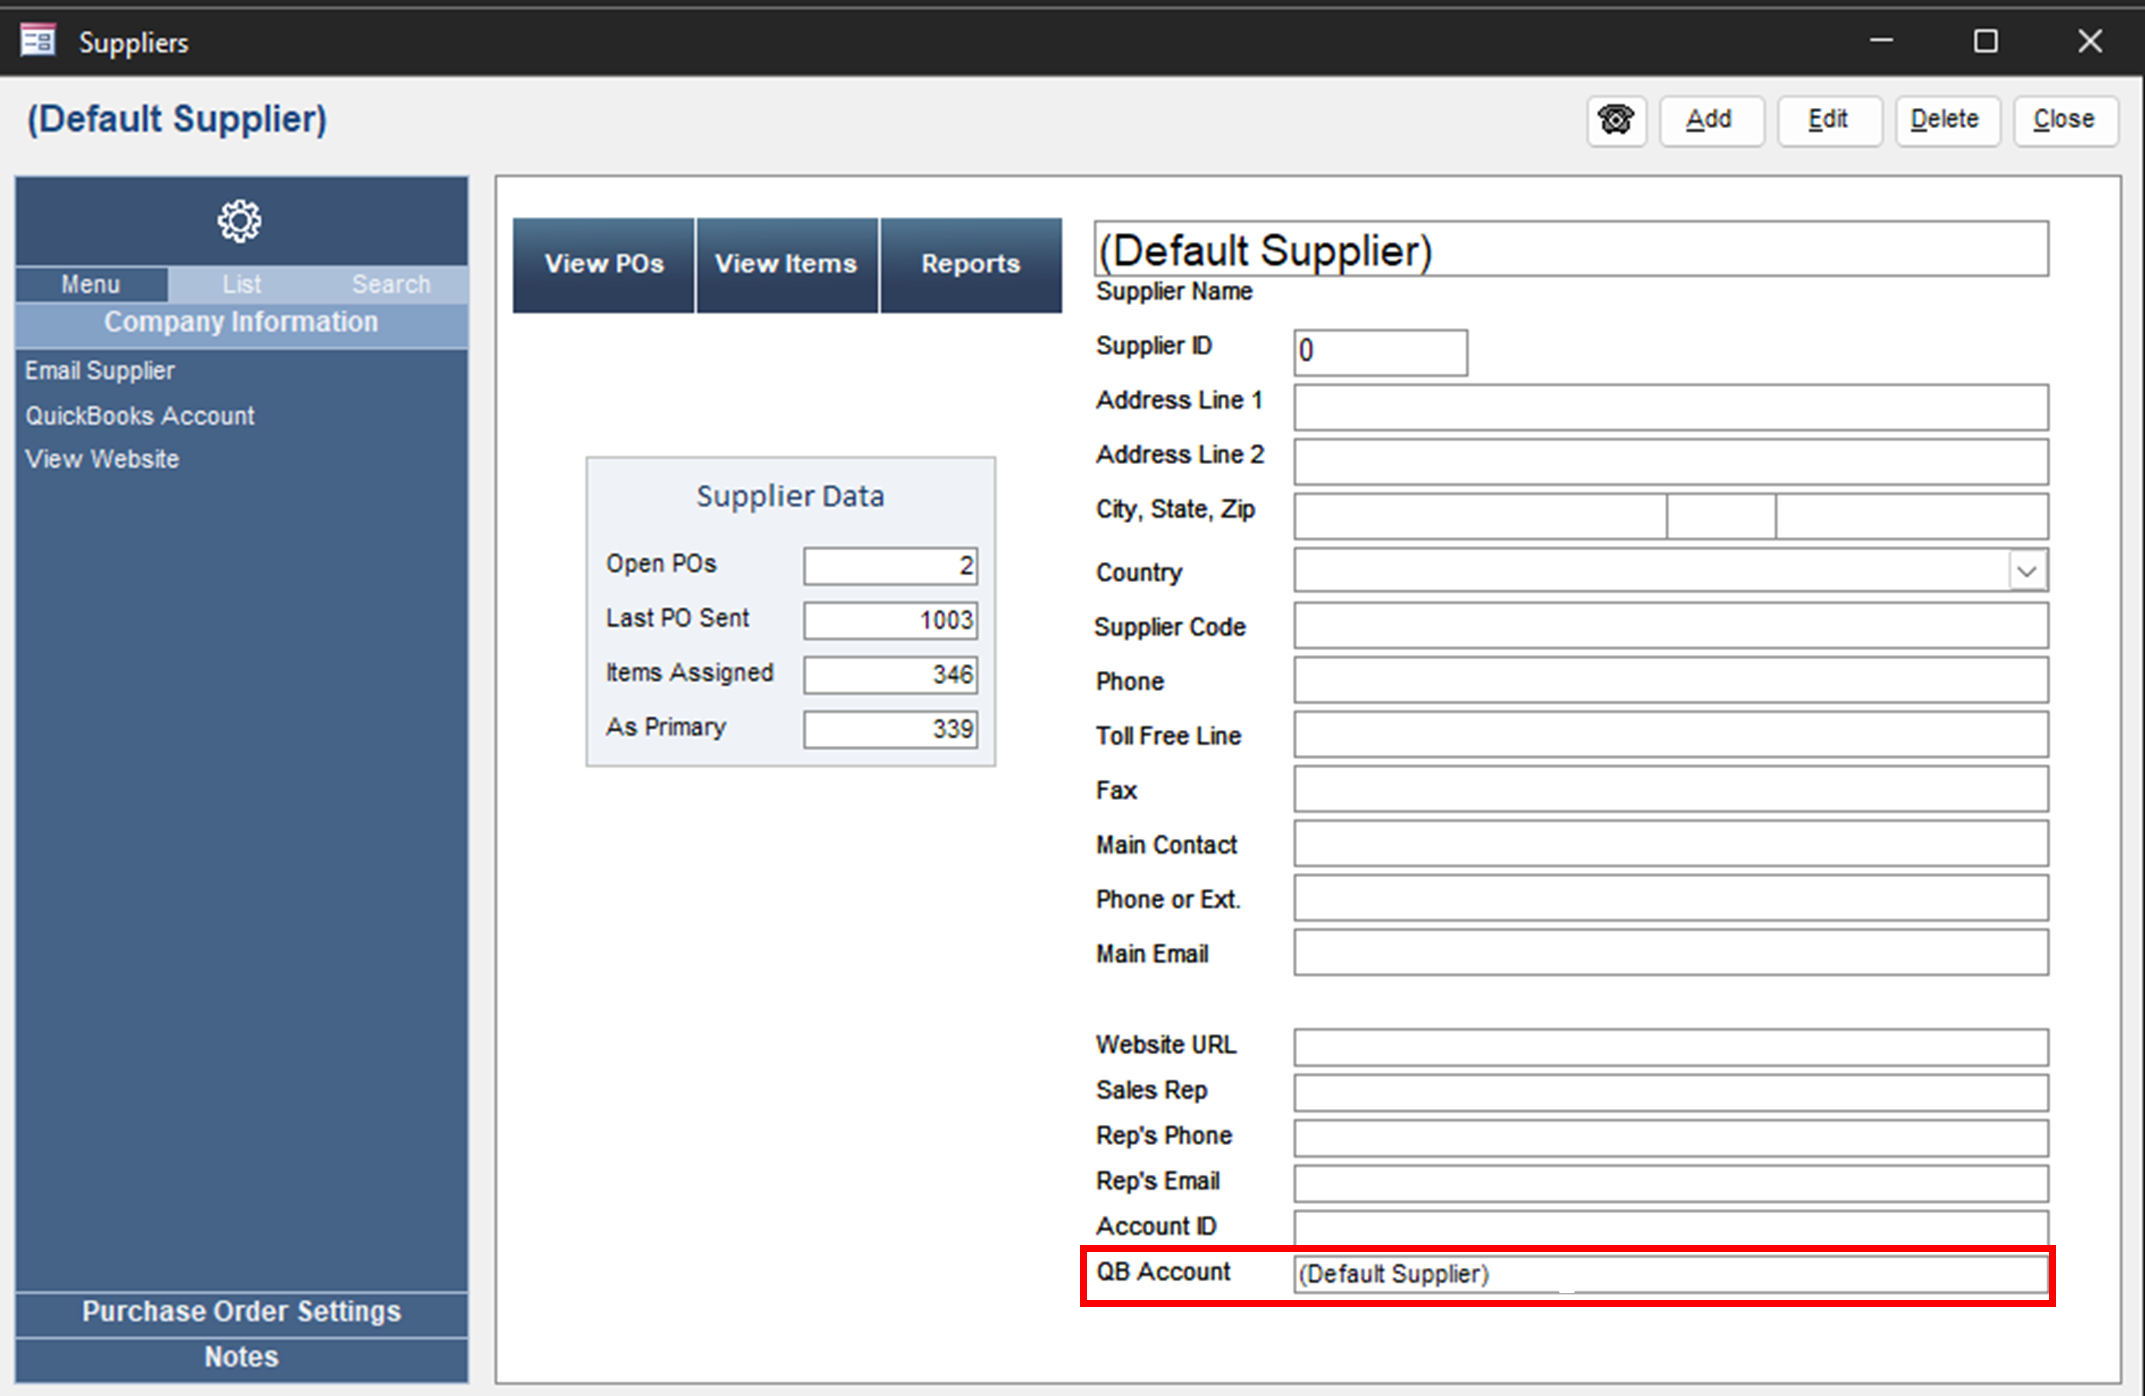
2) Be sure to set up your supplier(s) information in SEOM. At the Suppliers screen, specify the name of the QuickBooks account to which accounts payable information should be assigned in the Account Name for QuickBooks field. The Supplier Name is the default value in this field, but it can be changed according to your needs.