
SQL Data Reports – Creating, Editing, and Running Custom SQL Reports
- SQL Data Reports lets you build your own custom reports using SQL, save them for reuse, and export the results directly to Excel or CSV
- Features:
-
- Save named reports with reusable SQL.
- Export results to Excel or CSV.
- Use
{placeholders}to prompt users at run time for SKUs, dates, ranges, and more. - Build queries visually, then refine and store them in the form.
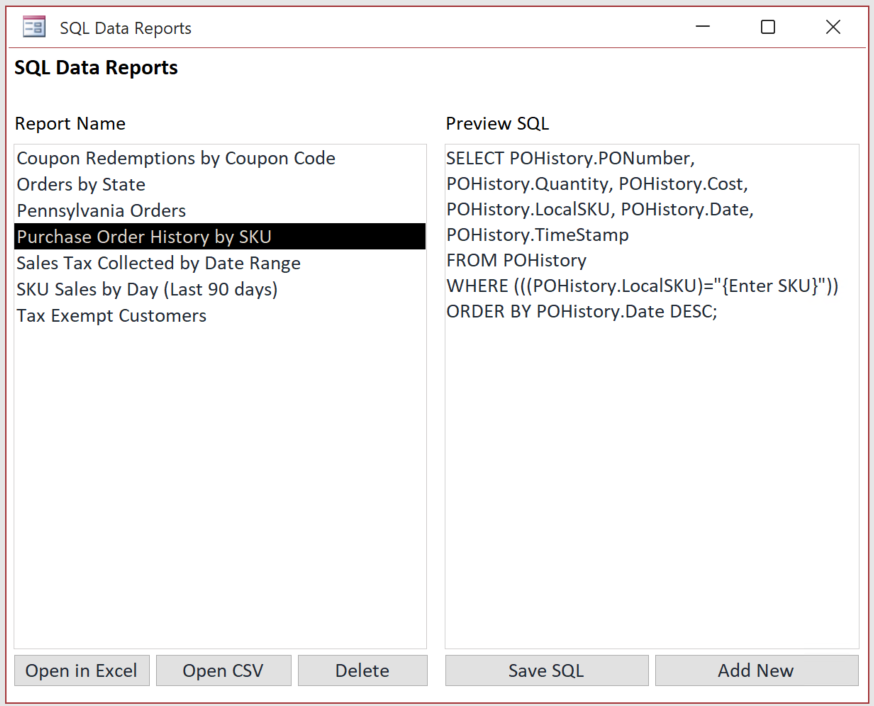
Overview of the SQL Data Reports Screen
The SQL Data Reports form has three main areas:
- Report Name list (left)
- Lists all saved reports (e.g., Coupon Redemptions by Coupon Code, Purchase Order History by SKU).
- Click a name to select a report.
- Preview SQL box (right)
- Shows the SQL statement associated with the selected report.
- You can edit this SQL when you are in edit mode (after clicking Save SQL or Add New).
- Buttons (bottom)
- Open in Excel – runs the selected report and exports the results to an
.xlsxfile. - Open CSV – runs the selected report and exports the results to a
.csvfile. - Delete – deletes the selected report definition.
- Save SQL – saves changes you’ve made to the SQL for the selected report.
- Add New – creates a brand-new report definition.
- Open in Excel – runs the selected report and exports the results to an
How Reports Are Stored
Each report is stored in a table (typically named SQLReports) with at least:
- ID – Numeric primary key used internally.
- ReportName – Friendly name that appears in the Report Name list.
- SQLStatement – The actual SQL text that will be run when the report is executed.
You don’t need to interact with this table directly—everything is managed through the SQL Data Reports form—but it’s useful to know what’s happening behind the scenes.
Running an Existing Report
Selecting a Report
- Open the SQL Data Reports screen.
- Click a name in the Report Name list (left).
- The corresponding SQL appears in the Preview SQL box (right).
If no report is selected and you click Open in Excel or Open CSV, you’ll see a message asking you to select a report first.
Running to Excel (Open in Excel)
- With a report selected, click Open in Excel.
- The system:
- Retrieves the saved SQL.
- Processes any dynamic prompts (
{…}) in the SQL (see Section 6). - Ensures the query is a SELECT, TRANSFORM (crosstab), or PARAMETERS query.
Action queries like
UPDATE,DELETE,INSERTare not allowed for safety. - Creates a temporary query (
z_TempExport) from your SQL. - Exports the results to an Excel file in your Documents folder.
- File name format:
ReportName_YYYYMMDD_HHNNSS.xlsx
(for example:Purchase Order History by SKU_20251113_142305.xlsx)
- File name format:
- Opens the generated Excel file automatically.
- After the export, the temporary query is deleted to keep the database clean.
Running to CSV (Open CSV)
The Open CSV button works similarly:
- Click Open CSV with a report selected.
- The system:
- Runs the same SQL and dynamic prompt logic.
- Exports the results to a CSV file in your Documents folder.
- Opens the CSV file in your default program (often Excel).
File name format:
ReportName_YYYYMMDD_HHNNSS.csv
Use CSV if:
- You want a simple, plain-text export.
- You plan to import the data into another system.
Creating a New SQL Data Report
Starting a New Report
- Click the Add New button.
- You’ll see an Input Box asking for the report name (for example:
Sales by State Last Month). - Enter a clear, descriptive name and click OK.
Behind the scenes:
- A new record is created in
SQLReports. - The form refreshes, selects the new report, and places the cursor in the Preview SQL box so you can start typing your SQL.
Entering the SQL
In the Preview SQL box:
- Type or paste your query.
- Make sure the statement is one of:
SELECT …TRANSFORM …(for crosstab queries)PARAMETERS …followed bySELECT …
Examples:
Simple SELECT:
SELECT OrderNumber, OrderDate, GrandTotal
FROM Orders
ORDER BY OrderDate DESC;
Crosstab by Month and State:
TRANSFORM Sum(Orders.GrandTotal) AS SumOfGrandTotal
SELECT Orders.ShipState
FROM Orders
GROUP BY Orders.ShipState
PIVOT Format([OrderDate], "yyyy-mm");
Saving the Report
- After entering or editing the SQL, click Save SQL.
- The SQL text is saved into the
SQLReportstable for the currently selected report. - You can now use Open in Excel or Open CSV to run it.
If there are syntax errors in your SQL, you’ll receive an error message when the query is created or when the export runs. Use that message to adjust your SQL, then click Save SQL again.
Edit or Delete Existing Reports
Edit a Report
- Select the report in the Report Name list.
- The existing SQL appears in the Preview SQL box.
- Make your changes directly in the Preview SQL box.
- Click Save SQL.
Your changes will be saved under the same report name (the ReportName field does not change unless you edit it via the table or a separate maintenance screen).
Tip: If you want to create a variation of a report (e.g., same structure but with different filters), you can:
- Select an existing report.
- Copy the SQL from the preview box.
- Click Add New, name the new report.
- Paste and adjust the copied SQL.
- Click Save SQL.
Delete a Report
- Select the report in the Report Name list.
- Click Delete.
- Confirm the deletion when prompted.
This removes the report definition from the SQLReports table. It does not delete any database tables or data—only the report definition.
Using Dynamic Prompts with {placeholders}
One of the most powerful features of SQL Data Reports is the ability to prompt the user for values when the report runs.
How It Works
- Anything typed inside curly braces
{ }in the SQL is treated as a placeholder. - When you run the report (Excel or CSV), the system:
- Scans the SQL text for
{…}. - For each placeholder, shows an InputBox.
- The text inside the braces is used as both the Prompt and the Title of the box.
- Whatever the user types is substituted into the SQL in place of
{…}(the braces are removed).
- Scans the SQL text for
If the user cancels or leaves the value empty, they are asked whether they want to cancel the entire report run.
⚠️ Important: The system does not automatically add quotes or
#signs around the entered value. You must include those in your SQL around the{…}placeholder if your field type requires them.
Example – Text Input (like SKU)
Stored SQL:
SELECT POHistory.PONumber,
       POHistory.Quantity,
       POHistory.Cost,
       POHistory.LocalSKU,
       POHistory.Date,
       POHistory.TimeStamp
FROM POHistory
WHERE POHistory.LocalSKU = "{Enter SKU}"
ORDER BY POHistory.Date DESC;
When you run the report:
- You see an InputBox with the prompt/title: Enter SKU.
- You type:
ABC123. - The final SQL sent to the database becomes:
WHERE POHistory.LocalSKU = "ABC123"
Example – Date Input
Stored SQL:
SELECT *
FROM Orders
WHERE OrderDate = #{Enter an Order Date}#;
At run time:
- InputBox prompt/title: Enter an Order Date.
- You type:
11/13/2025. - Final SQL:
WHERE OrderDate = #11/13/2025#;
Here the # signs are outside the {} so they remain in the final query and correctly mark the value as a date literal.
Example – Date Range
Stored SQL:
SELECT *
FROM Orders
WHERE OrderDate BETWEEN #{Start Date}# AND #{End Date}#
ORDER BY OrderDate;
Running the report:
- Prompt 1: Start Date
- Prompt 2: End Date
If you enter 11/01/2025 and 11/30/2025, the final SQL becomes:
WHERE OrderDate BETWEEN #11/01/2025# AND #11/30/2025#
Example – Numeric Input
For numeric values, don’t put quotes or # around the placeholder:
SELECT *
FROM Orders
WHERE GrandTotal >= {Minimum Total}
ORDER BY GrandTotal DESC;
If you enter 100, the final SQL is:
WHERE GrandTotal >= 100
Tips for Writing SQL for Data Reports
Start with the Access Query Designer
If you’re not comfortable writing SQL from scratch:
- Open the Access Query Design window.
- Build your query using the visual designer.
- Switch to SQL View.
- Copy the SQL into the Preview SQL box in the SQL Data Reports form.
- Add any
{placeholders}as needed. - Click Save SQL.
This gives you the best of both worlds: a visual builder plus reusable, dynamic reports.
Keep Queries Readable
- Use line breaks and indentation:
SELECT OrderNumber, OrderDate, ShipState, GrandTotal FROM Orders WHERE OrderDate >= #{Start Date}# AND OrderDate < #{End Date}# ORDER BY OrderDate DESC; - End with a
;(semicolon) if you like—it’s optional but neat.
Use Aliases for Friendlier Column Names
Excel will show the field names exactly as you define them. Use aliases for readability:
SELECT OrderNumber      AS [Order #],
       OrderDate        AS [Order Date],
       ShipState        AS [Ship State],
       GrandTotal       AS [Total Amount]
FROM Orders;
Be Careful with Filtering Logic
- Use parentheses to control the logic of
AND/OR:WHERE ShipState IN ("PA","NJ","DE") AND OrderDate >= #{Start Date}#vs
WHERE ShipState IN ("PA","NJ","DE")
  AND (OrderDate BETWEEN #{Start Date}# AND #{End Date}#)
Limit the Result Size When Testing
When designing new reports, start small:
SELECT TOP 100 *
FROM Orders
ORDER BY OrderDate DESC;
Once you’re confident the query is correct, remove the TOP 100 to run against the full data set.
Only Use Safe Query Types
The system intentionally restricts you to:
SELECTTRANSFORMPARAMETERS(with a followingSELECT)
This prevents accidental updates or deletions. If your query starts with UPDATE, DELETE, or any other action statement, it will be blocked with a message like:
“This SQL must be a SELECT or TRANSFORM (crosstab) query to export.”
Troubleshooting & FAQs
“Please select a report name first.”
You clicked Open in Excel, Open CSV, Save SQL, or Delete without a report selected.
→ Click one of the report names in the left list first.
“No SQLStatement found for the selected report.”
The report record exists but has an empty SQL field.
- Click Save SQL after entering valid SQL, or
- Edit the report in the
SQLReportstable, or - Delete the report and create a new one.
“This SQL must be a SELECT or TRANSFORM (crosstab) query to export.”
The first word of your SQL is not SELECT, TRANSFORM, or PARAMETERS.
- Open the query in the Preview SQL box and adjust it so it starts with one of these keywords.
“Error XXX: …” when running or exporting
Access detected a problem with your query. Common causes:
- Table or field names misspelled.
- Missing quotes or
#around date/string literals. - Incorrect use of
{placeholders}(for example, forgot to add quotes around string placeholders).
Double-check your SQL and test it in Query Design → SQL View if needed.
The prompt appears, but the query returns no results.
The SQL ran, but your filter values might be too strict or not match any data. Try:
- Broadening your date range.
- Checking for typos in SKUs or IDs.
- Removing some filters to confirm the base query works.