
Admin Portal
Log into the Shift4Shop Admin portal.
- This should have been setup during the initial process with Shift4Shop.
If you’re having trouble accessing your admin portal, you may contact Shift4Shop’s technical support team
- http://support.3dcart.com
- 1-800-828-6650.
Adding Stone Edge Module
- In the Shift4Shop Admin portal, look towards the left-hand side navigation bar and click on “Modules“.
- Search for “Stone Edge“. It may come up as Monsoon Stone Edge.

- Click on “Settings“
- Input your Shift4Shop Username and Password.
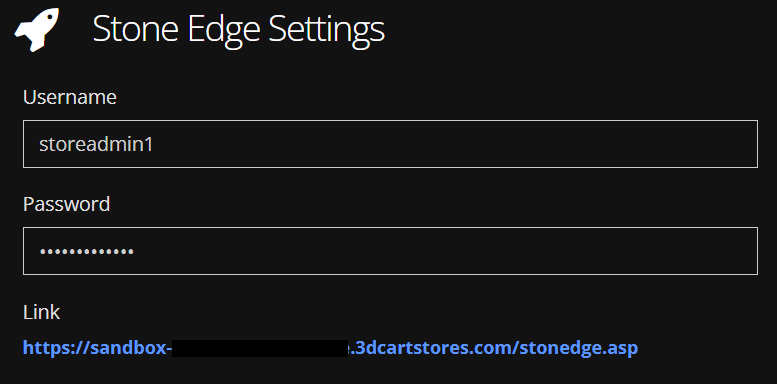
*The Stone Edge Settings page contains information you’ll need to add to the Stone Edge shopping cart definition, as outlined in the next section. Leave this page open to facilitate copying and pasting the values from the Username, Password, Link fields.*
Configuring Stone Edge
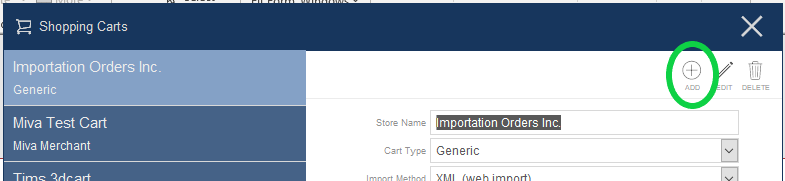
- In Stone Edge Order Manager, navigate to the Main Menu > Click the Gear or Settings Icon > Click “System Functions” > Click “Shopping Carts” to open your shopping carts > Upon opening, click “Add” in the top right corner. Pictured below.
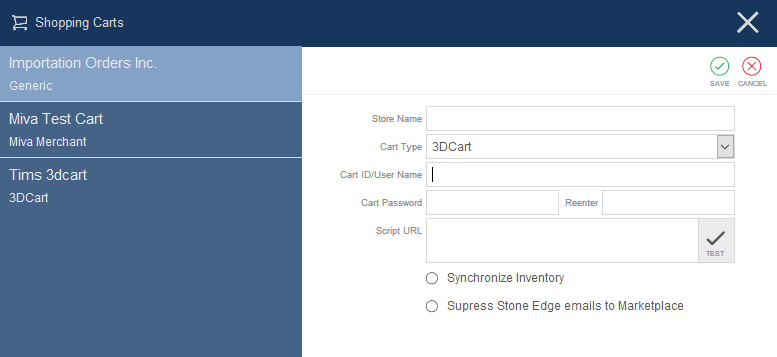
- Give your cart an arbitrary name in the Store Name field. It can be anything you’d like, but it should be unique. This value only shows internally in the Stone Edge application.
- Change the Cart Type to “3DCart“.
- Enter the CartID/Username. (These credentials are going to be the same as the credentials entered into the Stone Edge Module)
- Enter the Cart Password.
- Input the Script URL, press “Test Script URL” to validate the path to the script.
This test does not validate the Username and Password credentials, merely the accessibility of the script. - Click Save to create the shopping cart definition. Continue with the shopping cart configuration tasks below….
Importing Products
Shift4Shop supports product attributes/options.
Before importing product records from the shopping cart channel, decide how product attributes are handled.
- Go to Main Menu>Settings>System Function>Shopping Carts.
- Select the appropriate shopping cart definition from the list.
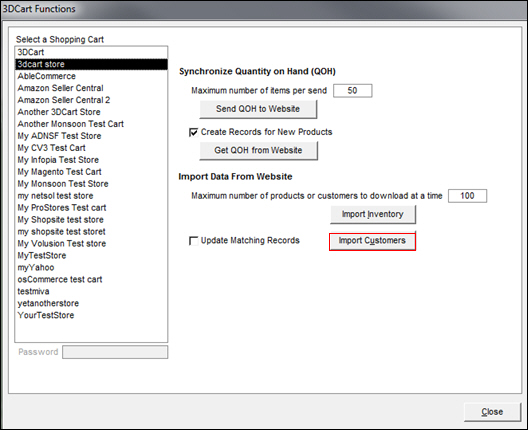
- Click Import & Update Data in the Additional Functions section of the screen.
- Optional: Select Update Matching Records to allow the import process to update the existing customer record with new information from the shopping cart.
- Select Import Customers.
- The program asks if it should import all Customer records from the shopping cart.
- Select OK.
- When the customer import is complete, Close the Shopping Carts screen.
Configuring Custom Fields
- Shift4Shop allows you to create checkout questions to gather additional information from your customers as they place their orders. Go to Shift4Shop online store manager>Settings>General> Checkout Questions.
- To import the contents of these fields as orders are imported, you must configure custom order fields in Stone Edge.
Refer to the Knowledge Base topic, Advanced Custom Fields, for instructions.
Importing Orders
- To import new orders, navigate to the Main Menu of SEOM > Import my Orders > Select the Shift4Shop/3DCart Shopping Cart
- You can now import by either of the two options. Import via Internet or Import from Text file.
For more information, refer to the Knowledge Base topic: importing orders.
Configuring Order Status Updates
- Navigate to the Main Menu of SEOM > Click the Gear or Settings Icon > Click System Functions on the left-hand side accordion > Click Set System Parameters.
- Set system parameter UseStatusUpdates to TRUE.
- Set cart-based system parameter UseGenericStatusUpdates to TRUE.
- Set system parameter GenericStatusSendXML to FALSE.
- Create cart-specific status labels as needed.
- Load the default list of Status Events.
- Choose the status event which triggers the sending of updates to the cart and select Notify Cart.
- Ensure that the Local or Shared Stack is up and running.
Acceptable Order Status Labels for Shift4Shop
You must select or define status labels in Stone Edge that match labels accepted by the shopping cart. The standard order status labels used by Shift4Shop are:
- Cancel
- Hold
- New
- Not Completed
- Partial
- Processing
- Shipped
- UnPaid
You may also define your own status labels (at the Edit Order Status screen of the Shift4Shop online store manager) using the following fields:
- Custom 1
- Custom 2
- Custom 3
Configure Real-time Inventory Synchronization
Refer to Knowledge Base topic, Inventory synchronization, for more information.
- In System Parameters, set SynchQOH to true.
- Take a physical inventory and update the QOH (Quantity on Hand) of all products at the web store or in Stone Edge.
- Go to Main Menu > Settings > System Functions > Shopping Carts > Your Cart Definition > Import & Update Data.
 Optional: Now within Import & Update Data. Select Create Records for New Products to have the program create records for products that don’t already exist within the store data file during the Get or Send Process.
- If the accurate QOH is on the web store, select Get QOH from Website. If the accurate QOH is in Stone Edge, select Send QOH to Website.
- Select Close to return to the Shopping Carts screen.
- Select Edit in the upper right-hand corner.
- Select Synchronize Inventory.
- Click Save.