
Overview
- Price levels define the different prices at which the same product may be sold.
- The system parameter: UseMultiLevelPricing must be “True” to use this feature.
- Stone Edge supports the use of 10 price levels which can be defined for each inventory item.
- Examples for using price levels can be:
- Wholesale
- Retail
- Club
- Price levels are given a name (user-defined), and names are assigned to customer records.
- By default, when an existing customer places an order, the price level is applied.
- The system will use the price level indicated in the customer’s record
- If the customer record does not specify a price level, the system will use the default price level (defined by the system parameter)
- Price levels do not affect imported orders
- Pricing information that comes from the shopping cart system honored by Stone Edge
- It IS possible to change the price of a product on an imported order at the Process Orders screen manually.
- NOTE: Turning multi-level pricing on/off requires the user to re-enter price information for products at each price level.
Defining Price Levels
Method #1
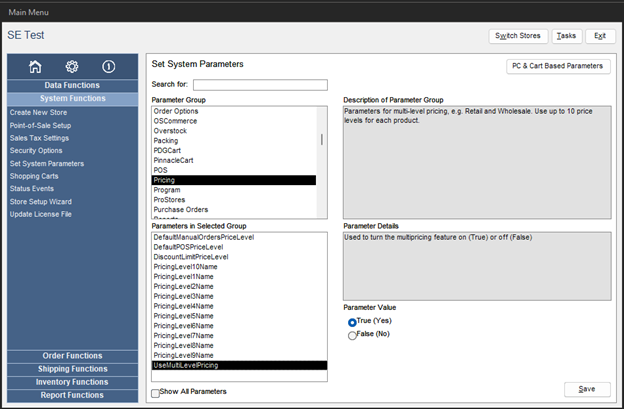
- Gear Icon (Settings)
- System Functions -> Set System Parameters
- Parameter Group = pricing
- Parameters
- UseMultiLevelPricing = True
- PricingLevel#Name -> user-defined name to identify what price level is used for
(# is replaced by the numeric value of specific pricing level)
NOTE: Ten price levels may be assigned 1 – 10. You can only have to in the whole system, not ten different for every product.
Method #2
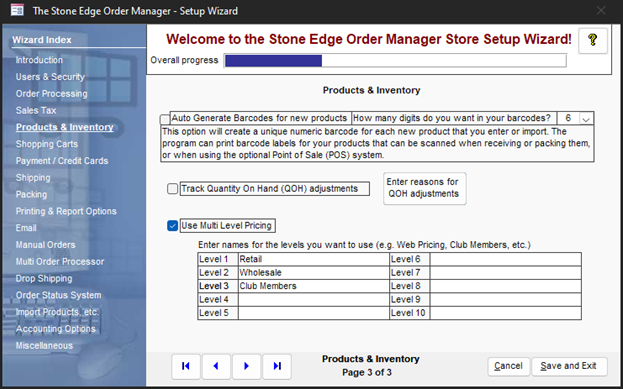
- Gear Icon (Settings)
- System Functions -> Store Setup Wizard
- Left-hand list click “Products & Inventory”
- Click on the bottom of the page to get to Page 3 of 3
- Checkmark “Use Multi-Level Pricing”
- Enter user-defined names for levels of pricing in the table below
- “Save and Exit” when finished
Enter Price Level Information for Products
Editing Singular Items
- From the Main Menu, Click “Manage My Inventory” from the list on the left-hand side
- Click “View & Manage My Inventory”
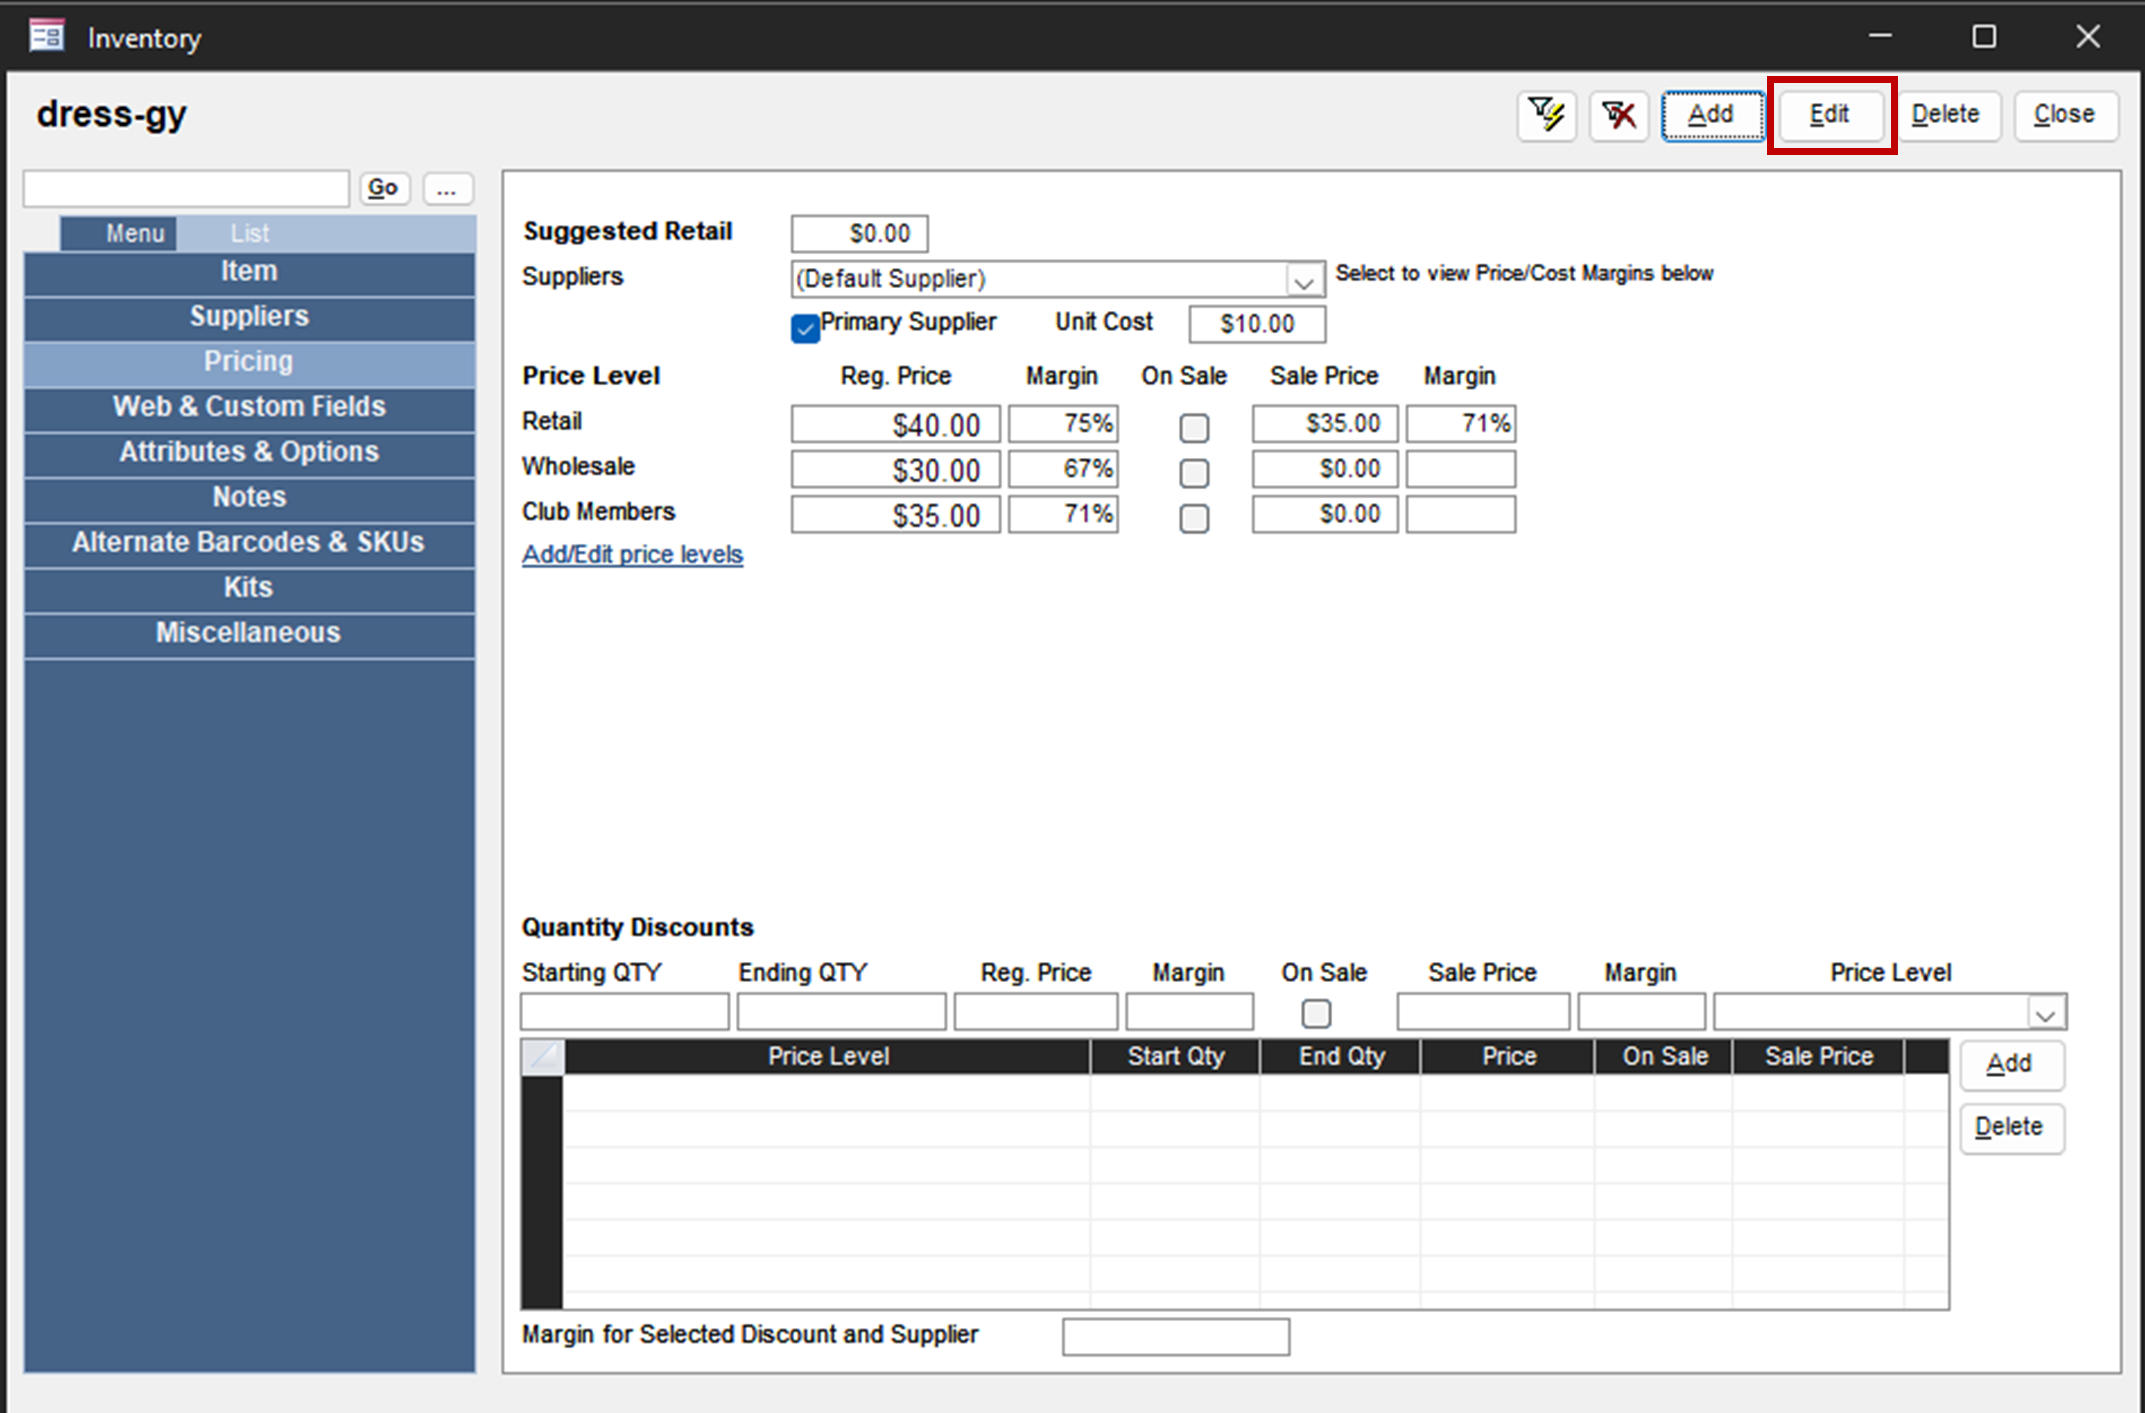
NOTE: Can click the “Manage My Inventory” button from the Main Menu if not changed from the default. - Inventory screen now showing -> choose an item to be priced
- Click “Pricing” from the list on the left-hand side
- Click the “Edit” button in the top-right corner
- Edit the item’s prices by clicking the corresponding box and typing in prices under Reg. Price for each price level
NOTE: Sale Price can be defined if desired and if the item is on sale.
NOTE: Margin percentage will automatically be set and cannot be manually entered.- Based on cost from supplier and price defined.
- Click “Save” when done.
Using Multi-Record Editor
- Main Menu.
- Click “Manage My Inventory” from the list on the left-hand side.
- Click “View & Manage My Inventory”
NOTE: Can click the “Manage My Inventory” button from the Main Menu if not changed from the default. - The inventory screen now showing
- Items -> Multi-Record & Price Editor (left-hand side).
- “Edit Inventory Data” pop-up appears.
- Select Fields to show in the table (the below fields are useful).
- Local SKU -> by default always shown
- Item Name -> for ease to know what item is being edited.
- Pricing 1 – 10 -> Show as many as defined by price levels.
- When adding Pricing categories 3 columns will show (pricing 1 will default to not have a number on the column title).
- Price#
- On Sale #
- Sale Price #
NOTE: The assigned names of each Price level will not be shown.
- Edit the item’s prices by clicking the corresponding box and typing in the prices.
NOTE: Changes are immediate and no save is required to confirm the change. - Click “X” in the top-right corner when done.
- When adding Pricing categories 3 columns will show (pricing 1 will default to not have a number on the column title).
Assigning Customers to a Price Level
- Main Menu
- Click “Manage My Customers” from the list on the left-hand side
- Click “View & Manage My Customers”
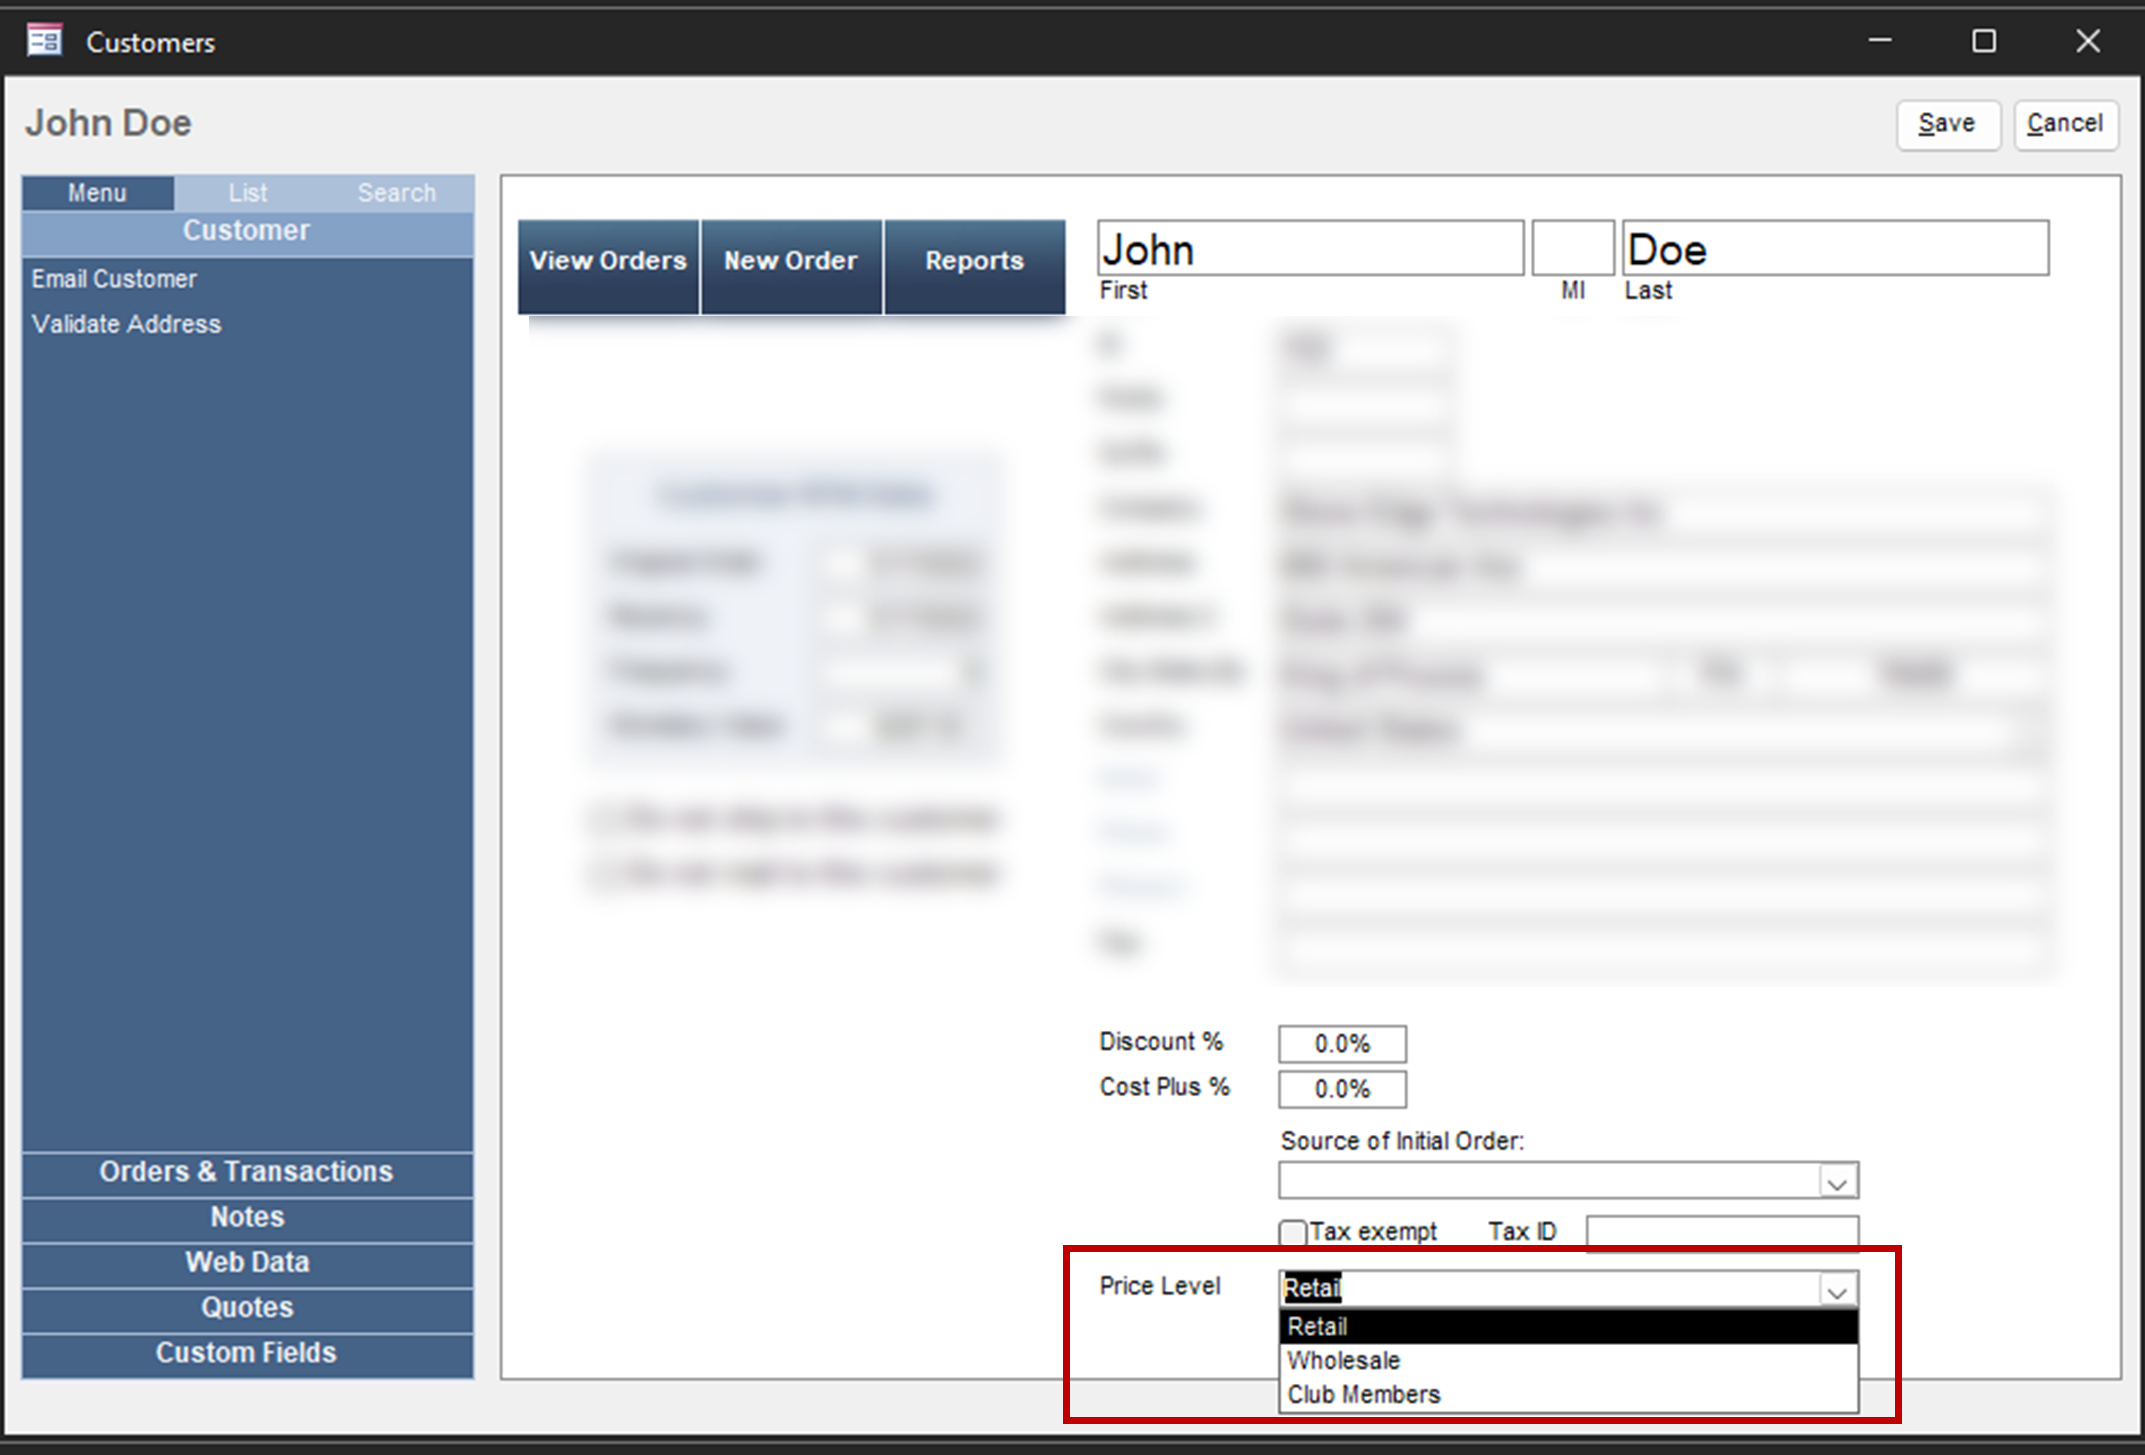
NOTE: Can click the “Manage My Customers” button from the Main Menu if not changed from the default - Customers screen now showing -> choose customer to be edited
- Click “Edit” in the top-right corner
- On the bottom of the screen find “Price Level” and click for a drop-down of price level categories created
- Choose price level from the list
- Click “Save” in the top-right corner.
Related System Parameters
- DefaultPOSPriceLevel
- Sets default price level for POS system using numeric values.
- Default set to 1 (Price Level 1).
- DefaultManualOrderPriceLevel
- Sets default price level for the manual system using numeric values.
- Default set to 1 (Price Level 1).
- DiscountLImitPriceLevel
- Set to a numeric value that corresponds to the price level
- NOTE: Only works for POS.
- The price level selected acts as the cutoff for discounts.
- EX: If 4 is the value, then Price level 4 is the cutoff.
If the SKU price is $20 for price level 4 and the item is sold for less than $20 the system will skip the system when giving a global-based discount because it is already less than the specified price level.
- EX: If 4 is the value, then Price level 4 is the cutoff.
- Default set to 0 (no cutoff).
- UseMultiLevelPricing
- True turns on multi-level pricing.