
Overview
- OMS‘s Purchase Order system is used to order merchandise from suppliers to replenish inventory levels as sales deplete the merchant’s stock.
- When merchandise from a purchase order is delivered to the merchant, it must be “received” and “invoiced” through the program to complete the life cycle. Invoice information can be exported to QuickBooks as “Bills” to be paid.
- Do not “receive” inventory ordered outside of the OMS purchase order system at this screen. Use the Inventory Scanner instead.
Main Menu > Settings > Inventory Functions > Scan Non-POItems
- The program can be configured to create purchase orders in a semi-automatic fashion: based on the current QOH, the number of units needed for unfilled orders, the quantity of units already on order from the supplier, and the re-order point of each item. It also follows minimum order quantities and other purchasing rules required by the supplier, such as purchasing in lots. In order for the program to add an item to a purchase order automatically, the product must have a Primary Supplier designated in its inventory record.
- Alternately, the user can manually create a purchase order and choose the items and their respective quantities rather than having the program do the work for them.
- Merchants that drop-ship merchandise can also place and track those sales through the OMS purchase order system. Tracking data can be entered manually or imported for drop-ship purchase orders. The program can also create packing records for drop-shipped merchandise.
- Inventory can be received against multiple standard purchase orders for the same vendor at the same time.
- Barcode labels can be printed for all items on a received PO at the same time.
- To access the Purchase Orders screen, go to:
Main Menu>Manage My Inventory>Manage My Purchase Orders
Best Practice
- Do not create purchase orders on more than one workstation at the same time.
- Do not leave “saved” purchase order work for long periods of time. Return to them and create the purchase order as soon as possible.
Purchase Order Work Flow
Regular Purchase Orders
- Merchandise that is stocked by the merchant.
- Create Purchase Orders > Receive Inventory > Enter Invoices.
Drop-ship Purchase Orders
- Merchandise that is sent directly to the merchant’s customers by a drop-ship supplier.
- Create Purchase Orders > Enter or Import Tracking Data > Enter Invoices.
Invoices
Once invoices have been entered, they can be exported to QuickBooks as bills to be paid. Unfortunately, the whole purchase order process can be sloppy for a lot of merchants:
- POs may need to be changed between the time they are placed and the time they are received.
- After a purchase order is placed, you may find that your costs are different from what you expected.
- The actual products and quantities you receive may differ from what you ordered.
- Invoices may include all or portions of multiple POs.
To accommodate issues like these, we developed the concept of “loosely connected data.” For each purchase order, OMS stores what was originally ordered, what is currently expected (if not already received), what is received, and what has been invoiced. Each stage is “loosely connected” to the other stages, so almost anything can be changed until the items have been received and invoiced. Each purchase order’s original details are “locked” once it has been added to a purchase order invoice. You can still modify “expected” and “received” information for the PO, but not the original details.
Description of the Screen
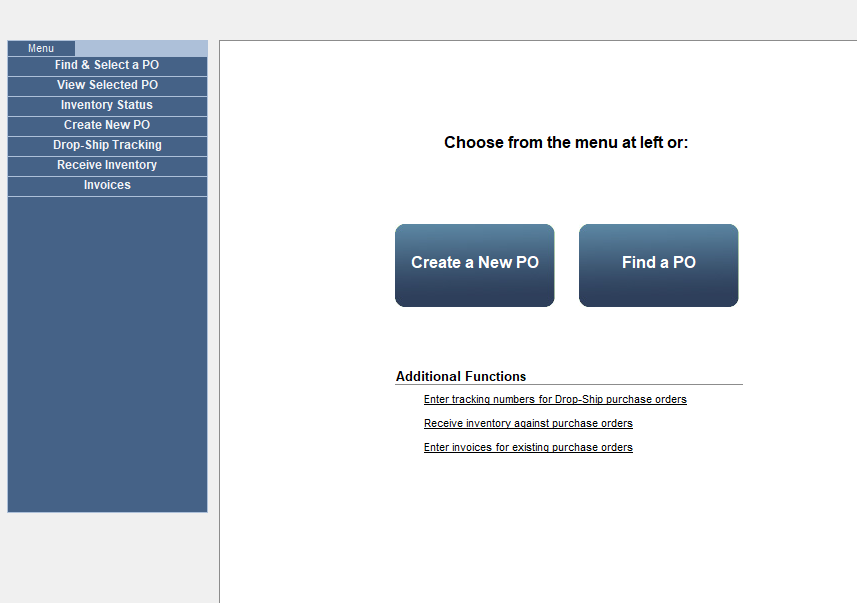
Purchase Orders screen
Accordion
- The Accordion is found on the left-hand side of the screen and has a series of tabs that change the data displayed in the right-hand pane or performs actions related to purchase orders.
Menu Tab
- Selecting this tab does nothing at present since there are no other views of the Accordion from which to return.
Filter & Select a PO Tab
Find a Purchase Order Screen
- Enter data in one or more of the fields and select the Begin Search button to produce a list of purchase orders matching the criteria.
- Select a PO in the list and click the View PO button to see more details or perform an action.
Close POs Past Cancel By Date Link
- Allows the user to close purchase orders that have Expected items that have not been received by the cancellation date set when the purchase order is created.
- It assumes the user will create a purchase order for those items with another supplier.
Print PO Status Report Link
- Select this link to print the Purchase Order Status report.
- If the system parameter UsePrinterMenu is set to TRUE, the printer menu is presented to allow the user to select a different output device.
- The program then prompts the user to enter criteria to filter the content of the report.
View Selected PO Tab
- When a purchase order is selected, select this tab to view its details.
- If no purchase order is presently selected, the program tells the user to select one and switches to the Filter & Select a PO tab (Find a Purchase Order screen).
View PO Items Link
- View Line Items, Expected, Received, or Invoiced records for the selected purchase order.
- Add or Split Line Items on the purchase order.
- Print Labels (barcode) for received items.
- Re-Send, Edit, Print, Cancel or Close the selected purchase order.
View PO Info Link
- View Comments, Notes, or Instructions related to the selected purchase order.
- See Supplier-specific information.
View PO Combined Items Link
- See a combined list of all line items from the current list of purchase orders.
Inventory Status Tab
- Displays a list of inventory items in the right-hand pane, filtered by the controls selected at the top of the screen.
Create New PO Tab
How would you like to create your PO?
- Make selections from the fields in the right-hand pane to create a new purchase order.
View QTY Not Shipped & BO Link
- Select a SKU via the Search for SKUs link.
- Select this link to view orders which show the selected SKU as Shipped without an Actual Ship Date set or orders placed within a specific time frame that contains backorders for the selected SKU.
Search for SKUs Link
- Opens the Search Inventory screen to enter criteria and find matching products.
Add New SKU Link
- Opens the Add New Product screen.
View Selected SKU Details
- Opens the selected SKU’s inventory record in browse mode.
Drop-Ship Tracking Tab
Add Tracking Numbers Link
- Opens the Drop-Ship Tracking screen.
Receive Inventory Tab
Receive Against a Purchase Order Link
- Opens the Select Purchase Orders screen.
Invoices Tab
Enter Invoices for Purchase Orders
- Opens the Purchase Order Invoices screen.
The Right-Hand Pane
Create a New PO Button
- Opens the Create a New PO tab.
- Make selections in the fields to create a new purchase order.
Find a PO Button
- Opens the Filter & Select a PO tab.
- Enter search criteria to locate a purchase order, close purchase orders, or print the PO Status Report.
Additional Functions Section
Enter tracking numbers for Drop-Ship purchase orders
- Opens the Drop-Ship Tracking screen.
Receive inventory against purchase orders
- Opens the Select Purchase Orders screen.
Enter invoices for existing purchase orders
- Opens the Purchase Order Invoices screen.