
Overview
- Steps needed to create an ODBC connection for an SQL database in the Windows operating system.
- This is needed to connect Stone Edge to your SQL database.
Opening the ODBC Controller
- In finder type “ODBC”
- You may find 2 programs come up -> Click: “ODBC Data Sources (32-Bit)”
NOTE: You may need to run this program as an administrator for the ability to make edits.
*If you cannot find the program though the search, you can also use this direct file path: “C:\Windows\SysWOW64\odbcad32.exe”
Set up the DSN (Data Source Name)
NOTE: You will need to setup an SQL server and database beforehand.

- Click “System DSN” from the tabs at the top and click the “Add” button on the right to open the “Create New Data Source” pop-up.
- Select a driver for the data source should be “SQL Server” near the bottom of the list.
- Click “Finish” to open the “Create a New Data Source to SQL Server” pop-up
- Enter the required fields on the initial screen:
- Create a “Name” for the ODBC connection, something you will remember.
NOTE: Every computer that connects to the database will need a DSN, so keep the naming consistent. - Skip the “Description”
- The SQL “Server” to connect to is where the database is located.
- The same server name is used for logging into SQL Server Management Studio.
- If you choose the wrong server name, you will eventually get an error.
- Create a “Name” for the ODBC connection, something you will remember.
- Click “Next” and choose a verification method for the login ID.
- The first option uses Windows Auth if enabled and setup prior on your SQL server. If you are not able to click “Next” to move to the next sceen it is not setup properly and you may need to check your server settings.
- The second, easier option is using SQL authentication. Enter the login ID and password you created to access the SQL database in SSMS.
- Click “Next”. If you have the correct permissions the next screen should load.
- If it takes more than a few seconds, it most likely failed. You may need to try a different authorization method or change the “Client Configuration” from a Dynamic port to the Port number: 1433 (setup using SQL Server Manager).
- Checkmark to “Change the default database” from “Master” to the database you created.
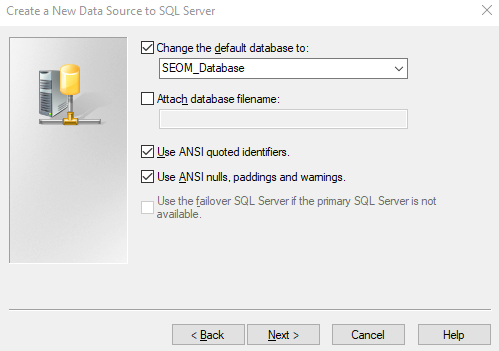
- Click “Next” -> “Finish”
- The “ODBC Microsoft SQL Server Setup” pop-up will appear reviewing your choices.
- Click “Test Data Source…” on the bottom-left of the screen.
- If the test comes back successfully (as a pop-up) click “OK” -> “OK” and you have finished the setup.
- If you are not able to get a successful message you may need to change your settings or check your network connection to the server.