
Overview
Updated In version 8.006 to use the latest API integration and Added CIM Functionality
If you use Authorize.Net to process credit card transactions, SEOM can interface directly with your Authorize.Net account.
Payments for orders that are pre-authorized on your website can be captured automatically when you approve those orders in SEOM.
The Authorize.Net interface requires an open connection to the Internet, such as a DSL or ISDN line or a cable modem. It is not intended for use with dial-up Internet accounts, although it may work if the dial-up connection is always opened before SEOM attempts to send data to Authorize.Net.
Configure SEOM to work with Authorize.Net
Click Save after setting each system parameter.
- Go to Main Menu > Settings > System Functions > Set System Parameters.
- Select the Credit Card parameter group.
- Set parameter CreditCardProcessor to Authorize.Net.
- Make sure that the CCInfoPrefix parameter is set to *ANET*.
- Enter your Authorize.Net API LoginID in the AuthNetUser system parameter and your Authorize.Net TransactionKey in the AuthNetTransactionKey system parameter. You can find this information at the Authorize.Net website by searching for API Credentials under Account Settings. Make sure that there is no value specified in the AuthNetPassword system parameter.
NOTE: These system parameters can also be set specifically by shopping cart if you want to use different credit card processors for different carts. Users of legacy Authorize.Net accounts should still use their original username and password information in the SEOMAuthNetUser and AuthNetPassword system parameters, and leave the AuthNetTransactionKey parameter blank.
- **Important**: Set AuthNetTestMode to TRUE while you are setting up and testing the system. Set it to FALSEwhen you are ready to begin processing real transactions.
- Set AuthNetSendEmail to TRUE if you want Authorize.Net to send its own email confirmation to your customer upon the completion of a transaction. Set it to FALSE if you do not want Authorize.Net to send confirmation email to your customers.
- Set the following system parameters as you wish to configure how SEOM handles your credit card transactions:
- AllowCaptureHigherAmount – If TRUE, the program lets you change the amount of a delayed capture to an amount greater than the pre-authorized amount. If FALSE, a delayed capture must be for an amount less than or equal to the pre-authorized amount.
- CaptureApprovedOrdersAtImport – If TRUE, when importing orders, if an order can be approved, the program tries to capture its pre-authorized credit card payment (if any). If the payment cannot be captured, the order is not be approved.
- CaptureAtFillBackorders – If TRUE, when using the Fill Backorders form, if an order can be approved, the program tries to capture its pre-authorized credit card payment (if any). If the payment cannot be captured, the order is not be approved.
- CaptureAtManualApproval – If TRUE, when orders are approved manually, the default is to capture the initial credit card charge if it has been pre-authorized but not captured. If FALSE, the default is to not perform the capture automatically.
- RequireAuthForManualOrders – If TRUE, when you enter a credit card order at the Manual Orders form, you must select the Authorization button to pre-approve credit card sales. Then, when you select Transmit, the payment is also captured. If FALSE, you can either do the same process, or skip the pre-authorization, and the program transmits the sale without a prior authorization.
- Check the settings of the main and/or cart-based system parameter, WebTransactionType to make sure it agrees with your workflow. The choices are Pre-Authorize or Sale. If payments are captured via SEOM, it should be set to Pre-Authorize. If payment is captured at the web store, it should be set to Sale.
Configure the Order Manager Point of Sale System to work with Authorize.Net
Click Save after setting each system parameter.
- Go to Main Menu > Settings > System Functions > Set System Parameters.
- Click on the Credit Card POSparameter group.
- Set CreditCardProcessorPOS to Authorize.Net.
- Enter your Authorize.Net API LoginID in the AuthNetPOSUser system parameter and your Authorize.Net TransactionKey in the AuthNetPOSTransactionKey system parameter. You can find this information at the Authorize.Net website by searching for API Credentials under Account Settings. Make sure that there is no value specified in the AuthNetPOSPassword system parameter.
- **Important**: Set AuthNetPOSTestMode to TRUE while you are setting up and testing the system. Set it toFALSE when you are ready to begin processing real transactions.
- Set AuthNetPOSSendEmail to TRUE if you want Authorize.Net to send its own email confirmation to your customer upon the completion of a transaction. Set it to FALSE if you do not want Authorize.Net to send confirmation email to your customers.
- If you are using a “card present” AuthNet account to process POS orders, set the AuthNetPOSAcctIsCardPresent system parameter to TRUE.
- Optional: Set system parameter RequireAuthForPOSOrders to TRUE to require authorization.
Authorize.net CIM
Functionality added in Stone Edge release 8.006 March 7th, 2024.
Note: No changes are needed in Stone Edge to enable this feature. Contact your Authorize.net to make sure you have this functionality on your account.
Note: If updating from version 7.1xx or 7.5xx, please get in touch with Support@stonedge.com. All previous Transaction history will not be used, and you will need to collect new payment information.
How to use CIM in Stoneedge
When using Auth.net as your payment processor and needing the CIm function, there are a few processes for referencing previous transactions so customers’ information does not need to be recollected.
Manual Orders Screen:
When placing a manual order for a returning customer. All steps are the same till you get to the payment screen if the customer is returning since moving to 8.006 or later.
- On the Payments tab, click the magnifying glass
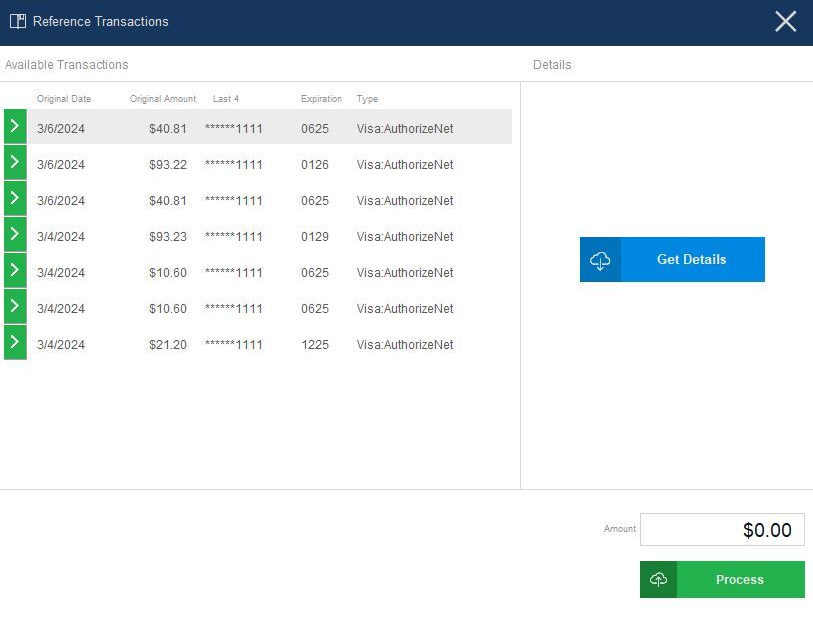
- Select the transaction you wish to use as a reference.
- Do Not click “Get Details
- “Process” will return you to the Order to populate the information needed
- Then, process with sale or reauthorization
View Orders Screen:
When having a returning customer through an imported order or if an order needs to be changed with items added and additional funds collected.
- Please note that Auth.net CIM integration works only with AVO, View Orders, and Manual Orders. It does not work with the Multi Order Processor (MOV).
There are two ways:
Transmit Button:
After clicking “get data from order,” you will click the “Transmit” button, and the following will display previous transactions that could be cloned.
Ref Transactions Button:
On the View Order Screen in the payments tab, you will see the “Ref Trans” button.
![]()
This can be used to call the screen to reference a previous transaction if there is no payment information on the current order.
The screen displayed is the same as manual orders and will have the same steps and functionality.