
Overview
- The View Notes & Tasks screen is accessible via the Tasks button on the Main Menu or by the keyboard shortcut Ctrl+Shift+T.
- This screen lists the tasks assigned to the user that is logged in to the program, if the security system is enabled.
- Notes and tasks can be located by using the pre-defined filters provided at the top of this screen or by using the Search button.
- To close this screen, click the X in the upper right-hand corner.
Description of the View Notes & Tasks Screen
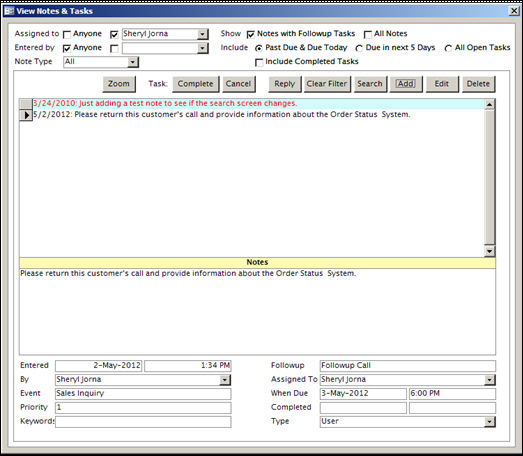
View Notes & Tasks screen
Filters Provided on the View Notes & Tasks Screen
Assigned to:
- the user may choose to view a note or task that was assigned to any user or they may select a specific person from the corresponding drop-down list
Entered By:
- the user may choose to view a note or task that was entered by any user or they may select a specific person from the corresponding drop-down list
Show: Check Boxes
Notes with Followup Tasks
-
- check this box to limit the list of notes to those which have tasks associated with them
All Notes
-
- check this box to include all notes even if they do not have an associated task
Include: Radio Buttons
Past Due & Due Today
- limits the list of records found to those that have already exceeded their due dates or are to be completed on the current date
Due in the Next 5 Days
- limits the list of records found to those whose completion dates will occur in the next five days
All Open Tasks
- the program includes tasks that have not yet been completed in the display
Include Completed Tasks
- the program includes tasks which have been completed in the display list
Note Type Drop-down List
- the program only displays records that match the selected record type; the choices are:
- All
- Order
- Customer
- Inventory – product records
- Supplier – vendor records
- User – not presently used
Fields and Controls on the View Notes & Tasks Screen
View Outgoing Email Button
- if the selected note or task has an outgoing email associated with it, this button will open the Preview Email Message screen, which displays the subject and text of the correspondence that was sent
Zoom
- click this button to open the order, supplier, customer, or inventory record with which the currently selected note or task is associated
Task Completed Button
- when a follow-up task associated with the note or task has been finished, click this button to is mark it complete; it will no longer appear in the Assignee’s task list
Cancel Task Button
- if a task is no longer relevant or needed, click this button to mark it as completed, and it will no longer appear in the task list for the person to whom it was assigned; to completely remove the task from the system, use the [Delete] button
Reply Button
- this button opens the Add Note screen, where additional information can be added to the selected note or task, or it can be re-assigned to another user, etc.
Clear Filter Button
- if the [Search] button has been used to locate the note or task, clicking this button removes the search criteria previously entered
Search Button
- this button will open the Search for Notes screen, where the user may enter criteria to locate a note or task quickly
Add Button
- this button opens the Add Note screen where the pertinent information can be recorded and a follow-up task can be assigned to the appropriate user
Edit Button
- this button opens the Edit Note screen where additional information can be added to a note or task or its status can be changed, etc.
Delete Button
- clicking this button results in the selected note or task being removed from the system; to prevent the note or task from appearing on a user’s task list without removing it from the system, use the [Cancel] button instead
Note List Box
- this pane is on the left-hand side of the screen and is where the user can select a note or task to review
Note Text Box
- this field contains the narrative details of the of the note or task
Entered Field
- the date that the note or task was entered is in the first field and the time of day appears in the second field on this line
By Field
- this field reflects the name of the user that entered the note or task
Event Field
- this field is used to categorize notes or tasks; select one of the pre-defined events from the drop-down list
- use the List Maintenance Note Events list to define appropriate categories for the business
Priority Field
- this field is intended for prioritizing notes or tasks; select one of the pre-defined priority codes from the drop-down list
- use the List Maintenance Note Priority Codes list to define codes that are meaningful to the business; the code entered can be letters or numerals, or a combination of both
Keywords Field
- manually type in any appropriate word or phrase that might help locate this note in the future when using the [Search] button
- the values entered here are not managed by the List Maintenance feature
Followup Field
- use this field to select a type of follow-up activity to be associated with the note or task
- use the List Maintenance Note Actions list to define follow-up actions that are meaningful to the business
Assigned To Field
- select the user to whom the task is assigned via the drop-down list, which is populated with the names of the users that are defined in the SEOM Security System
When Due Field
- enter a date when the task needs to be finished
Completed Field
- when the [Completed] button is clicked, this field is populated with the current date in the first field and the current time of day appears in the second field on this line
Type Field
- indicates the type of record to which the note or task applies: Order, Customer, Inventory, or Supplier; it can also indicate that this note is a Reply to another note or task
- Note Types are assigned automatically by the program and cannot be changed by the user.
- If the type of task is User, Workstation, or System, the Zoom button will not work. A message box stating Zoom function not available for selected note type! will be displayed if it is attempted.
- A type of User is assigned when a Note or Task is created from the Main Menu Tasks button.
Has Email Check Box
- if the selected note or task has an email associated with it, this box is automatically checked by the program and the View Outgoing Email button will appear read the subject and text of the message that was sent
- if there is no email associated with the note or task this check box and the View Outgoing Email button is not visible.