
Overview
- SEOM uses a variety of lists throughout the program that can be used as they are supplied with the program, or the user may add their own entries to the lists.
- This article explains how to create and assign a Category to inventory items.
- Assigning categories to products is useful for reporting, accounting, and exporting order information to a fulfillment center.
- Most of the lists that the program uses are accessible via the List Maintenance screen, which can be found by going to:
Main Menu>Accordion>Settings>Data Functions>List Maintenance
Creating an Inventory Category
- Open the List Maintenance screen.
- Select the Inventory Categories entry in the Select List box.
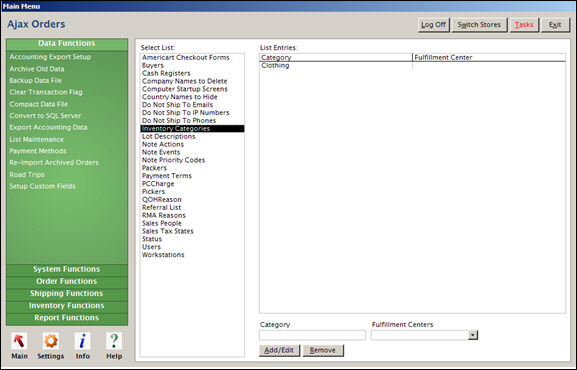
List Maintenance: Inventory Categories
- To add a category called “Jeans”, type that value into the text field labeled Category at the bottom of the screen and click the [Add/Edit] button.
- The category “Jeans”, is now visible in the List Entries section of the screen.
Assigning an Inventory Category to a Product
Categories can be assigned to products at the Inventory, Multi-Record & Price Editor, and the Global Editor screens by making a selection from the Category drop-down list on each of those screens.
Inventory Screen
- Open the Inventory screen by going to Main Menu>Accordion>Manage My Inventory>View & Manage My Inventory>Item
- Navigate to the desired Inventory record.
- Click the [Edit] button in the upper right hand corner of the Inventory screen.
- Click the down-arrow of the Category drop-down list and click on the appropriate pre-defined category to assign to product.
- Click the [Save] button in the upper right-hand corner of the screen to save the changes or click the [Cancel] button to abandon the change.
Multi-Record & Price Editor Screen
Changes can be made to multiple products in a single editing session at this screen. Refer to the Knowledge Base article, Multi-Record & Price Editor for more information.
![]() Changes made at this screen take affect immediately and cannot be un-done. Backup the data file before making mass changes.
Changes made at this screen take affect immediately and cannot be un-done. Backup the data file before making mass changes.
- Open the Multi-Record & Price Editor screen by going to:
Main Menu>Accordion>Manage My Inventory>View & Manage My Inventory>Item>Multi-Record & Price Editor
- Check the box labeled Category on the Standard Fields tab, which is the default view of the screen.
- Choose a product in the list of SKUs by clicking its row.
- Then click in the corresponding Category cell and select the appropriate entry from the drop-down list that appears.
Global Editor Screen
The Global Editor is used to make mass changes to a limited number of fields found on an Inventory record. The user has the ability control the group of records that will be altered by specifying a value or a range of values as a filter. For more details, see the Knowledge Base article, Global Editor.
![]() Changes made at this screen take affect immediately and cannot be un-done. Backup the data file before making mass changes.
Changes made at this screen take affect immediately and cannot be un-done. Backup the data file before making mass changes.
- Open the Global Editor screen by going to:
Main Menu>Accordion>Manage My Inventory>View & Manage My Inventory>Global Editor
- Select “Category” from the drop-down list labeled Change this field:.
- Another drop-down list labeled “To:” appears.
- Choose one of the pre-defined categories from the To: drop-down list.
- The selected category will be applied to all inventory records if the In all records check box is selected. To limit the group of records that will be affected by the changes, enter filtering criteria in the In records where: section of the screen.
- The records matching the criteria will populate the Selected Items grid at the bottom of the screen.
- To make the change in category for the selected records, click the [Perform Edit] button at the bottom of the screen.
- The program asks for confirmation before making the changes. Click [Yes] to proceed or [No] to abandon the changes.
- Next, click [OK] when prompted by the program. .
- Click the [X] button in the upper right-hand corner to exit the Global Editor screen.