
Overview
- This topic briefly discusses how to use a standard report as a template for creating a custom report. SEOM contains many system parameters that can be used to add a store logo or choose a different report template to control the contents and appearance of the standard reports which are supplied with the program, without the need to create a custom report.
- Refer to the Reports system parameter group page in the Knowledge Base, or see the Reporting chapter of the User Guide for a list of those parameters.
- Reports reside in the SEOM program file on each workstation. Therefore, any standard reports that are modified by the user must be saved in the Custom Reports database or they will be lost when the program is re-installed on a given workstation. Custom reports that are saved in the Custom Reports database can be re-imported into a workstation’s program file after the program has been upgraded or re-installed.
- If more extensive changes are desired, the standard SEOM reports can be modified using the built-in capabilities of Microsoft Access. Refer to Microsoft Access’s help facility for more detailed information, or contact Stone Edge Technologies Inc. at (484) 927-4804 to get a quote.
![]() Disclaimer: Troubleshooting problems with user-modified custom reports is not covered by the SEOM Technical Support maintenance contract.
Disclaimer: Troubleshooting problems with user-modified custom reports is not covered by the SEOM Technical Support maintenance contract.
Creating a Custom Report from a Standard Report
Determine Which Report to Modify
Most standard report objects in the SEOM program file are named exactly how you see them listed in the Report Menu. A report such as the “Sales Summary” is named “Sales Summary” in the database (F11).
However, reports such as invoices or packing slips are named dynamically because there are several formats of these reports from which the user can choose. If you are modifying a report such as an invoice or packing slip, follow these steps to determine which format is being used:
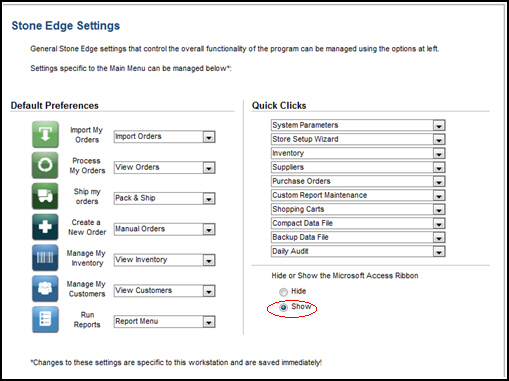
- Make sure the program is set to Show the Microsoft Access ribbon before beginning this process. Main Menu>Settings>Hide or Show the Microsoft Access Ribbon.
- Go to the Main Menu>Settings>System Functions>Set System Parameters.
- Select the Reports parameter group.
- For a packing slip, select the parameter PackingSlipTemplate.
- For an invoice, select the parameter InvoiceTemplate.
- Take note of the parameter value, as this is the name of the report template currently being used.
Locate the Report in the Database Window
- Open the database window (F11 at Main Menu). This feature may be restricted by SEOM‘s security system, if it is enabled.
- Select Reports on the left-hand side of the window, under the Objects heading.
- All of the reports that are included in the program will be listed alphabetically in the main database window. Find the report that is to be modified.
Make a Copy of the Report
- Right-click on the report’s name and choose “Save As” and enter a new name for the copy of the report.
 Do not modify the original report.
 - You are prompted to name the report. We recommend using a naming convention which includes your company name or initials, such as “Widget Company Invoice” or “Invoice – Widget Company”, to easily distinguish it as a custom report. Depending on which naming convention you use, either all custom reports will be listed near each other or they will remain by their standard report counterparts.
- Click [OK]. The Database window refreshes.
Edit the Report
- Right-click on the new report and choose Design View.
- Modify the copy of the report as needed, using Access’s built in report editor. Refer to Microsoft Access’s help for specific instructions about editing a report.
- Save the changes and close the new report.
Store the Custom Report in the Custom Reports Database
- Minimize the Database window. Access the Custom Report Maintenance feature and export the new custom report to the Custom Reports.mdb file for safe-keeping. Refer to Knowledge Base article, Custom Report Maintenance, for detailed instructions.
Tell the Program to Use the New Report
- Go to the Set System Parameters screen and enter the name of the modified report in the appropriate report template parameter.
- Select Save and OK.
Examples of Creating Simple Custom Reports
Changing Fonts on a Report
- Open the database window, choose the report and open it in Design View.
- Once in design view of the report, you will see several square or rectangular boxes called “Labels” or “Text Boxes”.
- Clicking inside one of these will select that object, and place “Handle Bars” (little black boxes on the corners and sides) around it.
- With the appropriate field selected, change the font just as you would in Microsoft Word:
- on the tool bar, you should see a drop down box displaying the font for that particular box
- change it to the desired font
- Repeat this for each field that should have a different font.
- Save the custom report.
- Export the custom report to the Custom Reports database.
- Import a new copy of the custom report on to each workstation in the complex.
Adding a Graphic Logo to a Report
The preferable way to add a company logo to a SEOM report is to use the system parameter, ReportLogoLocation, which identifies the location of the image to include on a standard SEOM report.
The image should be appropriately sized (1 inch X 1 inch) before setting the parameter. ReportLogoLocation is available as a Special (Cart-Based) parameter, so if there is more than one shopping cart defined within a single store data file, the paperwork for each cart can be branded with their own distinct logos.
For the adventurous types that like to do things the hard way, this example describes how to add a logo to a report instead of using the ReportLogoLocation parameter.
- From the design view of the report, select Insert then Picture from the Microsoft Access Menu bar.
- Browse to the desired image, select it and click OK.
- The image now appears on the report. Note: Images must be sized properly before importing them. You cannot re-size an image once it is imported.
- Click on and drag the image to the desired location. If necessary, move or re-size other fields so that they do not overlap the image.
- To re-size a text box, such as the address info, select the field, click the appropriate “Handle Bar” and drag the box to the proper size and position.
- Do not delete fields on an existing report, hide them instead.
Hiding a Field in the Report
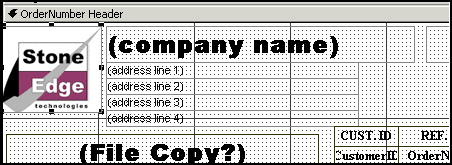
If you do not want to display a particular field, such as company name, it should be hidden rather than deleted from the report.
- Locate the report and open it in Design View.
- Right-click on the desired field and click Properties.
- In the Properties window, select the ALL tab, as seen in the image below.
- Scroll down the list to the Visible field.
- Enter or select NO from the drop-down list.
- Close the Properties window.
- Save the report and export it to the Custom Reports database.
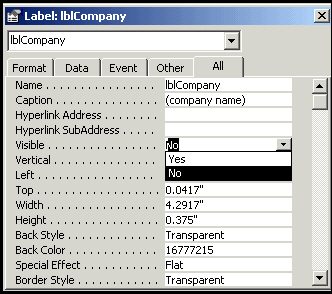
Field Properties window