
Adding an Option List
- Go to the Main Menu>Manage My Inventory>View & Manage My Inventory>Attributes& Options tab.
- Navigate to the desired product record.
- Select the Add Option List button.
- Enter a name for the Option List in the List Name field.
- Optional: The Prompt field pertains only to a Miva Web store and entering or changing the value in this field has no affect on the Web site.
- Optional: The Image Path field contains the path to the image of the product at the Web site.
- Optional: If this Option List (attribute) does not have options associated with it, enter modifiers that should be added to the base Price, Cost or Weight fields of the inventory item when this attribute is purchased. These fields are set to zero by default, and will not be used if options are assigned to this attribute.
- Optional: Choose the type of control that will be used to display the options in the list to the user when an order is being placed (Miva Merchant only):
- Drop-list
- Radio Buttons
- Check Box
- Text Field
- Text Area
- Optional: If it is necessary to choose an option from this list when ordering the product, select the box labeled Required.
- Optional: Select the box labeled Use when building Sub-SKUs to have the options in the selected Option Lists appear as part of the subSKU when building subSKUSthrough this user interface. The setting of this field is only applicable if you are using a Miva Merchant cart and have installed ModStop’s Inventory Track Pro or Viking Coders Inventory Manager for real-time inventory tracking. (System parameters UseModStopInventoryTrk or UseVikingCodersInventoryMgr = TRUE)
Be aware that If sub-SKUs are built as a result of an order or product import and the XMLfile does not include order option information (WebOptionCodeDelimiter, with or without AddToSubSKUIfNoCodeDelimiter) the program sets this field to TRUE, although it is not used when building subSKUs at this user interface unless the conditions in the previous paragraph are met. Refer to system parameter HonorUseForBuildOnOrderImport.
- Select the Save button.
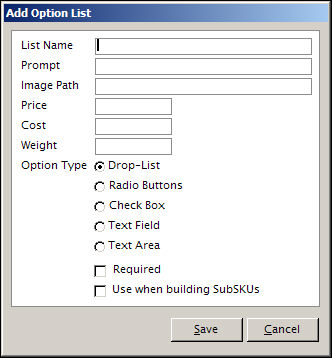
Add or Edit Option List screen
Editing an Option List
- Go to the Main Menu>Manage My Inventory>View & Manage My Inventory>Attributes & Options tab.
- Navigate to the desired product record.
- Select an Option List by clicking on its row (in the upper grid).
- Select the Edit Option List button.
- Make the necessary changes to the data in this screen and select Save to retain the changes. Select Cancel to abandon the changes.
Deleting an Option List
- Go to the Main Menu>Manage My Inventory>View & Manage My Inventory>Attributes & Options tab.
- Navigate to the desired inventory record.
- Select an Option List by clicking on its row (in the upper grid).
- Select Delete.
- The program prompts the user for confirmation before deleting the Option List and all of its Options.
- Select OK to proceed.