PM How to Run the Data Migration Utility
Contents of this Topic: ShowHide
Overview
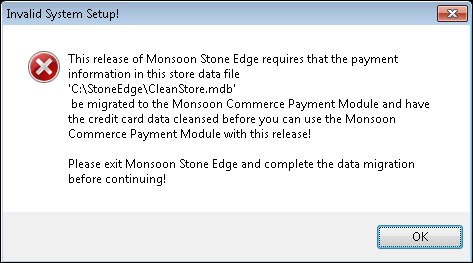
- Exit the program and follow the instructions in this topic to remove all sensitive credit card data from the data file.
- This utility can be stopped and restarted anytime before selecting Cleanse on the Convert tab.
 AuthNet Users:
- If you choose the conversion option to create customer records with AuthNet CIM, you can expect that each card is charged for a $0.01 transaction during the conversion which is immediately voided. This is due to the manner in which AuthNet validates the card information and creates the customer profile. This is not a Stone Edge issue.
Procedure
-
Create a backup copy of the Stone Edge store data file and the Payment Module database before beginning this process. These backups can be used to restart the migration process in the event of any errors during the conversion.
- This topic assumes you have already configured your Payment Accounts (gateways) and Payment Methods in the Payment Module, but if you haven't this utility allows you to stop and open the Payment Module to do so. The only drawback to defining them during this process is that the utility goes back to the beginning each time a change is made. For more information, refer to topics How to Add a Payment Account, How to Add a Payment Method, and How to Associate Payment Accounts with Payment Sources. It is recommended that you make a list of Stone Edge payment processor accounts and their credentials. This information can be found in the Credit Card and Credit Card POS system parameter groups, such as CreditCardProcessor, etc.,and is used in later steps.
- Go to c:\Program files (x86) > Monsoon Commerce > Payment Module.
- Right-click MCSEPE01.exe and select Run as Administrator.
- Log into the application as an Administrator (Payment Module User ID).
- Choose the type of store database being migrated and cleansed. Follow the instructions for the type of database you are cleansing, Access or SQL:
For an MS Access Database
-
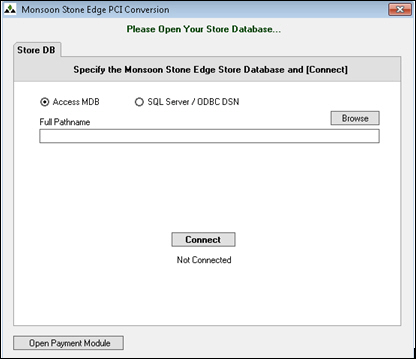
- Select Access MDB.
-
- Browse to the location of an Access database.
-
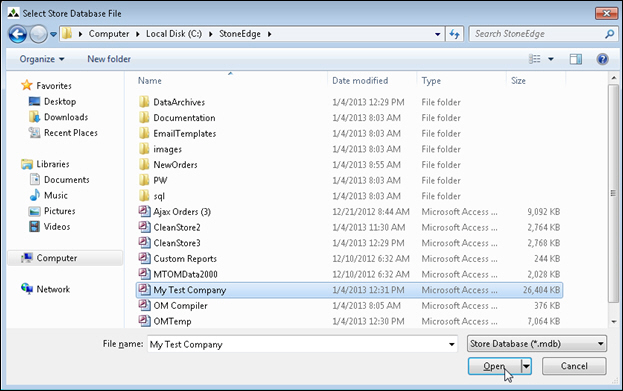
- Select the correct file and click Open.
- Click Connect. Go to step 7.
For an SQL Database
-
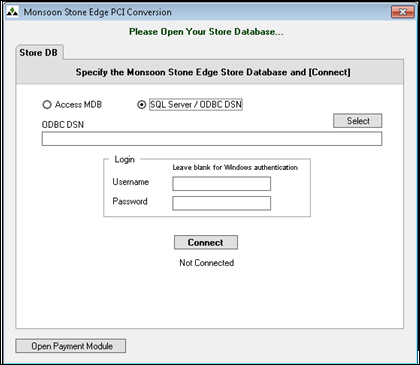
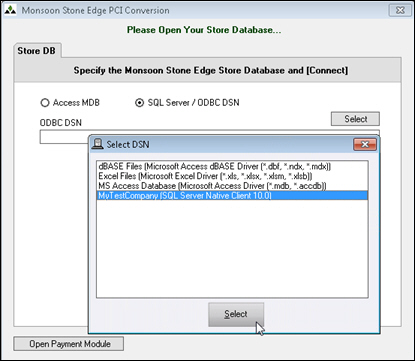
- Select SQL Server/ODBC DSN.
-
- Click Select to see a list of DSNs.
-
- Highlight the name of the appropriate DSN and click Select.
- Click Connect.
- The Processors tab of the migration utility opens and lists the payment processors (gateways) currently used by each payment source in the selected Stone Edge store file. Payment Source is a new term used in Version 7.1 and refers to Manual Orders, Point-of-Sale or individual shopping carts.
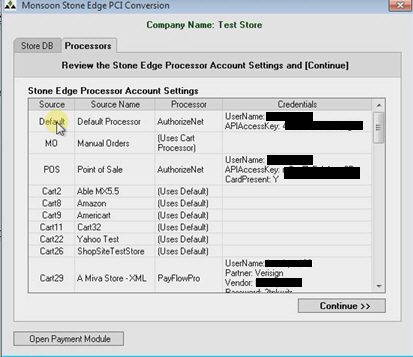
- Verify that the Sources are correctly mapped to the appropriate Processor accounts by reviewing the Credentials. If you are not sure, compare them to the values in the Stone Edge payment gateway system parameters for Manual Orders, POS or shopping carts (cart-based).
- Click Continue.
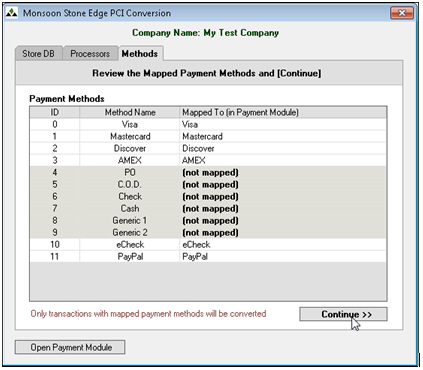
- The Methods tab opens and displays a list of Payment Methods currently defined in the selected Stone Edge store file. The program attempts to automatically map them to the Payment Methods defined in the Payment Module. The names must match exactly in both Stone Edge and the Payment Module. Only transactions associated with mapped Payment Methods are migrated to the Payment Module. If you need to change any of the mappings, click the appropriate row in Mapped To and make the appropriate selection. If you have not have not yet defined all of the payment methods you use in the Payment Module, click Open Payment Module and add them now. Be aware that after you make changes to the Payment Module at any point during this process, the utility goes back to the first tab and starts over. Your changes are reflected in the utility. Be aware that non-electronic or "transactable" payment methods, such as Cash, COD, Check are not, and should not be mapped at this screen, since those types of payments are still recorded in Stone Edge, not the Payment Module. (The same is true for Store Credit.)
- Click Continue to proceed to the The Map Processors tab, which lists the payment processors defined in the selected Stone Edge store data file.
-
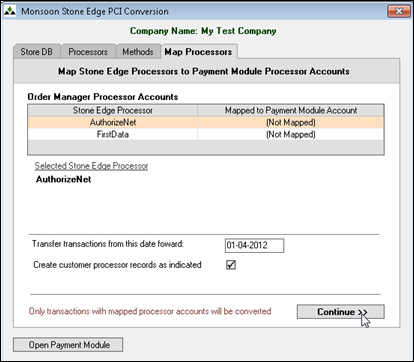
It is critical that you make sure the Stone Edge Processor Accounts are mapped to the correct Payment Module Account. Select a Stone Edge Processor and then click in the adjacent Mapped to Payment Module Account field and choose the proper counterpart from the drop-down. If you have multiple accounts with the same payment processor, such as a card present and a card not present account, you can review the credentials of the Selected Stone Edge Processor to be sure the correct one is mapped to the Payment Module Account.
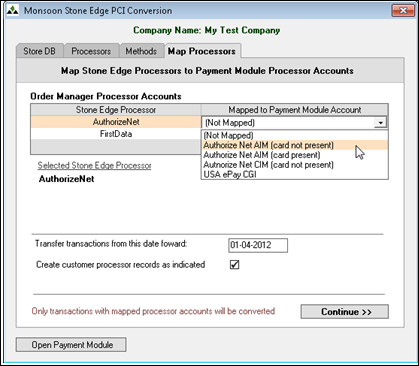
If your payment account is not yet supported by the Payment Module, such as First Data, leave it unmapped. Only transactions from mapped payment accounts are migrated to the Payment Module database. You can manage secondary transactions for those processors at their site during the return period.
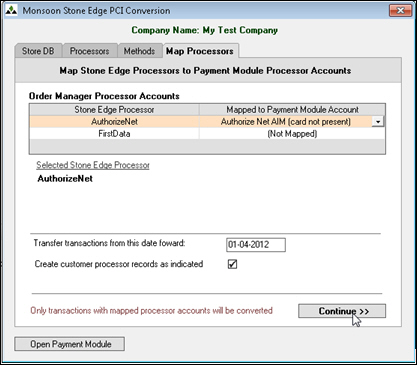
- Enter a date in Transfer transactions from this date forward. It is recommended that you only transfer transactions for your normal return period (30, 60, 90 days) to keep the length of time it takes to migrate your data to a minimum.
- If your Payment Accounts (gateways) support a customer information module, such as AuthNet CIM, select Create customer processor records as indicated to send customer information from the specified time frame to the payment processor where it is recorded in their system. Be advised that the amount of time it takes to migrate your data is also directly affected by the number of customer records being created at the payment processor.
- After making your selections, click Continue.
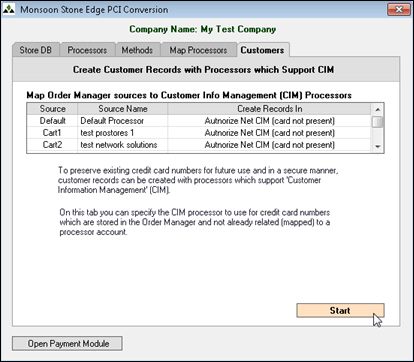
- The Customers tab displays a list of Source Names in the current Stone Edge. You can map customer information from processor accounts that do not have counterparts in the Payment Module, such as First Data, to a Payment Module payment account that has a customer information module. Customer information from the unsupported payment account is then recorded at the selected Payment Account. If the Create customer processor records as needed is not selected, any mappings on this tab are ignored. When you have made you selections, click Start to begin the data migration.
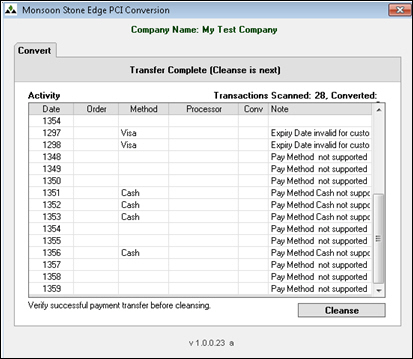
- When the process of migrating transactions and creating customer records is complete, verify the transaction data is now loaded in the Payment Module's database. The number of converted transactions is displayed on the Convert tab. Open the Payment Module and search for a range of transactions and/or open SQL Server Management Studio and check the Transactions table. Also, look in the Conv column for and transactions flagged with an N, and check the Notes column for more information, if any is available.
- When satisfied the data is migrated correctly, click Cleanse to remove full credit card numbers from the selected Stone Edge store data file. This step runs fairly quickly and alters credit card account numbers so that the first six digits and last for digits are visible, but the remainder of the numbers are replaced with the letter X. The Stone Edge credit card parameters are also removed from the system. Once a store data file is cleansed, the utility will not allow the user to repeat the process of migrating transaction data.
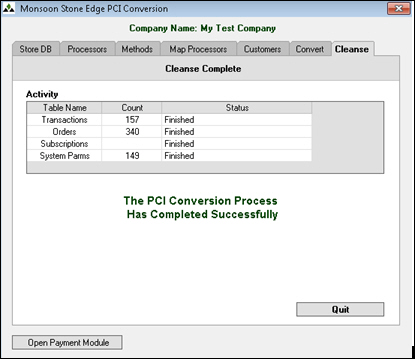
- Click Quit to end the process.
- When you are satisfied that the data was migrated successfully, securely delete the backup copy of the store data file which was made at the beginning of this procedure. The recommended tool to use is Microsoft SysInternals SDelete command. A free-ware application called Eraser can also be used. Eraser has a graphical user interface.
-
If you have other backup copies of the uncleansed store data file (onsite or offsite), securely delete them as well.
- Make a backup copy of the newly cleansed store file before resuming normal processing.
- If you have other Stone Edge store data files you wish to keep, repeat the instructions in this topic for each one.
- You are now able to process transactions through the Payment Module.
Additional Information
How to Add a Payment Account
How to Add a Payment Method
How to Associate Payment Accounts with Payment Sources
MCPM Concepts
Main Menu
Monsoon Commerce Implementation Guide
Created: 1/4/13
Revised: 12/18/13
Published: 04/13/2016


