Order Manager
Version 8
Order Manager
Version 8
Contents of this Topic: Show
The Monsoon Order Manager purchase order system is used to replenish your stock. Purchase orders are created and invoiced in the Monsoon Order Manager but are received in the Monsoon Fulfillment Manager when the merchandise arrives at the warehouse.
Purchase orders for regular inventory can be created manually, or they can be generated by the program based on information you provide. If you have the program generate purchase orders, you are still able to manually change the data before the purchase order is created and sent.
When creating purchase orders manually, you can either select items individually or use the multi-select screen to add multiple items to a purchase order at once.
Drop-ship purchase orders are not in the scope of this topic. Refer to the topic about Drop-Ship Purchase orders for more information.
To open the Purchase Orders screen, go to Main Menu>Manage My Inventory>Manage My Purchase Orders.
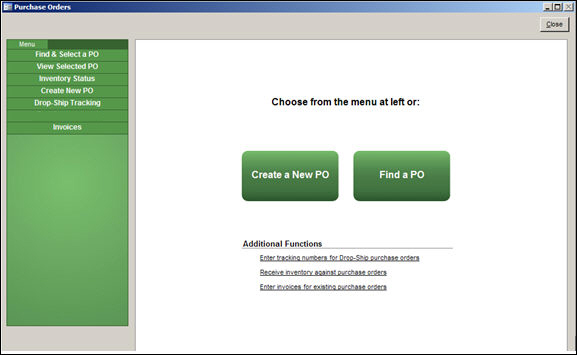
When the Purchase Orders screen first opens, it does not display existing purchase orders, but instead lists several common actions related to Purchase Orders.
Select either Find PO or select Find & Select a PO in the Accordion.
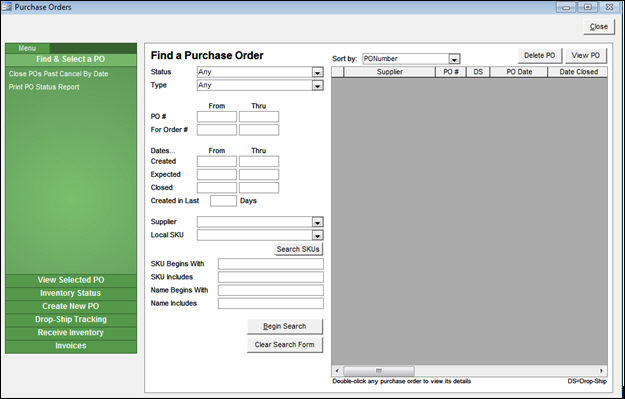
Purchase Orders screen - Find a Purchase Order tab
Select Clear Search Form to view all purchase orders in the system or enter criteria in the other fields on the screen to filter the list of purchase orders. For example, enter a single purchase order number or a range of numbers in the From and Thru fields on the PO# line.
Select Begin Search. To remove the filter, select Clear Search Form.
Select a purchase order in the list and select View PO to see its details. double-clicking in the fields of a purchase order in the list opens it in detail view as well.
Monsoon Order Manager can calculate the quantities to add to new purchase orders for items from a single supplier or all suppliers, based on the information provided in the Reorder Point/ReorderQuantity, Target Quantity, or Target Quantity/ReorderPoint fields (the fields depend on the setting of system parameter POCalcMethod).
If you select All Suppliers, the program creates a separate Purchase Order for each supplier which display the items and quantities to be ordered. You can then review and modify the data prior to actually creating and sending the purchase orders to the suppliers.
The automatic PO generation process only works for products that have a "primary supplier" designated on their product inventory record in Monsoon Order Manager. Products without a "primary supplier" can only be added to purchase orders manually.
The program reviews the following factors for each product when generating Purchase Orders:
Quantity on Hand
Quantity needed for any un-filled orders (Backorders)
Quantity already ordered from your suppliers, but not yet received (On Order)
Supplier minimum order quantity and other purchasing rules
The program provides three methods from which you can choose to determine how items are selected as candidates for a purchase order.
The quantity of each item added to the purchase order is determined by the values specified in the reorder information fields in the product's inventory record, which depend on the setting of system parameter POCalcMethod. (Order Quantity, Target Quantity, Delayed Target).
Whichever selection method you use, the Create POs Automatically function still allows you to manually edit and add items to the proposed purchase order prior to sending them to suppliers.
Displays the Target Qty field on the inventory record, which is the quantity you wish to have in stock at all times.
For example, if you want 10 pieces of an item on the shelf at all times and you sell 2 pieces so there are now 8 pieces on the shelf, the purchase order system automatically reorders 2 pieces to return the stock level to 10.
Displays the Reorder Qty field on the inventory record, which is the number of pieces to order when an item reaches or drops below its Reorder Point.
Displays the Reorder Point field on the inventory record, when the number of units currently in stock reaches or drops below this level, the program adds the number of units = to the Reorder Qty to the purchase order.
For example, if an item reaches or drops below its reorder point of 2 (there are 3 pieces on the shelf and you sell 1), the system orders the reorder quantity. Also, if you elect to consider back orders when auto-generating purchase orders, the sum of the units needed for back orders in a given time frame plus the item's Reorder Qty is added to the purchase order.
Displays the Target Qty. and Reorder Point fields on the inventory record.
The Delayed Target setting works similarly to the Target Quantity setting except that the system does not place an order until the inventory level drops below the Reorder Point.
For example, if your Reorder Point is 2, your Target Qty. is 10 and you sell 2 pieces leaving 8 pieces on the shelf, the purchase order system does not place an order for the product until the inventory level reaches 2, in which case it orders 8 pieces to return the stock level to 10.
If you have items in your inventory that you purchase from your supplier as a "lot", then you must set Supplier Purchasing Rules before Monsoon Order Manager can correctly generate a purchase order and track inventory for lot items.
This information may have been added already when you imported your inventory during program setup, or manually added individual items.
Go Main Menu>Manage My Inventory>View & Manage My Inventory.
Scroll through the records using the Record: navigational arrows or Search for specific product records.
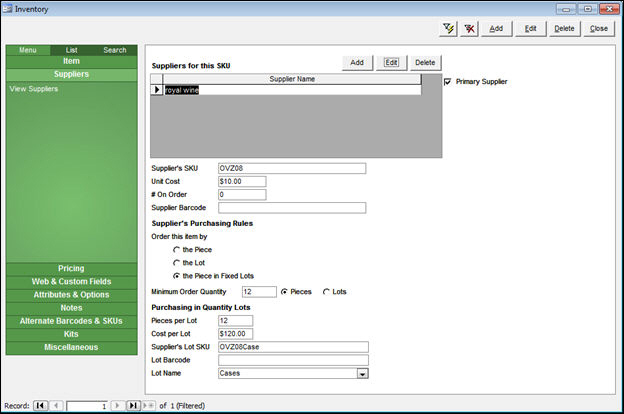
Select the Suppliers tab.
To make changes to the information in the Supplier's Purchase Rules section of the screen, select Edit (above Suppliers for this SKU) to open the Edit Product Supplier screen.
Choose by the Piece (default setting), by the Lot, or by the Piece in fixed Lots (this is not typical). The difference between purchasing in "lots" and "by the piece in fixed lots" is how you, or your vendor, want the line item to display on the purchase order – by the number of units (singles) or the number of lots (cases).
If the supplier of this item has a Minimum Order Qty., enter that number in the field. If you must order this item by the lot, select Lots, otherwise leave it set to Pieces (default setting).
In the Purchasing in Quantity Lots box, enter the Pieces per Lot and Cost per Lot.
Select Save when finished.
In this example, a merchant sells wine by the bottle, which the vendor requires he purchase by the Lot, (case) with a minimum order quantity of 1. Should the Auto PO System determine that the merchant needs to order 8 bottles of wine to meet his target quantity on hand, it orders a quantity of (1) Lot because this SKU must be ordered in lots of 12 bottles. The Auto PO System places one Lot (1 case) on the purchase order (instead of 12 bottles) because this SKU is ordered "by the Lot."

In this example, the merchant sells wine by the bottle, which he must purchase by the Piece in fixed Lots (cases). Should the Auto PO System determine that the merchant needs to order 8 bottles of wine to meet his target quantity on hand, it increases the order quantity to 12 units because this SKU must be ordered in fixed lots of 12 bottles. The Auto PO System places 12 units on the purchase order (instead of 1 lot or case) because this SKU is ordered "by the Piece in fixed Lots."
At the Purchase Orders screen, select Create a New PO, or select the Create New PO tab in the Accordion. View Image
Select Automatically to reorder items based on target quantities, reorder points and reorder quantities. View Image
Select the method to determine the scope of products that are ordered:
Needed SKUs – only those items the program determines are needed, based on the data in the field used by the purchase order calculation method, are added to the purchase order
All SKUs – order all items in your inventory based on the Target or Reorder Quantity of each item. If the target or reorder quantity is already met, the program adds the supplier's Minimum Quantity to Order to the purchase order. Be aware that the program adds a quantity of zero to the purchase order for items which do not have a supplier minimum set, which can happen when items are imported from a shopping cart or through a text file import.
Refills – order items based on historical sales data (For example, if there is less than a 30 day supply, bring the QOH up to a 60 day supply, based on the last thirty day's sales or a specific date range. The program calculates the average number of items sold per day in that period. You can then order an "X- Day" supply based on that rate.) Refill calculations do not consider the reorder or target information, just the sales data, so the results are the same regardless of the setting of POCalcMethod.
Select the suppliers for whom purchase orders are generated:
Selected Supplier – creates a single purchase order for the selected supplier (to be added to the purchase order, items must have the selected supplier designated as their Primary Supplier)
All Suppliers – creates a separate purchase order for the suppliers of the items on the purchase order
Select the Warehouse for which you want to generate purchase orders.
You can also enter a string of characters in Limit to SKUs that start with to filter the products which are added to the generated purchase order(s).
The program automatically assumes you want to consider back orders for the last 30 days, unless you clear that value or enter a different value in Include backorders from last___ days.
If Refills is selected as the scope for creating purchase orders, many additional fields become visible.
the If there is less than a ___ day supply..., and ...raise the QOH to a ____day supply fields are used to determine which items are needed to cover expected sales in a given timeframe
Base sales on Last ___ days or Date Range fields are mutually exclusive, but one of them must contain data to define the sales history period
Optionally, you can Increase, or Decrease the sales estimate by a specified Percent or by a specific number of Units.
Enter a value in Date Expected to indicate when you anticipate the merchandise will arrive from the supplier or use the Calendar icon to select the date.
Select Sales Include Externally Fulfilled Item if sales data should include orders for items that are fulfilled by an external third party, such as Fulfillment by Amazon.
Once all of your choices are made, select Add to order.
Show Details is selected on the right side of the screen which now lists the prospective items and quantities to be added to one or more purchase orders. The Qty. to Order and Unit Cost of each item can be changed here, if necessary. Select an item from the list and select Delete to prevent it from being added to the purchase order.
To see the data by individual purchase order, select Show POs. You can enter any special instructions or details for each PO here. Use the Record: navigational arrows to scroll between purchase orders.
Select Preview to see the actual purchase order that will be sent to the supplier.
Optional: select Start Over to delete the proposed purchase order data and begin the process again. Respond OK to Delete all information from Items to Order and start over?
If you are satisfied with the proposed purchase order data, select Create to generate the purchase order(s).
Respond Yes or No to Would you like to send the PO to your supplier? Yes results in the purchase order being printed, faxed or emailed to the supplier based on the settings in the Supplier record.
Respond Yes or No to Print file copies? Yes sends each purchase order to the printer for your records.
Select OK to acknowledge the process is Done!
At the Purchase Orders screen, select Create a New PO, or select the Create New PO tab in the Accordion.
Select Manually by item.
Select an entry from Local SKU or Item Name.
Adjust the Quantity up or down by using the arrows or entering a value.
Optional: Select a Supplier. The Primary Supplier is selected by default.
Optional: Enter the Monsoon Order Manager order number for which the item is being ordered.
Optional: Enter the Date Expected (when the item arrives from the supplier)
Select Add to order. The item or items being ordered appear in the right-hand side of the screen.
Optional: Make changes to the Qty. to order or Unit Cost fields. Select an item from the list and select Delete to prevent it from being added to the purchase order.
Optional: select Show POs to see the individual purchase orders. Use the Record: navigational arrows to scroll between records. It is possible to add more information in Instructions, Comments, Terms, and other fields displayed here.
Optional: select Preview to see the actual purchase order that is sent to the supplier.
Optional: select Start Over to delete the proposed purchase order data and begin the process again. Respond OK to Delete all information from Items to Order and start over?
If you are satisfied with the proposed purchase order data, select Create to generate the purchase order(s).
Respond Yes or No to Would you like to send the PO to your supplier? Yes results in the purchase order being printed, faxed or emailed to the supplier based on the settings in the Supplier record.
Respond Yes or No to Print file copies? Yes sends each purchase order to the printer for your records.
Select OK to acknowledge the process is Done!
At the Purchase Orders screen, select Create a New PO, or select the Create New PO tab in the Accordion.
Select Manually from list.
Select Find items to add.
Enter data in the fields or choose other controls on the screen to limit the products listed in the Select Items to Add screen. Press Enter.
Enter the quantity you want to order of each product in # to Order.
Select OK and return to the Create New PO tab to review the potential purchase orders in Show POs view.
Optional: Use the Record: navigational arrows to scroll between records. It is possible to add more information in Instructions, Comments, Terms, and other fields displayed here.
Optional: select Show Details to make changes to the quantity or cost of items to be ordered.
Optional: select Preview to see the actual purchase order that is sent to the supplier.
Optional: select Start Over to delete the proposed purchase order data and begin the process again. Respond OK to Delete all information from Items to Order and start over?
If you are satisfied with the proposed purchase order data, select Create to generate the purchase order(s).
Respond Yes or No to Would you like to send the PO to your supplier? Yes results in the purchase order being printed, faxed or e-mailed to the supplier based on the settings in the Supplier record.
Respond Yes or No to Print file copies? Yes sends each purchase order to the printer for your records.
Select OK to acknowledge the process is Done!
Created: 7/19/12
Revised: 7/6/`5
Published: 08/19/15