
Overview
- Steps to setting up email within Stone Edge
- Most popularly used for sending tracking emails
- Can send individual and bulk emails
Prerequisites
- Email with SMTP enabled
- Typically, does not work with 2-factor auth or multi-auth
- Needs to be enabled for the organization and the specific account being used
- Email templates
- Click i on Main Menu to view the filepath to email templates
- Click HERE to learn about editing email templates
Set up with Store Setup Wizard
- Main Menu -> Settings (Gear Icon) -> System Functions -> Store Setup Wizard
- Click “Email”
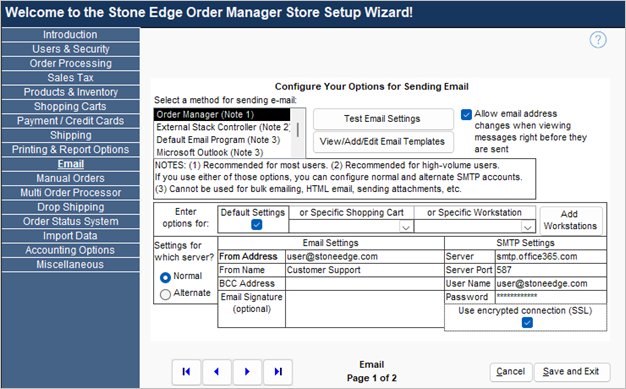
- Select the method to send email:
- Order Manager -> Default; managed within Stone Edge
- External Stack Controller -> Managed outside of Stone Edge
- Default Email Program -> Uses default Windows email program
- Microsoft Outlook -> Can be used with Microsoft email
- Typically requires Outlook to be open
- Email Settings
- From Address -> email address the email will be sent from (part of email header)
- From Name -> name/alias connected to from email address (part of email header)
- BCC Address -> optional email address to send a BCC copy of all emails (customer will not see this)
- Email Signature -> optional message at the end of the email (part of the email body)
NOTE: Only applicable when not using the email template
- SMTP Settings
- Server -> A URL to connect to your email’s SMTP service
(Example: smtp.office365.com) - Server Port -> A number provided by your email service (Examples: 25, 465, or 587)
- Username -> Can be the “from address” or specified by your email service
- Password
- If you’re using the “from address,” use the password to access your email
- Otherwise, it will be provided by the email service
- Use encrypted connection -> Enable (most modern email services require this setting)
- Click “Save and Exit” to save
- Reopen the Store Setup Wizard and navigate back to the Email tab
- Click “Test Email Settings.”
- Email will try to send to the email designated as “From Address.”
- Server -> A URL to connect to your email’s SMTP service
Setting up Using only System Parameters
- Main Menu -> Settings (Gear Icon) -> System Functions -> Set System Parameters
- Parameter Group = Email
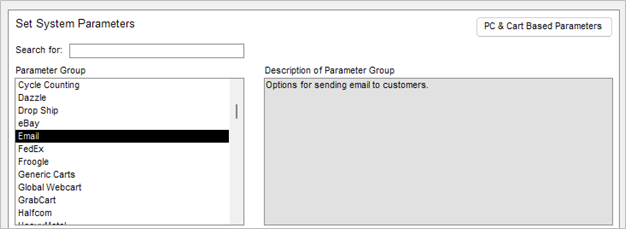
- Set the following:
NOTE: Description in “Parameter Details” section when selecting- EmailSendMethod
- EmailFromAddress
- EmailFromName
- EmailEmailBCCAddress
- EmailSignature
- SMTPServer
- SMTPPort
- SMTPUsername
- SMTPPassword
- SMTPUserTLS
- Setup can be checked through the Store Setup Wizard,
- or try emailing a customer (change to address beforehand)
Optional Settings
- For setting the email template folder location:
- Using an Access database: EmailTemplateLocation
- Using a SQL database: SharedFileLocation
- Other Parameters
- EmailReplyTo -> address populated when customer replies to email sent through SMTP
- AddNoteWhenEmailSent -> add note to order when email sent = True
- AddEmailToNotes -> adds email body to note when above parameter is enabled
- AllowChangeEmailAddress -> allows recipient address to be changed when sending individual emails (not for bulk email sending)
Basic Troubleshooting
- Test Email not successful or received an error message
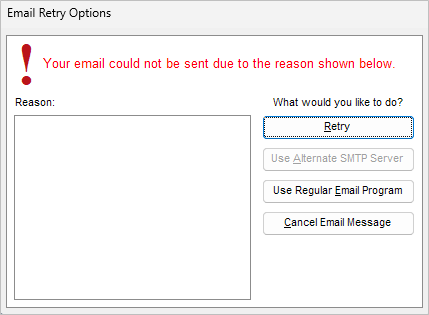
- Check email SMTP is enabled for the specific email account
- Check username and password are correct (usually error 535)
- Cart/Workstation Specific email settings
- Can be set by changing dropdown options in Store Setup Wizard

- Or by using PC & Cart Based Parameters in System Parameter menu
- Can be set by changing dropdown options in Store Setup Wizard