
Version 8 FM
Version 8 FM
Contents of this Topic: Show
Go to Main Menu>Manage My Inventory>View & Manage My Inventory>Inventory.
Select Add to create a new record for a SKU to be designated as an Assembly in a later step. While it is possible to select an existing inventory record and define it as an Assembly, the recommended practice is to create a new SKU whenever a new combination of products will constitute an Assembly.
Select Save to create the new inventory record.
Select Close to exit the Inventory screen.
Go to Main Menu > Settings > Inventory Functions > Assemblies.
Select the product SKU (inventory record created in the previous section) in Assembly SKU, use Search to locate the correct inventory record and select it, or you can also type it in.
Next, enter or select an inventory item to be a component of the Assembly in SKU to Add. The adjacent Search button can also be used to add a SKU to the SKU to Add combo box.
Enter the number of units needed for the Assembly in Qty to Add.
Select Add.
Repeat steps 3 through 5 as many times as necessary until all components are added to the new Assembly SKU.
Alternately, you can Copy from another Assembly SKU to add its components to the new Assembly SKU. If necessary, select each component individually in Parts in this Assembly to change its quantity.
Go to Inventory>Build/Break Assemblies.
If this is a new assembly SKU, verify it exists in the Fulfillment Manager by scrolling through the list of Assembly SKUs, or entering its name in the Search field. If the SKU is not yet received from Order Manager, try again later, allowing time for the Sync Manager system tasks on both ends to execute.
If you are working with an existing assembly SKU, select it from the list, type its name into the text box, or use Search.

To print barcode labels for each of the Assemblies being built, select Print barcode labels. To only print barcode labels for some items, scroll to the right and clear the check box in the Print column of those you do not want to print.
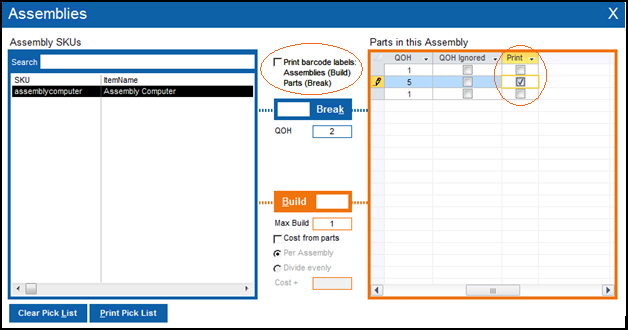
Once an entry is selected in the Assembly SKU combo box, the program calculates the number of Assemblies that can be built from the existing QOH of all components in Max Build.
Enter the number of Assemblies to build, up to the value of Max Build, and enter that value in Build.
Select Build. The program calculates the new quantity on hand figures for the Assembly SKU and each of its individual components, which can be seen in Parts in this Assembly.
Select X to exit the Assemblies screen.
Open Assemblies screen by going to Inventory>Build/Break Assemblies.
Select the Assembly SKU to be broken-down into its components from the list, or use Search to locate it.
To print barcode labels for each of the components, select Print barcode labels. To only print barcode labels for some items, scroll to the right and clear the check box in the Print column of Parts in this assembly..
Once a SKU is selected in Assembly SKU, the program displays its current QOH.
Based on the available QOH of the Assembly SKU, enter the number of Assemblies to break into their components in the Break text field.
Select Break.
Select X to exit the Assemblies screen.
Created: 3/20/12
Revised: 6/24/15
Published: 9/17/13