![]()
Version 7.0
![]()
Version 7.0
Contents of this Topic: Show
SEOM allows the user to manually create a note or task to record miscellaneous information about an order, customer, supplier or product in the program so it can be viewed by other users.
Notes that are not associated with any particular record type may also be created.
A note can be assigned as a Task to another user.
Notes are intended for internal use only.
The program can be configured to automatically create and associate a note with an order, supplier, customer or inventory record when a particular event has occurred.
Search for system parameters that include "note" in their names and review the parameter comments to determine which settings are appropriate for your business environment. For example, if AddEmailToNotes is set to TRUE, the program will add a note to any record for which an email was sent. Review the Notes tab of the particular record type to see the time and date the email was sent, as well as the text of the message.
To enter or access a note, select the Notes tabs on the Process Orders, Customers, Inventory, or Suppliers screens.
Another method of viewing Notes is by clicking the Tasks button on the Main Menu or by using the keyboard shortcut, Ctrl+Shift+T, both of which open the View Notes & Tasks screen. Refer to its Knowledge Base topic for an explanation of the fields on that screen.
When a field on the Add Note screen is clicked, the program displays a text explanation of the purpose of that field.
Go to one of the following locations to enter a note:
Main Menu>Tasks button>View Notes & Tasks>Add button
Main Menu>Accordion>Process My Orders>View and Process My Orders>Notes tab>Add button
Main Menu>Accordion>Manage My Customers>View & Manage My Customers>Notes tab>Add button
Main Menu>Accordion>Manage My Inventory>View & Manage My Inventory>Notes tab>Add button
Main Menu>Accordion>Manage My Inventory>Manage My Suppliers>Notes tab>Add button
Navigate to the appropriate record, if adding a note to an order, customer, supplier or inventory record. If adding a note that does not pertain to a specific record type, skip this step.
Click the [Add] button. The Add Note screen opens:
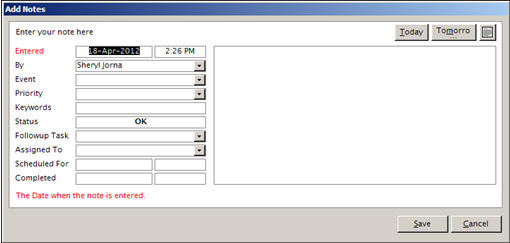
Add Notes Screen
The date and time fields are populated, based on the settings of the internal clock of the current workstation.
If the security system has been configured, the name of the current user will appear in the By field. This drop down list contains a list of users that have been defined in the security system.
Optional: An Event describes the reason for the note, e.g. Sales Inquiry or Media Inquiry. Choose an Event from the drop-down list of the same name. It is possible to type a new event name in this field, or the drop-down list can be pre-populated via List Maintenance - Note Events. The latter is recommended if the user ever intends to use this data in a query or report.
Optional: Make a selection from the Priority drop-down list, e.g. 1, 2, or 3 or High, Medium or Low. It is possible to type a new event name in this field, or the drop-down list can be pre-populated via the List Maintenance feature of the program (Note Priority Codes). The latter is recommended if the user ever intends to use this data in a query or report.
Optional: Enter a value in the Keyword field that will help to locate the note in the future. This field is not managed by the List Maintenance feature.
Enter narrative information about the note in the Enter your note here: field.
Click the [Save] button to retain the note in the program. The note appears in the list in the right-hand pane.

Notes tab of the Customers, Process Orders, Inventory or Suppliers screens
Click [Cancel] to abandon the data entered on this screen without creating a note or task.
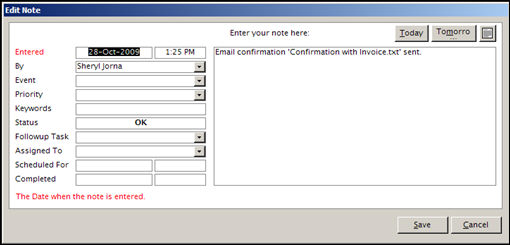
When a field on the Edit Note screen is clicked, the program will display a text explanation of that field.
The Edit button is not visible if the system parameter AllowEditNotes is set to FALSE.
Go to one of the following locations to edit a note:
Main Menu>Tasks button>View Notes & Tasks>Add button
Main Menu>Accordion>Process My Orders>View and Process My Orders>Notes tab>Add button
Main Menu>Accordion>Manage My Customers>View & Manage My Customers>Notes tab>Add button
Main Menu>Accordion>Manage My Inventory>View & Manage My Inventory>Notes tab>Add button
Main Menu>Accordion>Manage My Inventory>Manage My Suppliers>Notes tab>Add button
Navigate to the appropriate record, if changing a note associated with an order, customer, supplier or inventory record. If changing a note that is not associated with a specific record type, find it by using the Search for Notes screen.
Select the note in question.
Click the [Edit] button. The Edit Notes screen opens:
Edit Note screen
Make the necessary changes to the note.
Click the [Save] button to retain the changes made to the note.
Click [Cancel] to abandon the data entered on this screen without updating a note or task.
Go to one of the following locations to respond to a note:
Main Menu>Tasks button>View Notes & Tasks>Add button
Main Menu>Accordion>Process My Orders>View and Process My Orders>Notes tab>Add button
Main Menu>Accordion>Manage My Customers>View & Manage My Customers>Notes tab>Add button
Main Menu>Accordion>Manage My Inventory>View & Manage My Inventory>Notes tab>Add button
Main Menu>Accordion>Manage My Inventory>Manage My Suppliers>Notes tab>Add button
Navigate to the appropriate record, if responding to a note associated with an order, customer, supplier or inventory record. If changing a note that is not associated with a specific record type, find it by using the Search for Notes screen.
Select the note in question.
Click the [Reply] button. The Add Note screen opens:
Add Notes Screen
The Add Note screen opens and the default Followup Task is Read this note, but that can be changed by the user, if desired. Enter pertinent data in any of the fields, such as adding a completion date, changing the Scheduled For date, or adding more information about the situation in the note text field.
Click the [Save] button to retain the information that has been added.
Click [Cancel] to abandon the reply.
The Delete button is hidden if system parameter AllowDeleteNotes is set to FALSE.
If a Note has any associated Replies, it cannot be deleted.
Go to one of the following locations to delete to a note:
Main Menu>Tasks button>View Notes & Tasks>Add button
Main Menu>Accordion>Process My Orders>View and Process My Orders>Notes tab>Add button
Main Menu>Accordion>Manage My Customers>View & Manage My Customers>Notes tab>Add button
Main Menu>Accordion>Manage My Inventory>View & Manage My Inventory>Notes tab>Add button
Main Menu>Accordion>Manage My Inventory>Manage My Suppliers>Notes tab>Add button
Navigate to the appropriate record, if responding to a note associated with an order, customer, supplier or inventory record. If responding to a note that is not associated with a specific record type, search for it by the Search for Notes screen.
Select the note in question.
Click the [Delete] button.
The program will prompt the user to confirm the deletion of the note prior to performing that action. Click [OK] to proceed or [Cancel] to abandon the action.
Go to one of the following locations:
Main Menu>Tasks button>View Notes & Tasks>Add button
Main Menu>Accordion>Process My Orders>View and Process My Orders>Notes tab>Add button
Main Menu>Accordion>Manage My Customers>View & Manage My Customers>Notes tab>Add button
Main Menu>Accordion>Manage My Inventory>View & Manage My Inventory>Notes tab>Add button
Main Menu>Accordion>Manage My Inventory>Manage My Suppliers>Notes tab>Add button
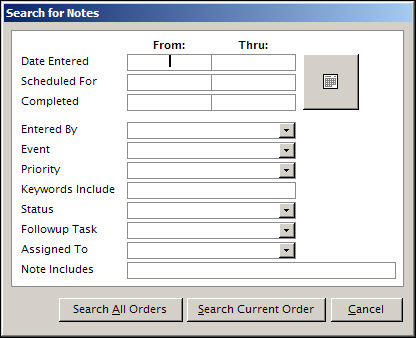
Click the [Search] button. The Search for Notes screen opens:
Search for Notes screen
Enter the known search criteria in the appropriate fields. Refer to the Search for Notes Knowledge Base topic for more information.
Click the Search All _____ or Search Current _____ button to begin the search. The buttons' labels depend on the location in the program from which this screen was called, such as the Inventory, Customer, Supplier or Orders screens.
The results of the search are displayed in the right-hand pane. Use the navigational arrows at the bottom left-hand side of the screen to scroll between matching records.
AddEmailToNotes - When set to TRUE, SEOM stores the body of an email in a note; AddNoteWhenEmailSent must also be set to TRUE.
AddNotesForStatusChanges - When set to TRUE, each time the status of an order or a line item changes, SEOM adds a note to the order record; UseStatusUpdates must be set to TRUE.
CarryForwardAddNotes - set to TRUE to have a note added to the order whenever a balance or credit is carried to another order. Notes will be recorded in the originating and subsequent orders.
UPSShipmentAddNotes - set to TRUE to have the system add a note to an order when shipments are processed.
VerifyAddToNotes - When set to TRUE and VerifyAddressesAtImport is set to TRUE, SEOM verifies domestic addresses with the United States Postal Service (USPS) and, if it finds a discrepancy, stores the original and revised addresses in a note in the order record.
Click the View Outgoing Email button to display an email associated with the selected note (if one has been sent).
If a note is added because the program sent an out-going email, the text of the note will include the To:, cc: and bcc: addresses to which the email was sent.
Notes are color-coded as follows:
Blue text on a light blue background: note has a follow-up task due on the current date.
Red text on a light blue background: note has a follow-up task that is over-due.
Pink text on a white background: note is included in the search results.
Created: 1/24/11
Revised: 6/11/12
Published: 04/13/16