
Order Manager
Version 8

Order Manager
Version 8
Contents of this Topic: Show
The Report Menu provides easy access to both standard reports (those supplied with the program) and custom reports (those which have been created by the user or a third-party).
You are able to add the most frequently used reports to a Favorites list, which are be grouped together at the top of the reports list.
Reports can be previewed using different templates without having to change the related system parameter.
Select your filtering criteria for most reports on the right side of the screen.
As of 8.010, the report preview window can be re-sized for all reports except the Sales by Salesperson report.
To access the Report Menu, go to:
Main Menu>Report My Reports>Run My Management Reports
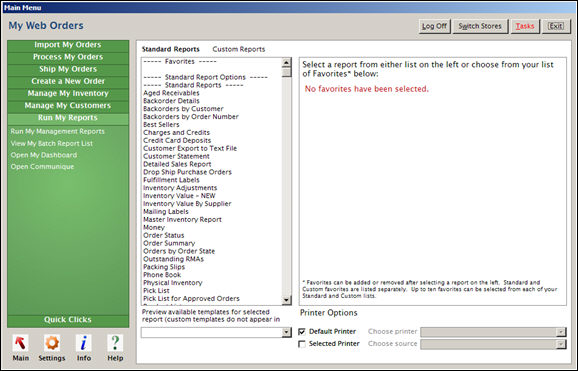
Report Menu: Standard Reports tab
On the left-hand side of the form there are two tabs, one that lists any Custom Reports that have been added to the system, and one that lists the Standard Reports that are provided with the program. The Standard Reports tab is the default view of this screen when it is initially opened.
Below the Standard Reports tab is a drop-down box that allows the user to select the template (format) of the report that is to be viewed. Some reports have multiple templates, while others only have a single format. If a report has more than one format, they will all be listed in the drop-down. If a report only has one format, that will be the only item in the drop-down.
The right hand side of the screen lists the Favorites when the screen is first opened, and it is also the location where the data filter for each report will be seen, once a report has been selected from the left-hand pane.
At the bottom right-hand side of the screen are the Printer Options, where the user can control the output destination of the report.
You can assign up to ten reports to a “Favorites” group in both the Standard and Custom report lists.
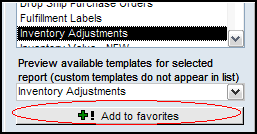
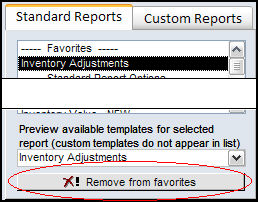
Reports can be added to the Favorites list by selecting them individually from the Standard or Custom Report lists and selecting the Add to favorites button that appears below the Preview available templates for selected report drop-down list:
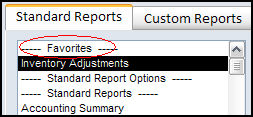
The report will then be displayed under the Favorites header in the list of reports:
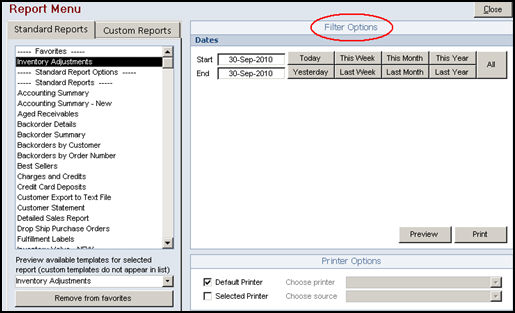
Favorites are also listed in the right-hand pane of the Report Menu when the form is first opened or when the Favorites link on the Standard Reports or Custom Reports tabs is selected.

The report can be run from either location circled in the image above. Once a report has been selected, the Filter Options for that report are displayed in the right-hand pane.
The reports that are included with the purchase of the program are collectively referred to as the Standard Reports.
They can be used as they are supplied or they can be customized for the business. Refer to the Knowledge Base article, Create a Custom Report from a Standard Report, for more information.
Most of the Standard Reports also offer several parameter-driven formats. The format, or template, of a report can be selected from the drop-down box below the list of reports:
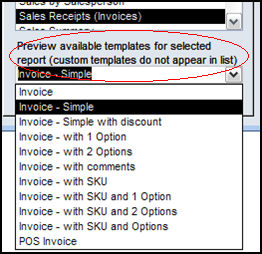
The user may choose to print a standard report in any of its template formats directly from the Report Menu. select on a report to see the possible variations in the drop-down list or review the system parameters in the Reports group to see the available standard templates for invoices, packing slips, labels, etc. Select a report in the Parameters in Selected Group box and then select the arrow in the Select or Enter your choice drop-down list. Refer to Set System Parameters, for more details.
If the user has already chosen to use a custom template for one of our standard reports via a system parameter, that template will appear as the selected template when the report is first chosen from the list, however, custom templates do not otherwise appear in the template drop-down list. If a template other than the custom template specified in the system parameter is temporarily chosen from the template drop-down list, it is possible to revert to the original setting (custom template name) by selecting the appropriate report name in the list of Standard Reports once again.
NOTE: Choosing a template from the Preview available templates drop-down list does not constitute a permanent change. The change is only in effect during the current viewing or printing session. To permanently change the default template that will be used for a specific report, the corresponding system parameter must be changed.
After choosing a report to print, a data filter form will appear, depending upon which report is selected. Some reports do not have filters and others, such as the “Customer Export to Text File", will open a separate filter form. The filter for the Customer Statement report looks like this:
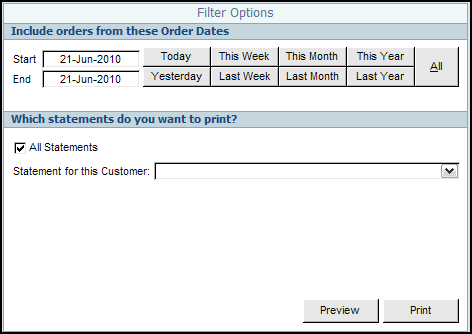
Select Preview to display the report results on screen, or Print to send the report directly to the designated printer.
If a custom template is being used with one of our standard reports, the following screen will appear, after the report has been selected:
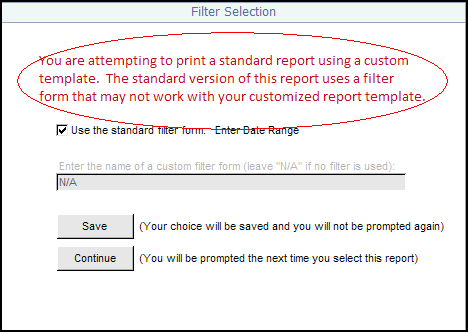
The message, circled in red above, basically means that the custom report may or may not function with the default filter form assigned to the standard report template. If you know that the report still uses the standard filter, leave the check box marked. If you know that the customized template uses a filter other than our standard filter, unmark the check box and enter then name of the correct filter form in the available text field. To test that change without making it permanent, select Continue. This will allow you to print the report using the options you have selected, but these choices will appear each time you run the report. If you are certain the report functions normally with the choices you have made on this form, select Save and you will not be prompted to make the choices again.
Back Order Reports. Use these reports to view the items currently on back order (needed). There are four different formats:
Back Order Details – Breaks down the quantity needed for each order organized by SKU
Back Order Summary – Summarizes each SKU and total needed based on a date range
Back Orders by Customer – Lists each customer awaiting back ordered products; sorted by customer name.
Back Orders by Order Number – same as the customers report but sorted by Order number.
Charges and Credits. Lists all orders that have pending Charges or Credits. Use to enter charges and credits into your credit card system. Includes order number, name, address and phone number, credit card number and expiration date, credit or charge amount, and room to enter authorization codes.
Detailed Sales Report – This report shows each order with line items. It gives the cost, sales, gross margin, quantity shipped, date entered and date shipped. This report also has an extensive filtering tool to allow you to search based on order date, shipped date or specific SKU. Reports can be sorted on many different fields.
Sales Receipts. These are invoices, or sales receipts. They can be printed for any range of order numbers.
Physical Inventory. Use for taking inventory. Includes Location, SKU, Name, Description, Expected Quantity, and spaces to enter actual quantity and notes .
Sales by Product. Select Sales by Product in the Standard Reports list and select Preview. The Select Dates and SKU's for Report dialog box opens. Enter a date range and either enter a value in the SKU's that start with: field or select a SKU in the Specific SKU's list box. You can also leave the All SKU's check box selected. Select OK. Report lists SKU, Item Name and quantities for Ordered, Shipped, Returned and Net.
This report is available in six different formats:
Sales by Customer and Product: Shows what products each customer purchased, grouped and sorted by customer.
Sales by Product and Customer: Shows what products each customer purchased, grouped and sorted by product.
Sales by Product No Options: Uses the least amount of paper. Does not include any order option fields.
Sales by Product with 5 options: Shows the first five order option fields.
Sales by Product with all options: Shows all ten of the order option fields.
Sales by Product with Prices: Shows the value of each product sold, by SKU.
Order Summary - Prints when orders are imported (if the Reports group system parameter PrintOrderSummaries is set to TRUE). Lists order status (Empty if nothing is available to ship, Partial if some but not all can be shipped, Complete if all can be shipped), name and order info, items ordered, back-ordered, etc.
This report is available in seven formats:
Order Summary: Shows a summary of basic order information that is sorted and grouped by Monsoon Order Manager 's order number. It is typically run after orders have been imported.
Order Summary by Shipping: Order Summary report sorted first by shipping method, then by Monsoon Order Manager Order Number.
Order Summary by Source: Order Summary grouped first by source of the order (Manual Orders, Shopping Cart , etc.) and then sorted by the Monsoon Order Manager Order Number.
Order Summary by Address and Total: Order Summary including full billing address sorted and grouped by the Monsoon Order Manager Order Number.
Order Summary with CC by Shipping: Includes credit card information and sorted by shipping method then Monsoon Order Manager Order Number.
Order Summary with CC Info - Order Summary including credit card information sorted and grouped by the Monsoon Order Manager Order Number.
Order Summary with Totals: Order Summary sorted and grouped by the Monsoon Order Manager Order Number, includes grand totals at the end of the report.
Pick List: Shows Location, Quantity Needed, SKU and Item Name, all ten order options, and spaced to enter number picked and notes. Prints when orders are imported (if system parameter PrintPickLists is set to True)
Slow Movers/Best Sellers. Supplies information regarding the best and worst sellers in your inventory.
The ability to define an "alias" for a report or to prevent a report from being visible at the Report Menu is controlled by the Set Report Options screen, which is now accessible via the Standard Report tab of the Report Menu.
Select the Standard Report Options link in the list of standard reports in the left-hand pane and the Set Report Options window will open in the right-hand pane:
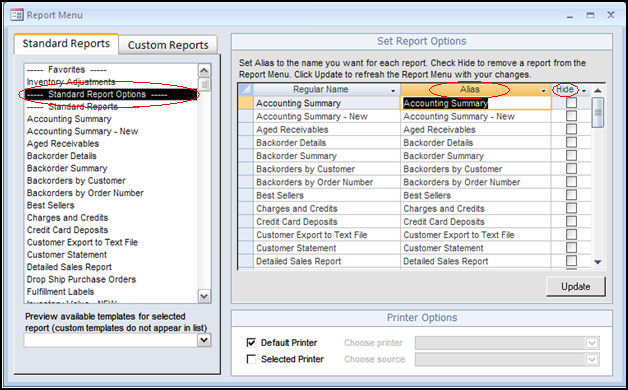
There are three columns and one button on the Set Report Options screen:
Regular Name - displays the standard name of the report as it is distributed with the program.
Alias - allows the user to reference any of the Standard Reports (as listed in the Regular Name column) by a different name. Type the desired name in the corresponding cell of the Alias column.
Hide - to prevent a report from being visible in the Report Menu, select the box in the corresponding cell of the Hide column.
Update - select this to have the changes take effect.
This same functionality can also be performed via Main Menu>Settings>Report Functions>Set Report Options
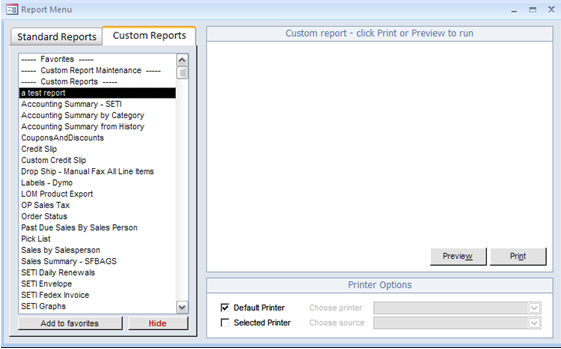
This list contains any custom made reports you have added to the system. Select the report you wish to view and select Preview to see the report on the screen. Select Print to send the report directly to the printer.
These reports are not supplied as part of the Monsoon Order Manager program, as it is originally distributed. They can be created from scratch or by modifying any of the standard reports that are included with the program. They must be created in, or imported into, the Monsoon Order Manager program file. Then, to include them in the Report Menu, use the Custom Report Maintenance feature. This feature is accessible from Main Menu>Settings>Report Functions>Custom Report Maintenance and it can also be opened from the Custom Reports tab – simply select the Custom Report Maintenance link. For more information about creating reports using Microsoft Access, see the local or online Help that is provided by Microsoft. Search for "creating reports" to find related articles.
The "Favorites" feature functions the same way for Custom Reports as it does for Standard Reports. Custom Reports do not include built-in filters so the only options available on the right-hand side of the screen are the Preview and Print buttons. Any filters associated with a custom report open in a separate window.
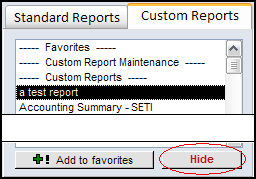
To remove a report from the list of Custom Reports, select it and then select Hide:
To see a previously hidden report in the Custom Reports list again, use the Add to Custom Reports Menu button of the Custom Reports Maintenance feature (select the Custom Report Maintenance link in the Custom Reports tab to open that utility). Refer to the directions in the Knowledge Base article, Custom Report Maintenance, for more details. Also, review the article, Creating and Editing Custom Reports for additional help in creating your own custom reports.
To select a default report template for each standard report, set the appropriate system parameter, as mentioned previously in the Standard Reports section of this article.
To select the format you want to use, go to Main Menu>Settings>System Functions>Custom Report Maintenance.
In the Reports parameter group, select the report template you wish to change. A drop-down menu lists the different templates that are available. Make a selection and select Save.
Several sales reports are provided to analyze your store’s performance. If you do not see a report here that provides the information you require, contact Monsoon Commerce for a quote to have a custom report created. If you are familiar with Microsoft Access’ report building tools, you may add your own reports to the program.
Once you build your own custom reports, move them into the Custom Reports.mdb file (provided with the program) so that copies are saved when the program is upgraded. For instructions how to move reports to the Custom Reports.mdb file, see the Knowledge Base article, Custom Report Maintenance.
The Print On: section of the screen controls where the reports will be printed.
The default printer of the workstation is initially selected when the Report Menu is opened.
To print reports at a different printer, select the Selected Printer box instead and choose a printer and paper source from the Select a Printer and Select a Paper Source lists.
To have a particular report always print to a specific printer, see the Knowledge Base article, Set Report Specific Printer Settings.
Refer to the Report Parameters Group Knowledge Base article for details.
Created: 5/2/12
Revised: 11/6/14
Published: 08/19/15