
Order Manager
Version 8
Order Manager
Version 8
Contents of this Topic: Show
Bronto is an e-mail marketing tool that offers the ability to execute sophisticated e-mail marketing campaigns throughout the customer life cycle, thereby increasing contact engagement and driving repeat purchases by sending the right message to the right contacts at the right time.
A Bronto Professional account is required to use this integration. At this time, integration with Bronto's Agency Edition is not supported.
Monsoon OMS customers should contact Bronto at 919-595-2500 extension 2, for technical assistance.
Contact Bronto to obtain Site, SiteID, Token and UserID values to enter into the appropriate Monsoon Order Manager system parameters listed below. For instructions on entering values into Monsoon Order Manager system parameters, see the Knowledge Base article, Set System Parameters.
BrontoSite
BrontoSiteID
BrontoToken
BrontoUserID
 |
When entering Bronto-provided values into the system parameters, be sure to use the appropriate case for all letters. |
There are no Special Parameters (cart-based) for this service. Customer records can be limited to those associated with a specific shopping cart by using the Source of Initial Order drop-down on the Bronto Export Filter screen, as described later in this article.
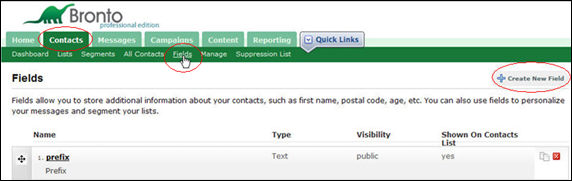
Log into the Bronto application.
Select the Contacts tab and select the Fields link.
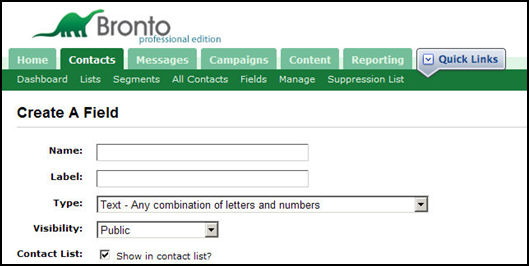
![]() When entering fields names into the Create A Field screen, above, be sure
to enter the field names using lower case letters.
When entering fields names into the Create A Field screen, above, be sure
to enter the field names using lower case letters.
Monsoon Order Manager Field |
Bronto Field |
Field Details |
Field Description |
Prefix |
prefix |
text |
Contact’s prefix |
First Name |
firstname |
text |
Contact’s first name |
Middle Name |
middlename |
text |
Contact’s middle name |
Last Name |
lastname |
text |
Contact’s last name |
Suffix |
suffix |
text |
Contact’s suffix |
Company |
company |
text |
Contact’s company name |
City |
city |
text |
Contact’s address city |
State |
state |
text |
Contact’s address state |
Zip |
zip |
text |
Contact’s address zip |
Country |
country |
text |
Contact’s address country |
Phone |
phone |
text |
Contact’s address phone |
Original Order Date |
originalorderdate |
date |
The date of the first order ever placed by this contact. |
Recency |
recency |
date |
The date of the most recent order placed by this contact. |
3 Month Frequency |
3mofrequency |
number |
The number of orders placed by this contact in the last three months. |
3 Month Monetary Value |
3momonetaryvalue |
currency |
The total amount of orders placed by this contact in the last three months. |
6 Month Frequency |
6mofrequency |
number |
The number of orders placed by this contact in the last six months. |
6 Month Monetary Value |
6momonetaryvalue |
currency |
The total amount of orders placed by this contact in the last six months. |
12 Month Frequency |
12mofrequency |
number |
The number of orders placed by this contact in the last twelve months. |
12 Month Monetary Value |
12momonetaryvalue |
currency |
The total amount of orders placed by this contact in the last twelve months. |
Previous Order Date 1 |
previousorderdate1 |
date |
The date of the most recent order placed by this contact. |
Previous Order Source 1 |
previousordersource1 |
text |
The source of the most recent order placed by this contact. |
Previous Order Amount 1 |
previousorderamount1 |
currency |
The amount of the most recent order placed by this contact. |
Previous Order Date 2 |
previousorderdate2 |
date |
The date of the second most recent order placed by this contact. |
Previous Order Source 2 |
previousordersource2 |
text |
The source of the second most recent order placed by this contact. |
Previous Order Amount 2 |
previousorderamount2 |
currency |
The amount of the second most recent order placed by this contact. |
Previous Order Date 3 |
previousorderdate3 |
date |
The date of the third most recent order placed by this contact. |
Previous Order Source 3 |
previousordersource3 |
text |
The source of the third most recent order placed by this contact. |
Previous Order Amount 3 |
previousorderamount3 |
currency |
The amount of the third most recent order placed by this contact. |
In the Type: drop-down list on the Create a Field screen, select the appropriate field type from the Field Details column of the chart shown above.
In the Visibility: field, choose whether the field should be Public or Private from the drop-down list. Public fields are visible to you and can be made visible to your contacts. Private fields are visible only to you.
Select Contact List: to have the field shown in the contact list.
| Contact Bronto support to determine the maximum number of fields that can be created or for assistance in setting up the integration with Bronto. Phone: 919-595-2500 Extension 2 |
Go to the Main Menu>Accordion>Settings>Data Functions> Bronto Contact Export.
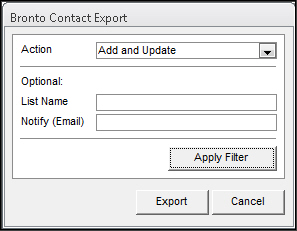
Bronto Contact Export screen
Select an Action from the drop-down list. The possible choices are:
Add - to add a new list
Update - to update an existing list
Add and Update - add and update a new list (this is the default action, if no action is selected from the drop-down list)
(Optional) In the List Name field, enter the name of the contact list (at Bronto) that is to be created or modified. The default is the All Contacts list.
(Optional) In the Notify field, enter an email address to receive a notice when the update process is completed. There is no default for this field.
Select the Apply Filter button to launch the Bronto Export Filter screen:
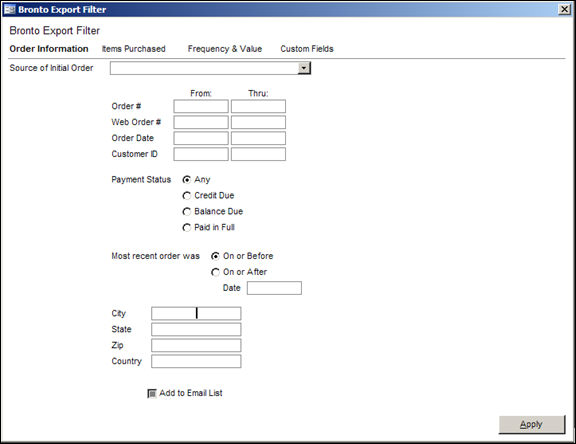
Bronto Export Filter screen
Specify the customer selection criteria to be used to produce a list of customer records sent to Bronto by entering one or a combination of the following:
In the top section of the form, there are numerous options for filtering customer records. Filter by:
Ranges of order numbers, web order numbers, order dates, or customer ids.
Payment status. Select Any Status, Credit Due, Balance Due, or Paid in Full.
Customers where their most recent order was on or before or after a given date.
Address. Enter a City, State, Zip, or Country.
Further limit the list of customer records by using the Items Purchased tab to include customers who have bought a single SKU , multiple SKUs or ranges of SKUs.
In the Orders that include the following items section, select All SKUs check box or enter characters in the SKU’s that start with text field.
You can also select Any SKU in list below check box and then build a list of SKUs using the options in the Select items here to build the list section.
To display your products sorted by SKU:
Select the SKU radio button plus the All button to see all SKUs in alphanumeric order.
Select SKU plus the # button to see SKUs that begin with a symbol followed by SKUs that begin with a number in alphanumeric order.
Select SKU plus a letter button to see SKUs that begin with that letter, in alphanumeric order.
To display your products sorted by product name:
Select the Name radio button plus All to see all product names in alphanumeric order.
Select Name plus # to see product names that begin with a symbol followed by product names that begin with a number in alphanumeric order.
Select Name plus a letter button to see product names that begin with that letter in alphanumeric order.
Select an item once and select Add to List.
The item appears in the Any of the following list of items list box to the right.
Delete an item from the list by selecting on it and selecting Delete.
Ignore the Add to Email List button, which will not be active and does not relate to this feature.
Select customer records based on data that is contained in custom fields on the Custom Fields tab. (If you have not set up any custom fields, the Custom Fields tab will not be visible. See Configuring Custom Fields to learn how to add custom fields.)
To filter customers based on range of order frequency and/or value of orders within a selected date range, go to the Frequency & Value tab. (For more information about RFM Recency, Frequency, Monetary Value data and how to view RFM data about a specific customer, see the RFM Data & Order History section of the Customers Knowledge Base topic.)
Select Apply in the upper right hand corner of the Bronto Export Filter screen when all customer selection criteria is entered. (This is the same as the Customer Filter screen.)
Select Export to send the selected customer records to Bronto. A confirmation box is displayed, indicating the success of the data transfer.
Created: 2/14/11
Revised: 6/30/15
Published: 08/19/15