Version 7.5

Version 7.5
Contents of this Topic: Show
Shipping Export Templates are used to control the sequence of data fields that are exported to a text file to be used as input to an external shipping software application.
If shipping information is exported for different purposes and the required layout of the files are not identical, create a different template for each scenario.
The Shipping Templates screen can be accessed via:
Main Menu>Settings>Shipping Functions>Shipping Export Templates
Store Setup Wizard>Shipping>Page 2>Shipping Export Templates button

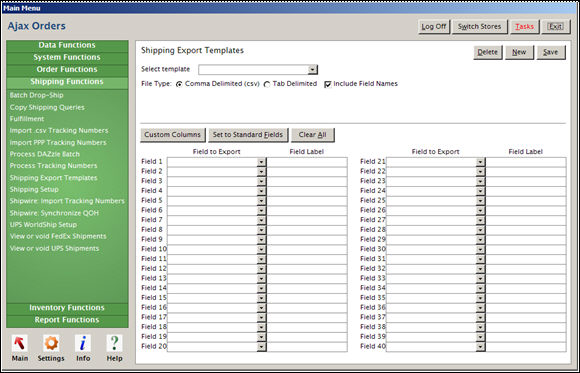
Shipping Export Templates screen
choose an existing template from this list to see its properties and field layout on the screen
click this button to remove the currently viewed template from the system; use this button with caution as this action cannot be reversed
click this button to define a new shipping export template
after entering information for a new template or making changes to an existing template, click this button to retain those additions or changes
select this button to create a .csv text file
select this button to create a tab delimited text file
check this box to include field names as the column headings in the text file
use as many of the forty drop-down fields (1 - 40) to map the SEOM fields to those in the text file
the sequence in which the fields are mapped is the sequence in which the fields will appear in the text file
click this button to read directions about creating a custom column in the text file
choose the Custom Column selection in one or more of the Field 1 - 40 drop-down lists
optionally, add a Field Label value to describe the purpose of that field, and optionally, a constant value to be entered into each record in the text file
this button populates the first thirteen drop-down lists with the most commonly used fields
the user must manually map any remaining fields
click this button to erase all of the selections made on this screen prior to clicking the Save button
Main Menu>Settings>Shipping Functions>Shipping Export Templates
Store Setup Wizard>Shipping>Page 2>Shipping Export Templates button
To create a new template, click the New button.
Enter a name for the new template when prompted by the program and click the OK button.
Select the appropriate radio button to indicate which type of text file is created, comma or tab delimited.
To have the field names appear as the column headers in the text file, check the box labeled Include Field Names.
Click the Set to Standard Fields button to populate the most commonly used fields in Fields 1-13 drop-down lists.
To have a different value than the SEOM field name appear as the column header, enter the desired value in the Field Label column of the appropriate field.
Manually map any additional fields in Fields 14 - 40 as needed.
Click the [Save] button to retain the layout and properties of the new template.
The template can now be assigned to a shipping method by way of the Shipping section of the Store Setup Wizard.
Choose the shipping export template from the Select Template drop-down list at the top of the screen to have its properties and field layout displayed.
Make any necessary changes to the template and click the Save button.
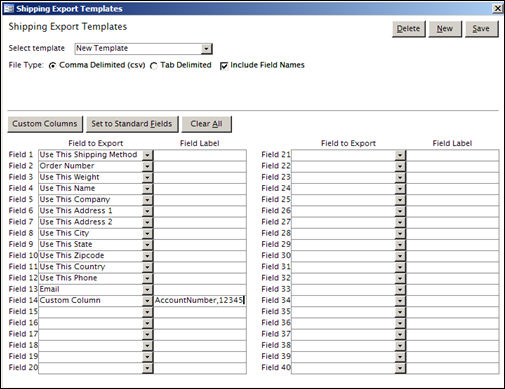
Select one of the forty fields and choose Custom Column from the drop-down list (at the very bottom).
To add a value as the column header for this field, type it into the Field Label column of the appropriate row on the Shipping Export Template screen.
To add a constant value in this column for each record in the text file, enter that value after the Field Label, separating the values with a comma.
For example, in the following image, the output text file will include a custom column labeled "AccountNumber" that contains the value "123456" in each row of the text file.

Created: 4/1/11
Revised: 5/15/12
Published: 04/14/16