
Version 7.0
Version 7.0
![]() Use the Next Topic and Previous Topic arrows,
Use the Next Topic and Previous Topic arrows, ![]() and
and ![]() , in
the Navigation Pane of the Knowledge
Base to read the topics about the Store
Setup Wizard in sequence. (The buttons are actually white on the
black background of the Navigation Pane.)
, in
the Navigation Pane of the Knowledge
Base to read the topics about the Store
Setup Wizard in sequence. (The buttons are actually white on the
black background of the Navigation Pane.)
Contents of this Topic: Show
The Drop-Shipping section of the Store Setup Wizard is where the user sets preferences for customer orders fulfilled directly by a vendor, or supplier, rather than from their own inventory.
Choose the method of sending purchase orders to suppliers, as well as the layout of the document to be sent by selecting a template for email, fax, or regular mail.
The values entered here are the system-wide defaults that will be used by the program. These values can be overridden by changing the corresponding field or fields in the particular supplier's record.
For a complete list of system parameters associated with drop-shipping, see the Knowledge Base topic, Drop-Ship Parameter Group.
This section of the Store Setup Wizard consists of a single page.
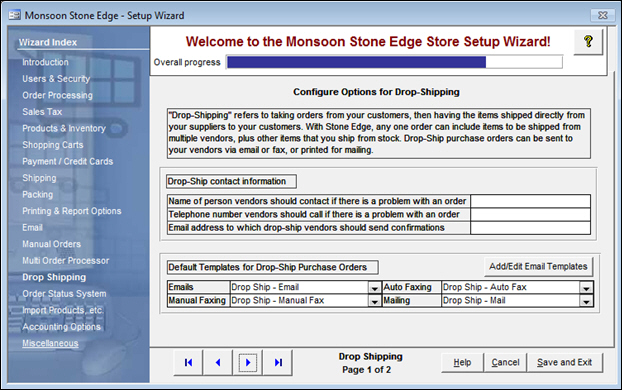
Figure 1: Store Setup Wizard - Drop Shipping, Page 1
enter the full or partial name of an employee the supplier should contact if questions about a Purchase Order arise
sets system parameter, DropShipContact
enter the telephone number of an employee that can assist a supplier with questions about an order
sets system parameter, DropShipPhone
enter the email address where order confirmations from vendors will be received
sets system parameter, DropShipEmail
Email templates are simple text files that contain the plain, generic text of an email message as well as program field tags, which insert specific information into the email message sent to a specific supplier. The program uses email templates stored in the Email Template folder that resides in the same location as the SEOM store data file.
The Auto Fax, Fax and Mail templates are Microsoft Access report objects that reside within the program file.
the default setting of this parameter is Drop-Ship - Email
choose a standard email template provided with the program from the drop-down list
it is also possible to create your own unique template via the Email Template Editor feature
sets system parameter DropShipEmailTemplate
the default setting of this parameter is Drop-Ship - Manual Fax
choose one of the standard fax report templates provided with the program from the drop-down list
it is possible to create your own custom report template by copying one of the standard reports provided with the program and making the desired changes to it, leaving the original template unchanged
sets system parameter DropShipFaxTemplate
the default setting of this parameter is Drop-Ship - Auto Fax
choose one of the standard fax report templates provided with the program from the drop-down list
it is possible to create your own custom report template by copying one of the standard reports provided with the program and making the desired changes to it, leaving the original template
sets system parameter DropShipAutoFaxTemplate
the default setting of this parameter is drop-ship - Mail
choose one of the standard fax report templates provided with the program from the drop-down list
it is possible to create your own custom report template by copying one of the standard reports provided with the program and making the desired changes to it, leaving the original template unchanged
sets system parameter DropShipMailTemplate
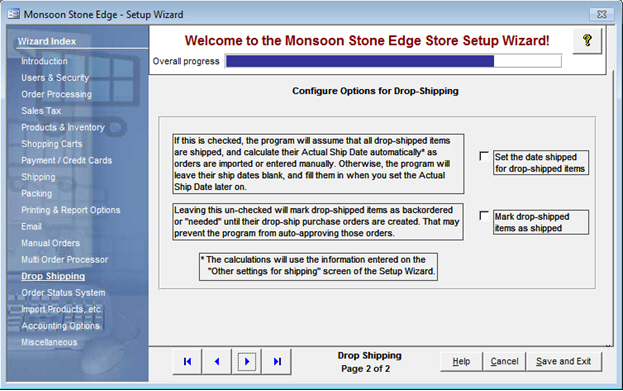
Figure 2: Store Setup Wizard - Drop Shipping, Page 2
use these buttons to scroll sequentially between the pages of the Store Setup Wizard
use the links in the Wizard Index pane on the left-hand side of the screen to skip between sections of the Wizard
the name of the Wizard section and page number can be found between the Navigational Arrows and the Help, Cancel and Save and Exit buttons at the bottom center section of the screen
sections that have many settings will have more than one page in the Wizard; be sure to review them all
causes the program to prompt for confirmation before exiting the Store Setup Wizard
click Yes to save the changes before exiting the wizard
click No to abandon the changes and exit the wizard
click Cancel to remain at the Store Setup Wizard and continue making changes
Created: 5/10/11
Revised: 9/4/12
Published: 04/13/16