
This shopping cart's capabilities:
Orders can be directly imported from the web site
Product records cannot be directly imported from the web site
Customer records cannot be directly imported from the web site
Custom (order) Fields can be imported from the web site
Manual Inventory Synchronization is supported from Monsoon OMS to the web site
Real-time Inventory Synchronization is supported at the SKU level, not at the attribute level
Order Status Updates are supported
This shopping cart type does not require an integration script from the Monsoon OMS download gateway.
Shopping carts can be defined during the Setup Guide when the program is first installed, or you can enter them at a later date by following these instructions.
To view the shipping methods defined and enabled in the merchant's shopping cart, login to Channel Advisor, select the appropriate account in the upper right-hand corner of the screen and then go to Sales>Shipping>Account Shipping Carriers, as shown in the figure below:
To view or define shipping methods in Stone Edge, go to Main Menu>Settings>System Functions>Store Setup Wizard. Select the Shipping link on the left-hand side of the form, and navigate to the third page of the Shipping section to configure the carriers (shipping vendors) and shipping methods used in Stone Edge. See the Knowledge Base article, Setup Wizard - Shipping for more information about defining shipping methods.
Go to Main Menu>Settings>System Functions>Shopping Carts.
If you have not yet setup a cart, the program asks if you want to do so now? Respond Yes.
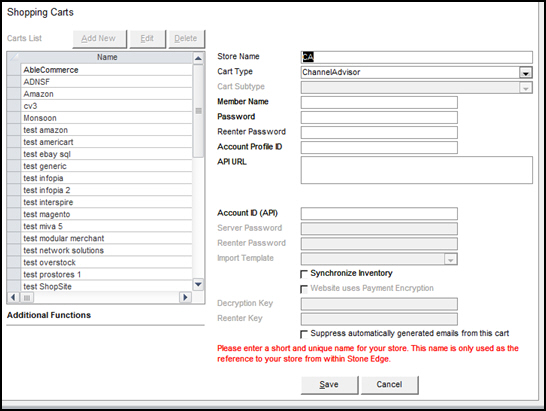
Select Add New. The fields displayed on this screen vary based on the cart type.
Enter a value in Store Name.
Select ChannelAdvisor from Cart Type.
Enter your ChannelAdvisor Member Name. This is the login ID provided to you by ChannelAdvisor to access your reports and is typically an email address. If you do not have a login ID or wish to create a limited access ID just for these reports, please contact your ChannelAdvisor Account Manager.
Enter your ChannelAdvisor login password in Password and in Reenter Password.
Enter your Account Profile ID. This is a numeric value unique to each ChannelAdvisor Merchant Account. The easiest way to determine your Account ID is to examine the URL for a ChannelAdvisor checkout generated within that account. You can find these URL's by visiting the Sales>All sales view in the ChannelAdvisor Merchant application, and selecting the "visit checkout" command for a particular order. If no sales exist, you can create a sample checkout via the Checkout>Checkout Preview menu option. The account ID (aka "Profile ID") is the value found after the "p=" query string parameter. For example, 10055350 is the account profile ID in the checkout URL https://chnla.com/r.asp?p=10055350&t=2595456&i=5647151.
Enter the API URL. Your API URL is either merchant.channeladvisor.com or enterprise.channeladvisor.com depending on the type of your ChannelAdvisor account.
Account ID (API) and Synchronize Inventory fields pertain to real-time inventory synchronization which is covered later in this topic. Leave them blank for now.
Decide whether to Suppress automatically generated emails from this cart. Selecting this prevents Stone Edge from sending tracking links or order confirmation emails, etc.
Select Save and the definition is added to the Carts List.
Up to five custom checkout fields can be imported from this shopping cart into Stone Edge custom order fields.
Determine the custom checkout fields being sent from Channel Advisor by checking an order XML files for the tag <CustomCheckoutField>. Take note of the position of each custom checkout field within the XML and enter the information in parameters CACustomFieldAlias1 through 5, where 1-5 represent the position of the field in the ChannelAdvisor XML.
For more information about setting up custom order fields in Stone Edge, review the Knowledge Base topic, Configuring Custom Fields.
Go to Main Menu>Import My Orders>Import My New Orders.
Choose the appropriate shopping cart definition from Select a Shopping Cart.
Select Import via Internet.
If this is the first time you are importing orders from this cart, you are asked if any of the orders have already been shipped. If so, specify the cut-off date. Refer to Knowledge Base topic, First Import, for full instructions.
If this is not the first time you are importing orders from this cart, select an existing batch or create a new batch of orders to import.
Refer to Knowledge Base topic Import Orders for specific instructions.
Set main system parameter UseStatusUpdates to TRUE.
If this is the first shopping cart you are setting up, load the default list of Status Events, otherwise, skip this step.
Define any special status labels the cart uses through the List Maintenance feature.
Choose the status event which triggers the sending of updates to the cart, and select Notify Cart.
Ensure that the Local or Shared Stack is up and running.
Cancelled
Payment Received
Shipped
Order Received
This feature is supported at the SKU level, not at the attribute, or variant, level.
Review Knowledge Base topic, Inventory Synchronization, for more information.
Take a physical inventory and update the QOH of all products in Stone Edge.
Go to Main Menu>Settings>System Functions>Shopping Carts.
Select the appropriate shopping cart definition from Carts List.
Select Import & Update Data under Additional Functions.
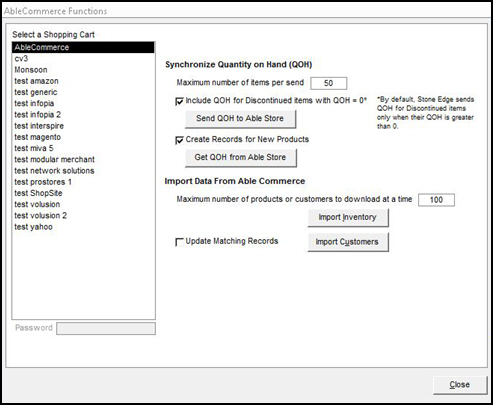
Select Send QOH to Website.
Select Edit.
Enter your Account ID (API). If you do not know this, contact your CA account manager.
Select Synchronize Inventory.
Select Save.
Manually make a change to the QOH of a product in OMS and check the QOH at the shopping cart in a few minutes. Some carts take longer than others to process inventory updates.
Options, Attributes and SubSKUs
Matching New Records to Existing Customers
Status Updates Feature: Basic Requirements
ChannelAdvisor Parameter Group
Created: 1/22/15
Revised: 9/8/15
Published: