
Overview
This topic does not explain how to export sales and deposit information, which is covered in the Accounting Export Setup and Export Accounting Data Knowledge Base topics.
- It is possible to export summary purchase order data to an .IIF (Intuit Interchange Format) file so it can be imported into QuickBooks after you receive items into your inventory.
- You can include data for as many received purchase orders as you wish in a single .IIF file, including multiple purchase orders from the same supplier and purchase orders received from different suppliers.
- The first step is to specify which accounts should be debited and credited in QuickBooks. You may enter your QuickBooks vendor names in SEOM supplier records if you wish.
- Going forward, whenever you click Post Data on the Receive Inventory tab of the Purchase Orders screen, SEOM exports the purchase order data to an. IIF file that you can import into QuickBooks.
- At the beginning of each. IIF records there are records prompt QuickBooks to create the appropriate debit and credit accounts if they do not already exist in QuickBooks.
- Each time you click Post Data, the following information is added to the .IIF file:
-
- Data that prompts QuickBooks to create a vendor record in QuickBooks for the current supplier (if that vendor does not already exist in QuickBooks).
- A Transaction (TRNS) record is added to the appropriate accounts payable account.
- A Detail (SPL) record is added to the appropriate asset or expense account.
Configure SEOM to Export Purchase Order Data to QuickBooks
- Go to the Main Menu > Settings > Data Functions > Accounting Export Setup. The Accounting Export Setup dialog box opens.
- Click the Edit Settings button.
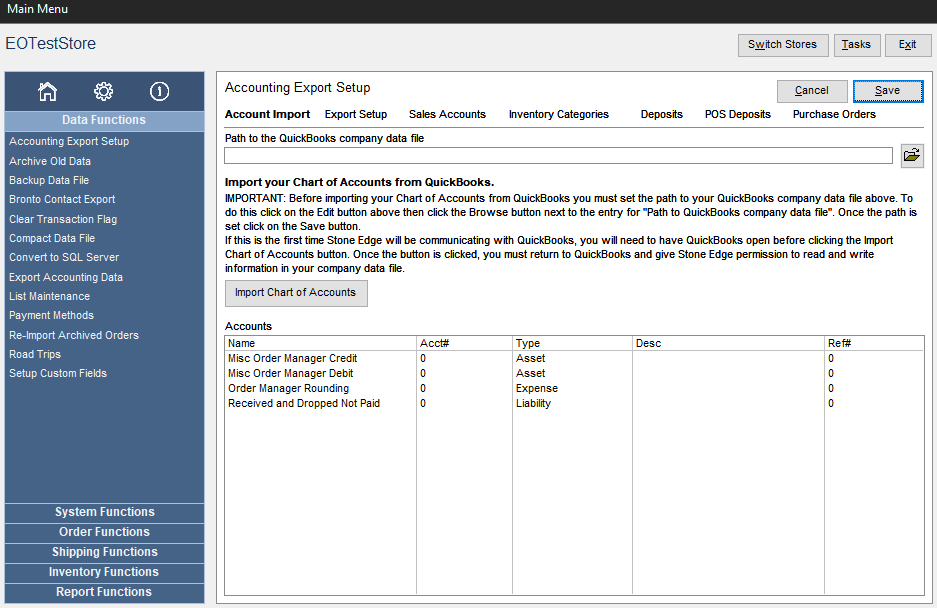
- Complete the fields on the Purchase Orders tab as follows:
-
- Export PO Receiving Data? – Select this box to export purchase order receiving data.
- Export PO Invoicing Data? – Select this box to export purchase order invoicing data.
- Export PO Receiving Data – Select this box to export data about items received using the Purchase Orders system.
- IMPORTANT NOTE: SEOM DOES NOT record receiving history at the Inventory Screen or at the Scan Non-PO Items into the Inventory screen. Any receiving recorded here WILL NOT be exported to your Accounting System!!!
- IMPORTANT NOTE: SEOM DOES NOT record inventory valuation changes for “Inventory Adjustments.” Adjustments WILL NOT be exported to your accounting system.
- Export PO Invoicing Data – Select this box to include invoices (bills) entered at the Purchase Orders system in the export to your accounting system.
- Purchase Order Payable Account – Set this to your “Accounts Payable” account (QuickBooks) or an “Expense” account (text). This will be the account that gets credited when invoicing data is exported.
- Purchase Order Liability Account – Set this to an “Other Current Liability” (QuickBooks) or to a “Liability” or “Expense” (text) account. This account maintains the value of received goods (as a negative) that have been received (or drop-shipped) but has not been paid for (invoiced). This account is credited when receiving or, for drop-ships, when the item is marked as “shipped” (post-order approval). This account is Debited by the product totals recorded on an invoice.
- Purchase Order Asset Account – Set this account to an “Inventory Asset” (QuickBooks) or “Asset” (text) account that tracks your total inventory value. This should be the same account that is set as the Credit Account for Cost of Goods Tracking on the Sales Accounts tab.
- Purchase Order Freight Charges – Set this to an “Other Current Expense” (QuickBooks), or an “Expense” (text) account for maintaining the Debit data for shipping charges incurred against Purchase Orders and Drop-Ships. Credit Account is the Purchase Orders Accounts Payable account.
- Purchase Order Discounts – Set this to an “Other Current Expense” (QuickBooks), or an “Expense” (text) account for maintaining the Debit data for discounts applied to Purchase Orders and Drop-Ships. Credit Account is the Purchase Orders Accounts Payable account.
- Purchase Order Surcharges – Set this to an “Other Current Expense” (QuickBooks) or an “Expense” (text) account for maintaining the Debit data for surcharges applied to Purchase Orders and Drop-Ships. Credit Account is the Purchase Orders Accounts Payable account.
- Click Save to retain your settings and exit the Accounting Export Setup dialog box.
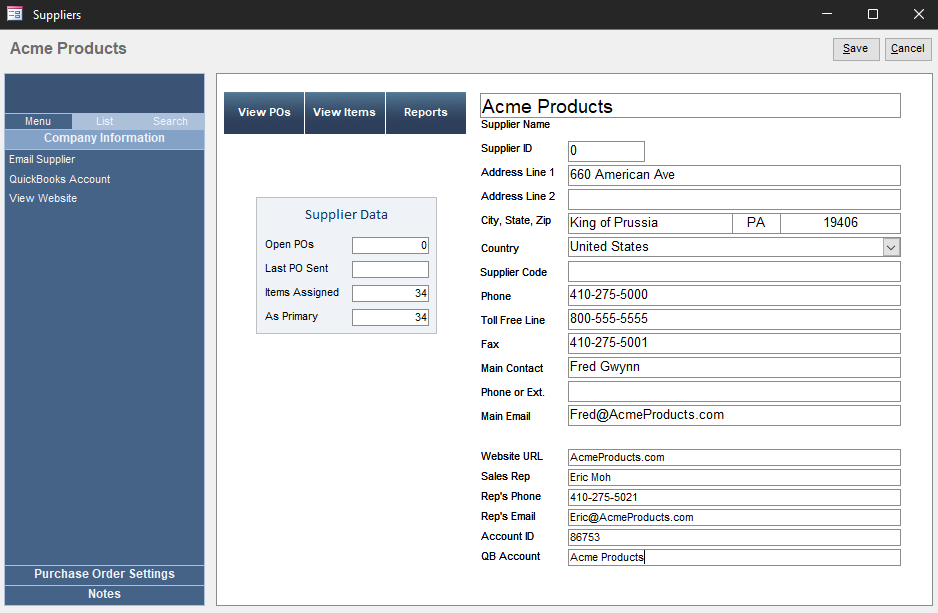
- Go to Main > Manage My Inventory > Manage My Suppliers.
Suppliers screen
- Compare the suppliers in SEOM to the vendors in QuickBooks. Each supplier from whom you receive inventory must be listed in QuickBooks. The vendor name must match the supplier’s name as it appears in either the Supplier Name field or the QB Account field on the Company Information tab.
- Click Add or Edit to create a new supplier record or make changes to an existing supplier record, respectively.
- Click Save to retain the new record or changes.
- Click Close to exit the Suppliers screen.
Export SEOM Purchase Order Information to an .IIF File
- Each time you go to the Purchase Orders screen in SEOM, the program looks for the .IIF file.
- If the program finds the file, you are prompted to archive the .IIF file, delete it or keep it so you can continue adding data to it.
- If you have already imported the data into the .IIF file into QuickBooks, you should either archive it or delete it, so you avoid creating duplicate records.
- If you have NOT imported the data into QuickBooks yet, you should keep it so you can import it later; otherwise, you will lose the data.
Import an .IIF file into QuickBooks
Before you import data into QuickBooks, we strongly recommend that you back up your QuickBooks data. A backup copy will allow you to restore your data if a problem occurs during the import.
- In QuickBooks, go to File > Utilities> Import > IIF Files.
- Navigate to the location of the IIF file.
- Click Open to import the data in the file into QuickBooks.