
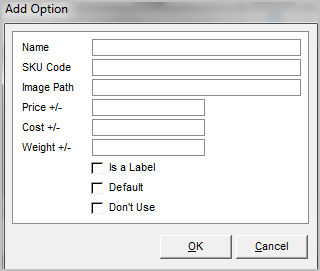
Adding an Option
Please be aware that any options added here manually may be inadvertently changed, based on the selected Options Lists action chosen during an XMLProduct Import (if the shopping cart system supports that functionality).
- Go to the Main Menu>Manage My Inventory>View & Manage My Inventory>Attributes& Options tab.
- Navigate to the desired inventory record.
- Click on the OptionList to which the option will be added.
- Click the [Add Option] button.
- Enter a name for the Option in the Name field. This is the only required field on this screen.
- Optional:
- If desired, enter informational data in the Code, Prompt and Image Path fields; the Code and Prompt fields are only used by some shopping cart systems and the Image Path field refers to an image at the Web site
- If the price or cost of the product changes depending on the option that is selected, enter the modifier in the Price +/- or Cost +/- fields; for instance if an XXL T-shirt costs $2.00 more than T-shirts S-XL, enter $2.00 in the Cost +/- field for the XXL option
- Is a Label – this field only applies to some shopping cart systems that allow the merchant to utilize alternative text to list a product at the Web site rather than using the less friendlySKU
- Default – check this box if this option should be default entry presented to the user when the product is purchased
- If an option should not be included in the choices presented to the user when the product is purchased, check the box labeled Don’t Use
- Click the [OK] button.
Edit/Add Option Value screen
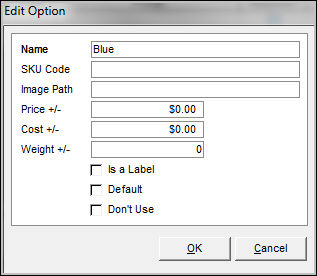
Editing an Option
- Go to the Main Menu>Manage My Inventory>View & Manage My Inventory>Attributes & Options tab.
- Navigate to the desired inventory record.
- Select an Option by clicking on its row in the lower grid.
- Click the [Edit Option] button.
- Make the necessary changes to the data in this screen and click the [OK] button to retain the changes. Click the [Cancel] button to abandon the changes.
Deleting an Option
- Go to the Main Menu>Manage My Inventory>View & Manage My Inventory>Attributes & Options tab.
- Navigate to the desired inventory record.
- Select an Option by clicking on its row in the lower grid.
- Click the [Delete] button.
- The program prompts the user for confirmation prior to deleting the selected option.
- Click [OK] to proceed.