![]()
Order Manager
Version 8
![]()
Order Manager
Version 8
![]() Use the Next Topic and Previous Topic arrows,
Use the Next Topic and Previous Topic arrows, ![]() and
and ![]() , in
the Navigation Pane of the Knowledge
Base to read the topics about the Store
Setup Wizard in sequence. (The buttons are actually white on the
black background of the Navigation Pane.)
, in
the Navigation Pane of the Knowledge
Base to read the topics about the Store
Setup Wizard in sequence. (The buttons are actually white on the
black background of the Navigation Pane.)

Contents of this Topic: Show
The Email section of the Store Setup Wizard is comprised of two pages.
The first page is where the user specifies the method the program uses to send email as well as related settings. It is also possible to create, edit, or simply view Email Templates at this screen.
The second page of this section contains a host of settings that control the types of email messages sent by the program, when they are sent, and the template used for each type of message.
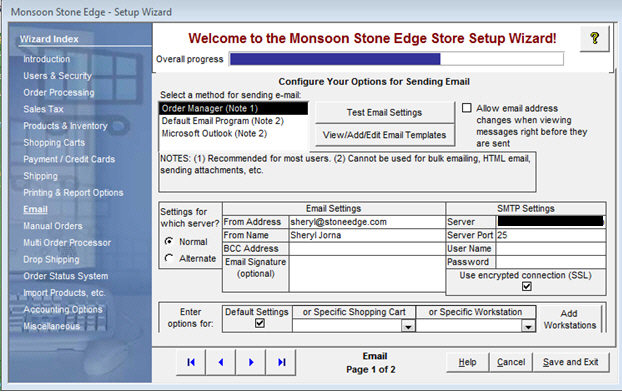
Figure 1: Store Setup Wizard - Email Section, Page 1
choose the method the program should use to send email
sets system parameter EmailSendMethod.
this is the recommended method that is suitable for most users
primary and secondary SMTP accounts can be configured
can be used for sending bulk email to customers, sending HTML email or including attachments with email
select this method to use the email program set as the default email application on the current workstation
this method does not support the sending of bulk email to customers, HTML email or the sending of attachments with email correspondence
choosing this option requires that a copy of Microsoft Outlook is installed on each workstation that will send email from Monsoon Order Manager
this method does not support the sending of bulk email to customers, HTML email or the sending of attachments with email correspondence
this method is also subject to messages that require a response from the user every time that an email is sent (paraphrased message: Program X is attempting to send email - do you want to allow this and for how long?)
select this to check the validity of the email settings entered at this screen
this opens the Edit Email Templates screen, where you can create new email templates, or edit and view existing templates
refer to the Knowledge Base topic, Email Template Editor, for more information about using this feature
select this box if it is permissible for users to alter the To: email address when the message is viewed prior to sending (Send Email screen)
sets system parameter, AllowChangeEmailAddress
Choose a radio button to determine which email server's settings are being specified, Normal or Alternate. The fields in this section of the screen only pertain to "Order Manager" as the chosen method for sending email.
this represents the primary email server that the program uses
this represents the secondary email server that the program can use if necessary
Enter the appropriate values in the following fields as they pertain to the selected Email Server, Normal or Alternate:
enter the company email address appears as the "sending address" of the email
sets system parameters EmailFromAddress or EmailFromAddress2
enter the name of the person or department that should appear as the "sender" of the email
sets system parameters EmailFromName or EmailFromName2
this field is optional and can be used to keep a copy of any email that is sent by Monsoon Order Manager
enter the designated company address to receive a copy of each email sent by Monsoon Order Manager in this field
sets system parameters EmailBCCAddress or EmailBCCAddress2
The fields in this section only pertain to "Order Manager" as the chosen method for sending email. Enter the settings for the selected email server, Normal or Alternate, in the fields below:
enter the name of the server
sets system parameters SMTPServer or SMTPServer2
enter the port that should be used to send email
sets system parameters SMTPServerPort or SMTPServerPort2
if required by the server or ISP, enter the UserName of the account to use when sending email from Monsoon Order Manager in this field
sets system parameters SMTPUserName1 or SMTPUserName2
if required by the server or ISP, enter the corresponding Password for the account that sends email from Monsoon Order Manager in this field
sets system parameters SMTPPassword1 or SMTPPassword2
to use Secure Socket Layers protocol when sending email from Monsoon Order Manager, select this box
sets system parameters SMTPUseTLS or SMTPUseTLS2
enter the text that should be included as the signature at the end of an email message sent by Monsoon Order Manager
sets system parameter EmailSignature
Choose one of the following options to determine the scope of the settings entered at this screen. The available options change depending on the chosen method of sending email. The settings that are specified by shopping cart or workstation override the values that are specified when the Default Settings Check box is selected.
select this box to set the global Email and SMTP settings the program uses to send email
these settings can be overridden by entering different information at the specific shopping cart or workstation levels
select a pre-defined shopping cart from the list to set email preferences pertaining only to orders originating from that source
applies to the Email and SMTP Server settings only, to set email templates by a specific cart or market, see the Shopping Carts topic
select a workstation from the drop-down list to set email preferences for email that is sent from that particular machine
select this to open the List Builder screen where the user may create a definition for a new workstation
enter the desired name in the Computer Name field or select the This Computer button, if adding the definition from the new workstation; select Save to add the new workstation to the list
Choose an email method from Select a method for sending email in the top left of the page.
For the Order Manager, continue with step 2.
If Default Email Program is selected, skip to step 3.
If Microsoft Outlook is selected, skip to step 3.
The Enter Options for box is pre-selected for Default Settings. Select the "default" email settings first. To set different options for a Specific Shopping Cart or Specific Workstation, choose those selections, one by one, after completing the Default Settings and follow the same sequence of steps.
The Settings for which server box is pre-selected for Normal, or the primary server.
Complete the fields in the Email Settings box. (Hover the cursor over each field for explanatory pop-up text, or refer to the description of these areas, as discussed in the previous section of this topic.)
Complete the fields in the SMTP Settings box. These fields are global, there are no corresponding cart-based parameters. ((Hover the cursor over each field for explanatory pop-up text, or refer to the description of these areas, as discussed in the previous section of this topic.)
If an Alternate, or backup server will be used, select that radio button and repeat steps 2.a.i. - 2.a.ii.
Check the Require encryption ( SSL ) box if your email provider or server requires the use of encryption, or Secure Socket Layers (SSL).
At the top of the screen, select Allow email address changes when viewing messages right before they are sent, if users should be able to change the destination address when sending email through Monsoon Order Manager .
Also at the top of the screen, View/Add/Edit Email Templates opens the Edit Email Templates screen, where you can create or edit their own email templates or edit any of Monsoon Order Manager 's standard email templates. It is not necessary to make any changes at the Edit Email Templates screen as part of the program setup, however you may want to add or edit email templates later when you are more familiar with them. See the KB article, Email Template Editor, for more information.
Once you've completed these steps, select Test Email Settings to verify the settings are functional.
This screen allows you to specify when the program automatically sends email to customers, and the email template used to compose the message.
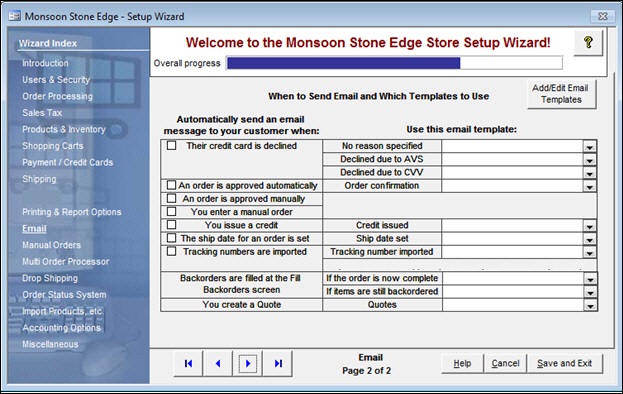
It is not necessary to make a decision about all of them immediately, you may return to this page at a later date.
lists the possible times at which the program should send an email with information related to a customer's order
select each function for which the program should send an email; see Chart1 to see the system parameters that are set by this action
select the appropriate template for each function from the drop-down lists in the Use this email template: section of the screen
if a suitable template has not been provided with the program for a particular situation, such as a credit card being declined, create your own by selecting Add/Edit Email Templates, found on this screen
Email sent when... |
Corresponding and/or Associated System Parameters |
Their credit card is declined |
|
|
|
An order is approved automatically |
|
An order is approved manually |
|
You enter a manual order |
|
You issue a credit |
|
Tracking numbers are imported |
|
Backorders are filled at the Fill Backorders screen* |
|
You create a Quote** |
Chart1
* to enable the program to send emails at this juncture, clear the box labeled "None" on the Fill Backorders screen; there is no controlling system parameter
** Quotes are not sent automatically, you must manually select Email on the Quotes screen
choose a template to be used to create the text of each type of email message from the corresponding drop-down list
if the program does not provide a sample template for the selected situation, you may create one of your own by using the Edit Email Templates screen, which is accessed by Add/Edit Email Templates or via Main Menu>Settings>Email Template Editor.
opens the Edit Email Templates screen, where you can create new email templates or edit existing templates
refer to Knowledge Base topic, Email Template Editor, for more information about using this feature
use these buttons to scroll sequentially between the pages of the Store Setup Wizard
use the links in the Wizard Index pane on the left-hand side of the screen to skip between sections of the Wizard
the name of the Wizard section and page number can be found between the Navigational Arrows and the Help, Cancel and Save and Exit buttons at the bottom center section of the screen
certain areas of the program that have many settings will have more than one page in the Wizard; be sure to review them all
opens the Knowledge Base
causes the program to prompt for confirmation before exiting the Store Setup Wizard
select Yes to save the changes before exiting the wizard
select No to abandon the changes and exit the wizard
select Cancel to remain at the Store Setup Wizard and continue making changes
select this to save all changes that have been made before exiting the Store Setup Wizard
Created: 5/4/11
Revised: 4/30/15
Published:08/19/15