
Order Manager
Version 8
Order Manager
Version 8
Contents of this Topic: Show
The Order Status Service was developed to provide those merchants whose shopping cart systems do not accept order status information from an outside source, such as Monsoon Order Manager, a way of communicating order status and tracking information to their customers. This system cannot function as a standalone application - it requires a copy of Monsoon Order Manager to be installed on at least one workstation that will act as the Shared Stack Controller .
The purpose of the Order Status Service system is three-fold:
it adds a new level of sophistication to the merchant's web site
it improves customer service
it saves time and money by reducing the "Where's my order?" telephone calls
It all starts with Monsoon OMS. The program has about thirty status events that the Order Status Service can track, such as Order Received, Payment Received, Ship Date Entered, Tracking Number Imported, etc. The merchant decides which of those events to track, and enters the status text, or label, that they want to use for each event. Different status labels can be entered for each event in the status life cycle of an order, as well as for the status life cycle of each line item in the order.
Whenever one of those status events occurs, Monsoon Order Manager immediately sends that information to the Monsoon Commerce servers. The merchant can include links to the Order Status Service in their email messages and on their web site.
To check their order status, the customer either selects a link in the email that they received from the merchant, or goes to the merchant's web site and enters their Zip Code and order number. The Monsoon Commerce servers respond with the up-to-the-minute order status information. The response page can include the merchant's HTML header and footer, so the page will have the same "look and feel" of the merchant's web site. If any tracking numbers have been entered or imported for the order, those tracking numbers will appear as hyperlinks to UPS, USPS, FedEx or other carrier's order tracking pages.
The Order Status Service requires a copy of Monsoon OMS. Once the program is set up, there are three main steps to complete in order to begin using the Order Status Service:
Purchase an Order Status Service Subscription, which can be done online at www.StoneEdge.com.
Set up the Status Events feature within Monsoon OMS.
Set up the Order Status Service account settings.
The Status Events feature in Monsoon Order Manager lets the merchant define a set of status labels that the program can automatically apply to Order and/or Line Items when certain events occur. An event is defined as an action that takes place in Monsoon Order Manager such as approving an order, logging a payment, returning a line item , etc.
By itself, the Status Events system only sets status codes within the program, it does not necessarily transmit order information to any web site. However, this feature can be used in conjunction with the web-based Order Status Service, and some shopping cart systems or other order status programs.
NOTE: Use of the Stone Edge Order Status Service requires a separate subscription, which can be purchased at www.StoneEdge.com.
As each order is added to Monsoon Order Manager, the program sends information about the order to the Monsoon Commerce servers. Posted information includes the following:
Bill To Name
Bill To Zip Code (for security purposes - it is not displayed)
Bill To Email Address (for security purposes - it is not displayed)
Bill To Phone Number (for security purposes - it is not displayed)
Ship To Name
Order Manager Order Number
Shopping Cart Order Number (if applicable)
Current Order Status
Line Item SKU
Line Item Quantity Orders
Line Item Quantity Shipped
Line Item Quantity Needed
Line Item Status
NOTE: No payment or address information is sent to the Order Status Service web site. Only the fields listed above are ever sent to the Order Status Server, so there is no reason to worry about confidential information being exposed to the Internet.
As changes are made to various orders, Monsoon Order Manager can transmit those changes to the Order Status Service web site in real time, assuming that an Internet connection is available, so your customers can easily view up-to-the-minute information about their orders. As Shipping Carrier's Tracking Numbers are added to Monsoon Order Manager, they are also sent to the Order Status Service server. Tracking numbers are displayed as hyperlinks, which can be selected for immediate access to the appropriate shipper's package tracking system.
Monsoon OMS comes with a set of standard, or pre-defined, status events which are listed in the chart below:
EVENT |
OCCURS WHEN... |
Drop Ship Canceled |
A drop ship order is canceled at the Process Orders screen. |
Drop Ship Ordered |
A drop ship order is placed at the Process Orders screen. |
Item Add |
A line item is added to an order at the Process Orders screen. |
Item Cancel |
A line item is canceled at the Process Orders screen. |
Item Change Status |
This event is fired when the user manually changes the status of one or all line items on theOrder or Item Status tabs of the Process Orders screen (Main Menu>Accordion>Process My Orders>View and Process My Orders>Order tab>Order Status Link). Do not specify status labels for Item Status or Order Status in the Set Up Order & Item Status Events page of the Setup Wizard (Page 2 of Order Status System section). The values will be pulled from the order or item status at the time the event is fired. |
Item Exchange |
A line item is exchanged for another product at the Process Orders screen. Status will change for both the original order and the newly created order. |
Item Fill Backorder |
Backorders are filled at the Process Orders screen or at the Fill Backorders screen. Status will change for both the original and newly created orders. |
Item Return |
A line item is returned at the Process Orders screen. |
Item Revise |
A line item is revised at the Process Orders screen. |
Item Set Expected Ship Date |
The expected ship date is set for a line item or items. If a status label is not selected for this event, date information will not be included in the status update for the item. |
Item Set Actual Ship Date |
The actual ship date is set for a line item or items. |
Item Unreturn |
The return of a line item is reversed at the Process Orders screen. |
Order Add Tracking Number |
A new tracking number is manually entered at the Process Orders screen – (Main Menu>Accordion>Process My Orders>View and Process My Orders>Shipping tab). |
Order Approve |
An order is approved through the Process Orders screen, Web Import or Manual Orders. |
Order Cancel |
An entire order is cancelled at the Process Orders screen. |
Order Cancel Back Order |
A back order has been canceled. |
Order Change Status |
The user manually changes the status of an order at the Process Orders screen – Main Menu>Accordion>Process My Orders>View and Process My Orders>Order tab>Order Status Link) |
Order Credit Issued |
The user "Logs Credit Issued" or transmits a credit through the Payment Terminal. (Main Menu>Accordion>Process My Orders>View and Process My Orders>Payment tab>Log Credit). |
Order Edit Tracking Number |
Revisions are made to an existing tracking number. |
Order Force Backorder |
A backorder has been forced for an item in this order. |
Order Fill Backorder |
Backorders are filled at the Process Orders screen or the Fill Backorders form. Status will change for both the original and newly created orders. |
Order Import |
An order is imported from a text file or from the Internet. This is the first status applied. Subsequent events may follow immediately after import (such as Approved, Paid or Shipped) that will change the status again. |
Order Pack |
The order is closed following the packing of a box in the Packing form. |
Order Payment Edit |
The payment information is modified on the Process Orders screen. (Main Menu>Accordion>Process My Orders>View and Process My Orders>Payment tab). |
Order Payment Received |
A user "Logs Payment Received" or transmits a capture or sale from the Payment Terminal at the Process Orders screen. (Main Menu>Accordion>Process My Orders>View and Process My Orders>Payment tab). |
Order Payment Void |
A user transmits a "Void" via the Payment Terminal at the Process Orders screen. |
Order Set Actual Ship Date |
The actual ship date is set for the entire order (all line items). |
Order Unapprove |
An order is "Unapproved" at the Process Orders screen. |
Order Uncancel |
An order is "Uncanceled" at the Process Orders screen. |
Monsoon OMS has pre-defined status labels that the merchant can use, or the merchant can define their own status labels. Be advised that some shopping cart systems only accept a specific set of status labels. See the Shopping Cart's Knowledge Base page for more details.
| Backorder Canceled | Item Canceled | Payment Edited |
| Backorder Filled | Item Exchanged | Payment Received |
| Credit Issued | Item Returned | Payment Voided |
| Drop Shipment Canceled | Order Approved | Pending |
| Drop Shipment Ordered | Order Backordered | Pending Shipment |
| Item Added | Order Canceled | Shipped |
| Item Backordered | Order Received | Tracking Number Edited |
The merchant can manually set each parameter mentioned below or use the Order Status Section of the Store Setup Wizard.
Set the following system parameter:
Set the following system parameters (in the SETI parameter group):
SETISendStatusUpdate - set to TRUE
SETID - enter the Order Status System User Name that was provided by Stone Edge when the subscription service was purchased
SETIPassword - enter the Order Status System Password that was provided by Stone Edge Technologies when the subscription service was purchased
SETIMerchantID - enter the Merchant ID that was provided by Stone Edge Technologies for use with the Order Status System
SETIURL - enter the URL to the Stone Edge Order Status ASP page; this URL will be supplied by Stone Edge Technologies when the Order Status System subscription is purchased
SETIStatusLinkURL - enter the URL that will be presented in the email link that customers use to access the order's status information. The default URL is "http://www.stoneedge.net/setistatus/checkstatus.asp". It is possible to enter a URL from your web site that will redirect inquiries to the Stone Edge Order Status System URL, instead. Refer to Appendix A.
Use Monsoon Order Manager 's List Maintenance feature to define your own status labels, however, labels should not exceed 50 characters and they cannot contain single (') or double quotes (") in the text. Open the List Maintenance screen from the Data Functions tab of the Settings menu or via the Enter Status' button on Page 2 of the Order Status Section of the Store Setup Wizard. If the status labels will be added via the Store Setup Wizard, it is not be necessary to choose a list type from the Select List section of the screen, it will already be loaded (as shown in the image below).
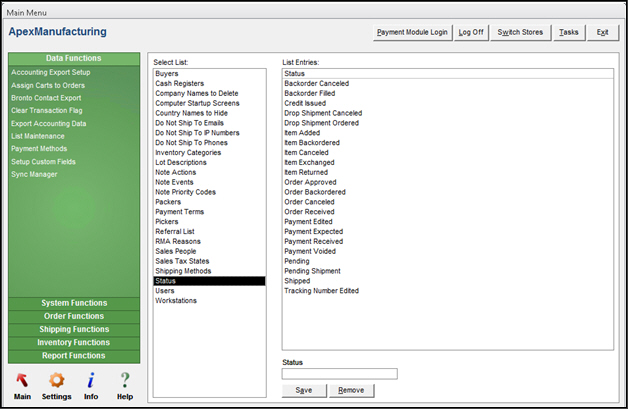
Choose Status from the Select List section of the screen.
Enter the name of the new status label in the Status field.
Select Add/Edit or press Enter twice.
The entry appears in the List Entries section of the screen. The entries are in alphabetical order.
To add more entries to the same list, repeat steps 2-3 as often as necessary to create all of the new status labels.
Choose the Status label to be removed from the List Entries section of the screen.
Select Remove.
The entry disappears from the List Entries section of the screen.
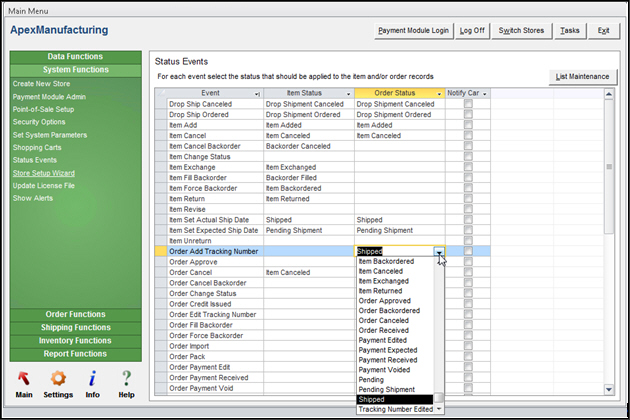
In the example shown in the figure above, the status event, Order Add Tracking Number, is assigned the status label of Shipped. When an order has new tracking information added to it, the status of the order will change to Shipped when the Status Event is triggered by the Process Tracking Numbers function. Since the Notify Cart box is checked, the program also sends the status updates to the shopping cart.
Select in the Item Status or Order Status column in the row for a particular event.
Select the drop-down list indicator on the right side of the field (where the cursor is pointing in the figure above), which displays the list of status labels supplied with the program or added via the List Maintenance screen. It is not possible to type in a new entry into the field, any new labels must be added via the List Maintenance screen.
Select the status label that should be assigned to the order or item when the event occurs by selecting it in the list.
Repeat steps 1-3 for any other events that will be used. Changes made at this screen take effect immediately.
Select the label in the Item or Order Status columns in the row for the appropriate status event.
Press the Delete or Backspace keys to remove the label.
The change is saved immediately. Repeat as often as needed.
Main Menu>Process My Orders>View & Process My Orders>Order>Order Status
Main Menu>Process My Orders>View & Process My Items>Item Status
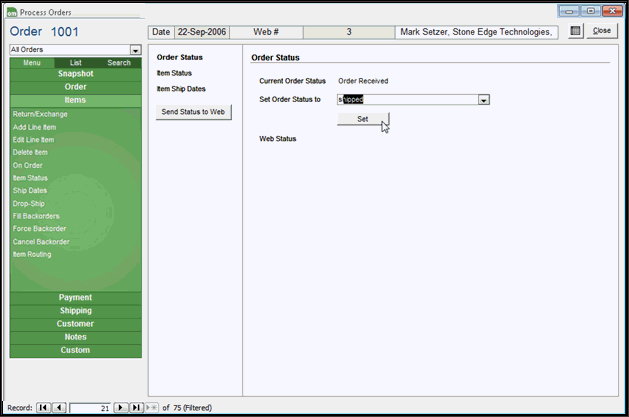
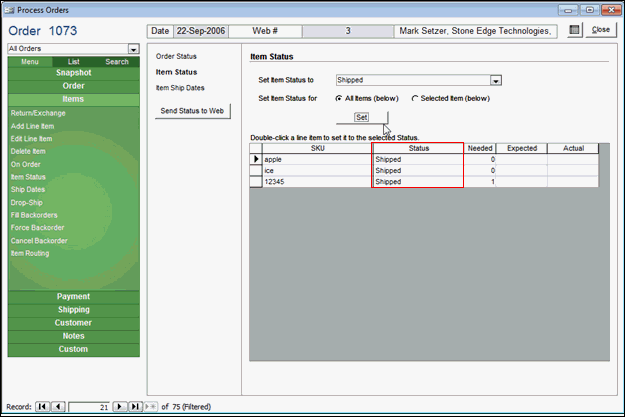
Clear the value in Set Item Status to or Set Order Status to drop-downs.
To clear the status of a single line item, select the line item from the list and select Selected Item. To clear the status of a all line items, select All Items.
Select Set.
Occasionally, changes may not get posted to the Order Status Service for a variety of reasons. If it becomes necessary to re-send the current status information to the Order Status Service server, select Send Status To Web.
The Order Status Service has a web-based interface from which the user can select the fields to be included in their order status displays, as well as adding HTML headers and footers to format the data, etc.
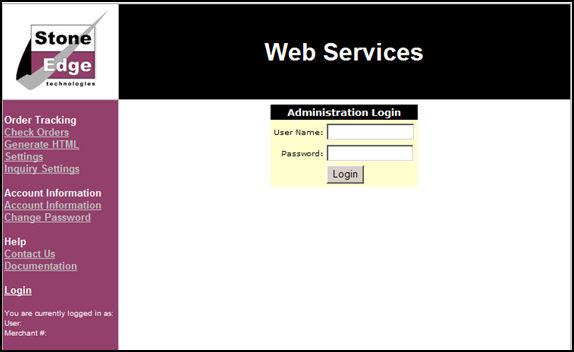
All account settings are maintained at the following URL: http://www.stoneedge.net/setistatus/admin
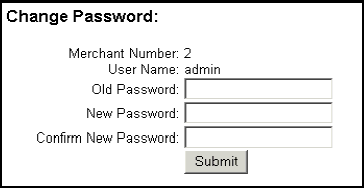
To access your account, it is necessary to enter the User Name and Password assigned by Monsoon Commerce when the Order Status Service subscription service is purchased. That information can be found in the order confirmation email that is sent to the address specified in our customer records. Select Login.
The left-hand side of the screen is the Navigation Pane, which includes links for accessing the many functions available within the Order Status Service, organized by purpose.
Check Orders - use this screen to view order status information outside Monsoon Order Manager. It is possible to sort the list of orders by date, order number, web order number, billing name or shipping name

Generate HTML - this page displays a generic non-formatted HTML or Java Script source code that can be copied and pasted for use on your site; just choose which fields (Email, Zip Code or both) that should be included along with the order number field and select Generate HTML Form.
It is recommended to use both the Zip Code and Email fields, although the example in the figure below shows that only the Zip Code field will be included along with the order number field.

Of course, you are free to create your own forms from scratch or from any HTML editor that you use. If you are creating your own form, please be aware of the following required and optional fields and the appropriate formatting:
| Field Name | Required? | Expected Value |
| MerchantID | YES | Merchant Provided: Your assigned MerchantID |
| Order Number | YES | Customer Provided: Either the web site order number or the Monsoon Order Manager order number |
| Zip and/or |
Both can be specified alone or together, but at least one of them is required to be present. | Customer Provided: The Bill To: Zip Code or the customer's email address that was used for the order |
The values passed to the Order Status Service script to do the actual lookup, such as e-mail address, Zip Code, or order number, are not case-sensitive. The key/value pairs can be submitted in a URL or from a form using either the POST or GET method.
Settings (Global) - this page is where you can control how your customers view their order's status
POST Methods (Generic and Formatted are most widely used):
Generic - this is the "no frills" format. The customer will see the status of their order on a white page with black text.
Formatted - this method is recommended for most merchants because it gives the merchant a lot of control over the appearance of the data without any special programming. Copy and paste the HTML from your existing site into the header and footer. Use this method when you want the same "look and feel" as your web site.
Query String to URL - this method should only be attempted by users with advanced programming skills
When using this method, the order status data will be sent to a web page that you specify. Contact Monsoon Commerce to obtain more information about using this method, however, Monsoon Commerce does not provide the technical resources necessary to implement this type of custom modification.
XML - only - this method should only be attempted by users with advanced programming skills
This method gives the merchant the most control over the data that is displayed in the Order Status System. Contact Monsoon Commerce to obtain more information about using this method, however, Monsoon Commerce does not provide the technical resources necessary to implement this type of custom modification.
Days before Deleting Orders: all orders will automatically be deleted out of the system based on the number of days that are specified here. The maximum number of days to keep the orders in the Order Status Service is 60. If you need to retain order information for a longer period of time, contact Monsoon Commerce . Additional charges may apply due to increased storage requirements.
Select which fields to use: this section of the screen is where you indicate which fields should be visible to customers when using POST Method 1 or 2. If using the Query String to URL method, it determines which additional fields are sent in the query string to the specified URL, along with those fields that are always sent by default. All fields are always sent in the XML-only method, regardless of which boxes are checked in this section of the screen.
Inquiry (Mail) Settings - this page gives the merchant control over the email inquiry option, which allows your customers to send an email to inquire about an order
Mail Settings
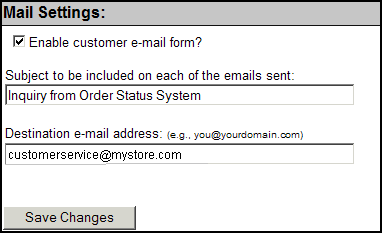
Figure 7: Mail Settings screen of Inquiry Settings for OSS
Check the box labeled "Enable Customer email form?" to permit email inquires.
Specify the subject line that will appear on every inquiry email, along with the email address to which the inquiries should be sent.
Form Settings
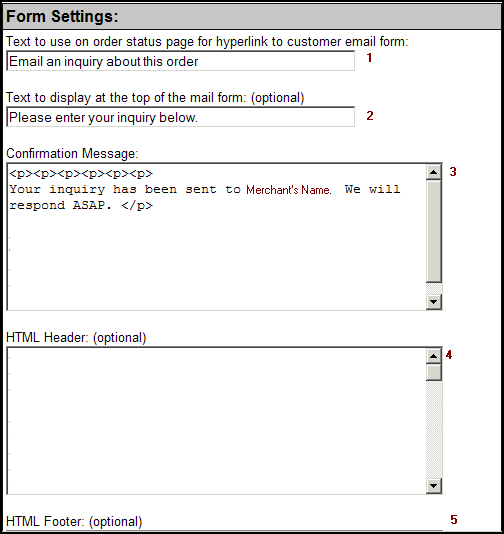
The first text box is where the user specifies the text that will be displayed as the hyperlink to the email form in the order status service page.
The second field is optional and is used to specify a label for the mail form, such as "Please enter your message below", or "Compose a message about your order", etc.
The third box is where the user can enter a confirmation message that will be displayed to the customer after they have sent an email inquiry; plain text or formatted HTML can be used
(Optional) The fourth box and fifth boxes are where HTML code can be added to the header and footer of the email inquiry pages to maintain the "look and feel" of your web site.
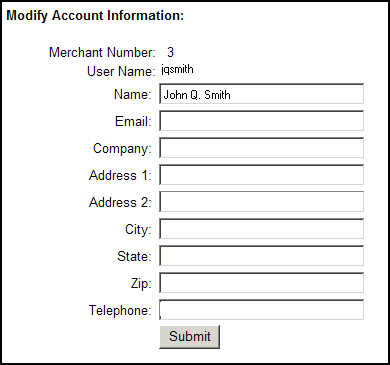
Account Information - edit the information in the text boxes as needed and select Submit button to make the changes.
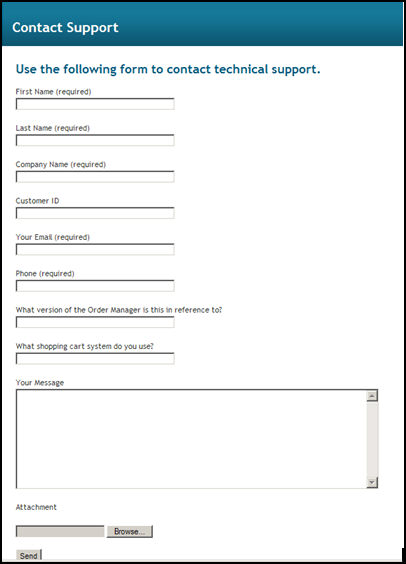
Contact Us - this link opens the Contact Support email page for Monsoon OMS Technical Support; enter your information and select Send.
Documentation - this link opens this page of the Monsoon OMS Product Knowledge Base
Open the Email Template Editor, which is found on the Report Functions tab of the Settings menu, and select the template that provides your customers with tracking information for their order. The email templates used for various purposes are selected in the Email section of the Store Setup Wizard.
Insert the <<Status Link>> tag into the body of your email template. The tag can be located using the All or Orders radio buttons.
Save the changes to the template.
Merchants typically set up an HTML form on their store site where customers can retrieve orders status information. To get their order status information, customers typically enter their order number and email address into an online form.
To generate the HTML for a "check status" form, select Generate HTML on the navigation bar of your Order Status Service Web Services page.
Choose which type of form you want and which fields to include.
select Generate HTML Form. Copy and paste the HTML to the area or page you have designated on your web site.
Created: 4/15/11
Revised: 8/6/12
Published: 08/19/15