
Order Manager
Version 8

Order Manager
Version 8
Contents of this Topic: Show
The Change Suppliers screen is used to add or alter existing supplier record(s) associated with inventory items. When making any mass changes, it is advisable to backup the store data file first.
To access this screen, go to Main Menu>Settings>Inventory Functions>Change Suppliers.
This screen can be used to designate the Primary Supplier for a group of products at once. To be the Primary Supplier of a product simply means the program uses that supplier record when automatically creating purchase orders to replenish inventory levels. It is possible to override that assumption and manually instruct the program to generate purchase orders for another secondary supplier if necessary.
You can set the Suppliers SKU field to the value of the Local SKU field for a group of inventory records (products), simultaneously, and the new supplier's Unit Cost for the products can be changed manually at this screen.
Use the controls on the left-hand side of the screen to select product records to change. Add the products to the right-hand pane of the screen and make any changes necessary there. Select Make Changes to put the changes into effect.
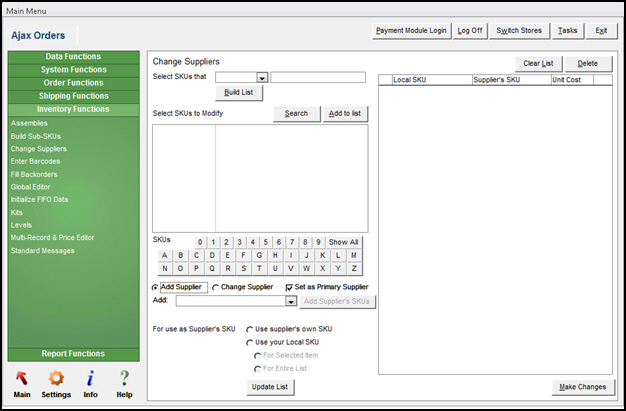
Change Supplier screen: Add a supplier to inventory records
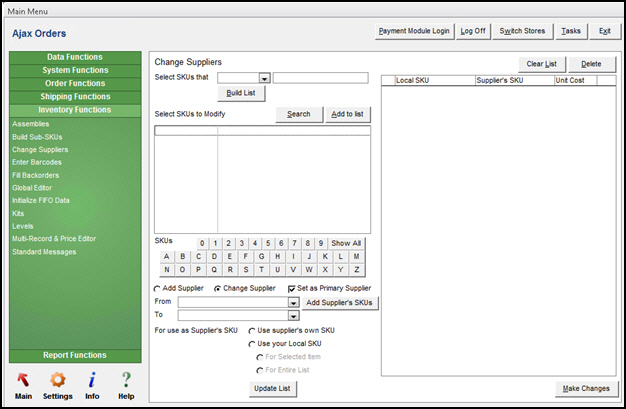
Change Suppliers screen: Change products from one supplier to another supplier
There are several ways to build a list of SKUs and make changes to them in a batch. Select the method that works for you.
select this entry from the drop-down list and enter a string of characters the SKU starts with in the adjacent text field
select Build List to add the matching inventory records to the right-hand pane
select this entry from the drop-down list, enter a string of characters the SKU ends with in the adjacent text field
select Build List to add the matching inventory records to the right-hand pane
move the matching records to the list in the right-hand pane, where changes can be made
before the records are added to the right-hand pane, you must choose the Add Supplier or Change Supplier operation and select suppliers from the appropriate Add or From/To drop-down lists
Another method is to add product records to the list box in the left-hand pane by using the Search, Show All or the SKUs letter and number buttons. Then select a record and select the Add to List button to move the product SKU to the right-hand pane.
While this pane may display more than one SKU at a time, it is not possible to move more than a single SKU to the right-hand pane at one time.
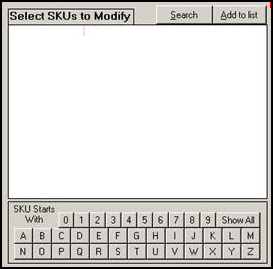
select this to open the Find a Product (Search Inventory) screen and add a product record to this list
when a SKU (product record) is selected in the left-hand pane, click this to move it to the right-hand pane where changes can be made
use Show All, or the letter and number buttons to produce a list of product SKUs in the left-hand pane
while this can result in more than one SKU being listed in the left-hand pane, only a single SKU can be Added to the list in the right-hand pane at a given time
select this to associate an additional supplier record with the selected group of SKUs (product inventory records)
select this radio button to change a supplier already associated with selected SKU or SKUs (product inventory records) to that of a different supplier
select this to assign the supplier chosen in the Add: or To: drop-down lists as the Primary Supplier of the SKUs in the right-hand pane
clear this if the changes being made should not affect the Primary Supplier designation of the SKUs in the right-hand pane
choose a supplier to associate with the SKUs in the right-hand pane
this field is only visible when the Add Supplier radio button is selected
choose a supplier already associated the products which will no longer be their supplier
this field is only visible when Change Supplier is selected
choose a supplier record from the drop-down list to replace the supplier record selected in From:
be aware that if an inventory record is not already associated with the supplier in the From: drop-down list, it will simply add the To: supplier record to its list of suppliers
this field is only visible when the Change Supplier radio button is selected
This section of the screen contains the list of SKUs (inventory records) that are candidates for change.
select this to remove all SKUs from the list in the right-hand pane and start over
select a SKU from the list and select this to remove it from the list
when the data in the right-hand pane is correct, click this to perform the changes
the program prompts for confirmation before making the changes
this column displays the value currently in the Local SKU field of the inventory record
the data in this column cannot be edited
this column initially displays the current value in the Supplier's SKU field of the inventory record, if any
the data in this column can be manually edited or the value can be changed by using the controls in the For use as Supplier's SKU section of the screen
this column initially displays the value currently in the Unit Cost field of the inventory record
the data in this field can be manually edited
select a supplier record in the From: drop-down list and select this to have all SKUs (inventory records) associated with that supplier added to the right-hand pane
This section of the screen allows you to make mass changes to the Supplier's SKU field for some or all of the records listed in the right-hand pane. Click Update List to see the new supplier's SKU in the right-hand pane. If this data is to be changed, do so before selecting Make Changes. Use a combination of the following buttons to make your changes.
select this to enter the value of the Supplier's SKU field in the inventory record in the Supplier's SKU field in the right-hand pane
select this to use the value of the Local SKU field in the inventory record as the Supplier's SKU field in the right-hand pane
select this to limit the scope of the action of Use supplier's own SKU or Use your Local SKU to a single item when Update List is clicked
select the row of the single item in the right-hand pane
select this to change the value of the Supplier's SKU field to the value of the Local SKU field for every inventory record in the list when Update List is clicked
Select Begin with or End with from the drop-down list.
Enter a string of characters in the adjacent text field.
If adding a new supplier record to the product, select the Add Supplier radio button, and skip to step 5. Otherwise proceed with the next instruction.
The Change Supplier radio button is selected by default when this screen is opened.
Choose the supplier record to be replaced in the From: drop-down list.
Choose the supplier record that is replacing the current supplier record in the To: drop-down list.
Select Build List.
A list of records (SKUs) matching the criteria in the text field appear in the right-hand pane.
Continue adding records to the list or make the desired changes to the records in the right-hand pane.
Select Search to open the Search Inventory screen. Refer to its Knowledge Base topic for information about using that screen.
When a SKU (inventory record) is selected at that screen, it appears in the SKUs to Modify list box.
Select the SKU in Select SKUs to Modify.
Select Add to List and that record appears in the right-hand pane.
Continue adding other records or proceed with making the desired changes to the records in the right-hand pane.
Select a number or letter button to see a list of records starting with that character in Select SKUs to Modify.
Select the row the SKU to be changed.
Select Add to list to have this record appear in the right-hand pane.
Continue adding other records or proceed with making the desired changes to the records in the right-hand pane.
Select the Change Supplier radio button.
Select a supplier in the From: drop-down list.
Select the Add Supplier's SKUs button.
All of the inventory records that are associated with the selected supplier appear in the right-hand pane.
Continue adding other records or proceed with making the desired changes in the right-hand pane.
Build a list of records to be changed by using one of the methods described elsewhere in this topic.
Select the Change Supplier radio button. (selected by default when this screen is opened)
Choose the supplier record to be replaced in the From: drop-down list.
Choose the supplier record to replace the current supplier record in the To: drop-down list
If the new supplier record should be designated as the Primary Supplier for the selected products, leave the check box marked. Otherwise, clear the box.
Optional: Select whether to use the suppliers own SKU as the Supplier's SKU in the inventory record or to use the value of the Local SKU field as the Supplier's SKU. Choose to make that change for a single record or all records in the right-hand pane.
Optional: Edit the Unit Cost values of the records in the right-hand pane.
Select Make Changes.
The program prompts for confirmation.
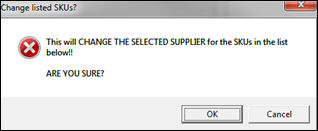
Select OK to proceed with the change or Cancel to abort the changes.
The program may prompt the user again if it detects other issues:
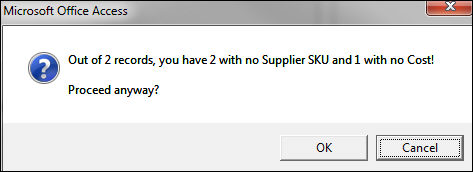
Select OK to proceed with the change or Cancel to abort the changes and correct the other issues.
Finally, the program prompts the user to acknowledge the completion of the changes.
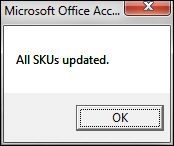
Select OK to end the dialog.
Backup the store data file as a precaution.
Build a list of records to change by using one of the methods described earlier in this topic.
Select the Add Supplier radio button.
Choose the supplier record to associated with the product in the Add: drop-down list.
If the new supplier record should be designated as the Primary Supplier for the selected products, leave the check box marked. Otherwise, clear the box.
Optional: Select whether to use the suppliers own SKU as the Supplier's SKU in the inventory record or to use the value of the LocalSKU field in the inventory record as the Supplier's SKU. Choose whether to make that change for a single record or all records in the right-hand pane.
Optional: Edit the Unit Cost values of the records in the right-hand pane.
Select Make Changes.
Created: 7/12/11
Revised: 6/30/15
Published: 08/19/15