Version 7.5

Version 7.5
Contents of this Topic: Show
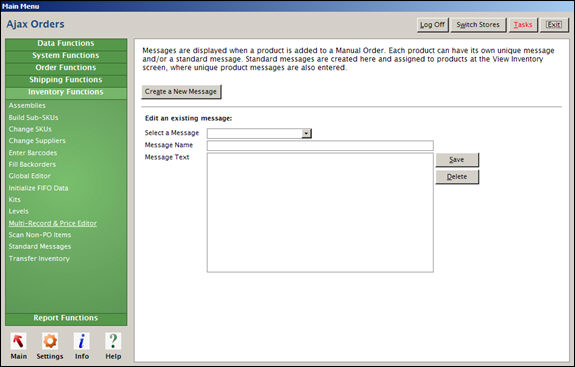
The Standard Messages screen is where the user defines product-related messages to be displayed at the Point-of-Sale or Manual Orders screen when an item is added to an order.
Once messages have been defined here, they are assigned to individual products at the Miscellaneous tab of the Inventory screen.
An unlimited number of product messages can be defined, but only three Standard Messages can be assigned to a single inventory item.
The program does allow the user to define one Unique Message for each inventory item via the Miscellaneous. tab of the Inventory screen, in addition to the three standard messages.
The Standard Messages screen is accessed via:
Main Menu>Settings>Inventory Functions>Standard Messages

Standard Messages screen
click this button to remove the selected message from the program
the program does not prompt for confirmation prior to deleting a Standard Message, so be sure that you have the correct message selected before clicking this button.
Go to Main Menu>Settings>Inventory Functions>Standard Messages
Click the [Create a New Message] button.
Enter a name for the new message in the pop-up box.
Click the [OK] button.
Enter the text of the message in the Message Text field.
Click the [Save] button.
Click the [OK] button to confirm the creation of the message.
![]() The program does not prompt for confirmation prior to deleting a Standard Message, so be sure that you have the correct message selected before clicking the [Delete] button.
The program does not prompt for confirmation prior to deleting a Standard Message, so be sure that you have the correct message selected before clicking the [Delete] button.
Go to Main Menu>Settings>Inventory Functions>Standard Messages
Choose an existing Standard Message from the Select a Message drop-down list.
Click the [Delete] button.
Go to Main Menu>Settings>Inventory Functions>Standard Messages
Choose an existing Standard Message from the Select a Message drop-down list.
Change the name of the message or change the text of the message.
Click the [Save] button.
If the text of the message is changed, the program will request that the user acknowledge the completion of the change. Click [OK].
If the name of the message is changed, the program will prompt for confirmation before making the change.
Click [OK] to proceed with the change and click [OK] again to acknowledge the completion of the change; or click [Cancel] to abandon the change.
Go to the Main Menu>Manage My Inventory>View & Manage My Inventory>Miscellaneous tab
Navigate to the desired inventory record.
Click the [Edit] button in the upper right-hand corner of the screen.
Select one of the pre-defined product messages from the Standard Message 1 - 3 drop-down lists as necessary.
Click the [Save] button in the upper right-hand corner of the screen.
Go to the POS or Manual Orders screens. When the item is added to an order, the Standard Message appears in a pop-up.
Click [OK] to add the item to the current order.
Or click [Cancel] close the pop-up. If the order is placed at the Manual Orders screen, the user will have to manually remove the line item from the order. If the order is being placed at the POS interface, the line item has not yet been added to the order when this message is displayed, so it is not necessary to remove it from the order.
Created:
Revised: 6/11/12
Published: 04/14/16