Import My Inventory
Contents of this Topic: ShowHide
Overview
Several types
of data can be imported through the Import
Data screen, such as Product
(Inventory), Customer, or Supplier
records. Product cost and price information can be imported via this
screen as well.
Data can be
imported from:
A tab or comma-delimited
text file
A table in a Microsoft
Access database
Any other format
(e.g. an Excel spreadsheet or FoxPro table) that can link
to an Access database. For information on linking data in
external tables to Access, please see MS Access documentation.
When importing
data from a text file, if the data contains commas, the file should
be saved as a tab-delimited file, not a csv.
Quotes should
not be present in text files, regardless of whether it is a csv or
tab-delimited file, or you will encounter errors.
To access this
screen go to one of the following areas:
Main
Menu > Manage My Inventory > Import My Inventory - File
Main
Menu > Manage My Inventory > Import Cost, Price & Weight
Main
Menu > Manage My Inventory > Import My Suppliers
Main
Menu > Manage My Customers > Import My Customers - File
The user is
lead through the steps to import the various types of data by a series
of screens.
Depending on
the type of data being imported, fields on the screens change. Refer
to the specific Knowledge Base
topic for the type of data being imported for more details.
This topic
discusses the product (inventory) import process.
Description of the Screens
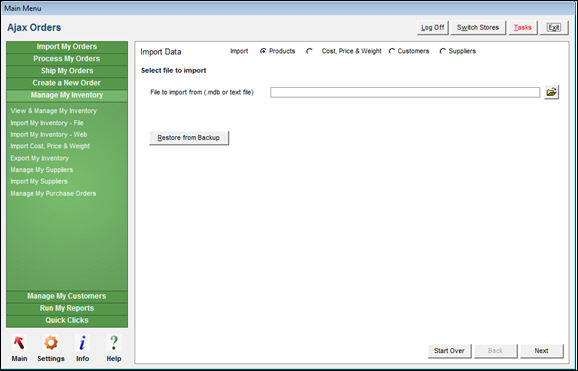
Import Inventory
screen: Select File to Import tab
Select File to Import Tab
Import Radio Button
- the Products
radio button is selected by default
File to import from (.mdb or text file) Field
- enter the path to the file containing the
product information
- the program displays up to 50 fields in the
file and the first 100 records at the bottom of the screen
Folder Button
- select
this button to navigate to the location of the file containing the
product information
Restore from Backup Button
- select this button to restore from a previous
backup, if one was created at the last step of the process
Start Over Button
- returns to the Select
File to Import tab
Next Button
- select this button when ready to proceed to
the Import Options tab
Import Options Tab
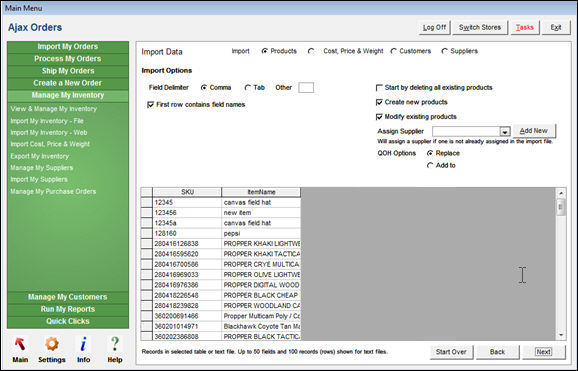
Import Inventory screen:
Import Options tab
Field Delimiter Radio Buttons
Comma Radio Button
- select this button if the fields in the input
file are separated by commas
Tab Radio Button
- select this button if the fields in the input
file are separated by a tab
Other Field
- enter the character used to separate the fields
in the input file
First Row Contains Field Names Check Box
- select this box if the first row in the input
file contains a header record with field names
Start By Deleting All Existing Products Check Box
- select this box to delete all existing product
records in the Inventory table
before importing the data from the input file
- if this box is not checked, products that
do not already exist are appended to the Inventory
table
Create New Products Check Box
- select this box to create inventory records
for products that do not currently exist (based on the SKU)
- if this is not selected, existing product
records may be modified, but no new product records are added
Modify New Products Check Box
- select this box to make replace information
in existing product records with information from the input file (based
on the SKU)
- if this is not selected, new product records
may be added, but existing product records are not modified
Assign Supplier Drop-down List
- select a supplier to assign to product records
that do not already contain a Supplier ID or Supplier Name value
- this supplier automatically becomes the Primary
Supplier of the product
Add New Button
- click this button to add a new supplier record
"on the fly"
QOH Options Radio Buttons
Replace
- select this button to replace existing quantity
on hand values with those in the input file
Add to
- select this button to add the quantity on
hand values in the input file to those values in the existing product
record
Data in Text File or Database Table
- this section of the screen displays up to
fifty fields and the first one hundred records of data in the input
file
Start Over Button
- returns to the Select
File to Import tab
Back Button
- returns to the previous tab
Next Button
- select this button when ready to proceed to
the Inventory Fields tab
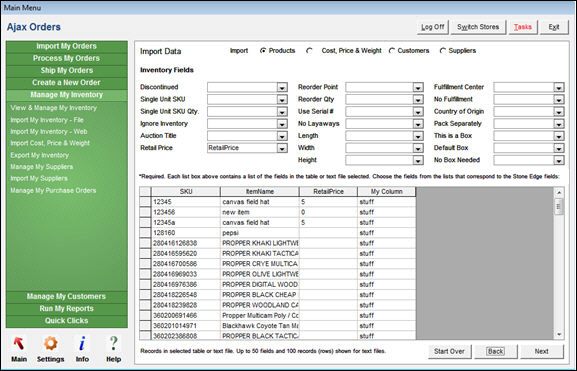
Inventory Fields Tab - Page 1
Import
Inventory screen: Inventory Fields tab
- map the fields
in the input file to their counterparts in SEOM
- Local SKU is the only required field
| Local SKU |
Supplier ID |
Published Weight |
| Item Name |
Supplier Name |
Actual Weight |
| Description |
Supplier's SKU |
Category |
| Regular Price |
Primary Supplier Type |
Location |
| On Sale |
Primary Supplier |
Email BCC |
| Sale Price |
Your Cost |
Drop-Ship |
| Taxable |
Qty on Hand |
Barcode |
Data in Text File or Database Table
- this section of the screen displays up to
fifty fields and the first one hundred records of data in the input
file
Start Over Button
- returns to the Select
File to Import tab
Back Button
- returns to the previous tab
Next Button
- select this button when ready to proceed to
the second page of the Inventory
Fields tab
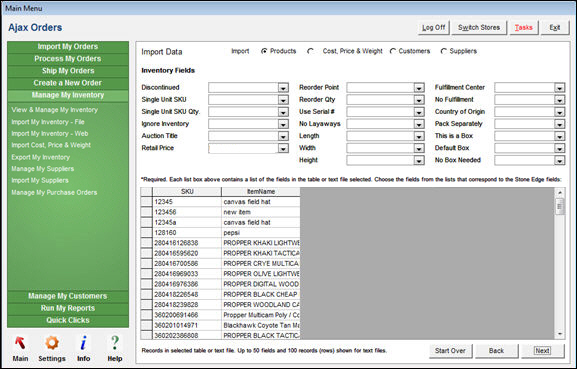
Inventory Fields Tab - Page 2
Import
Inventory screen: Inventory Fields tab, Page 2
- continue mapping fields in the input file
to those in SEOM
| Discontinued |
Reorder Point |
Fulfillment
Center |
| Single Unit SKU |
Reorder Qty |
No Fulfillment |
Single Unit SKU Qty. |
Use Serial # |
Country of Origin* |
| Ignore Inventory |
No Layaways |
Pack Separately |
| Auction Title |
Length |
This is a Box |
| Retail Price |
Width |
Default Box |
| |
Height |
No Box Needed |
* this must be a two-letter abbreviation
for the country in which the product was produced and is used in customs
forms
Data in Text File or Database Table
- this section of the screen displays up to
fifty fields and the first one hundred records of data in the input
file
Start Over Button
- returns to the Select
File to Import tab
Back Button
- returns to the previous tab
Next Button
- select this button when ready to proceed to
the first page of the Custom Fields
tab, if custom inventory fields are defined
Custom Fields Tab Page 1
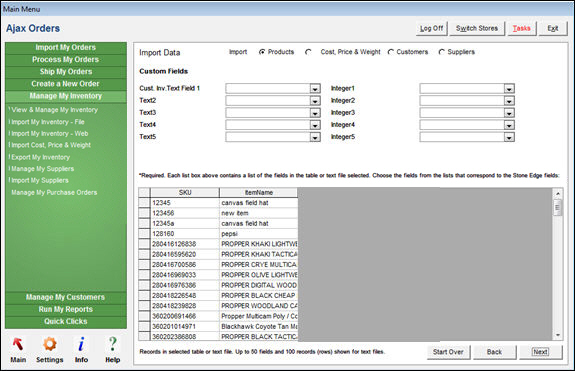
Import Inventory screen:
Custom Fields tab
- map fields in the input file to any custom
inventory text or integer fields defined in SEOM
- this tab is not visible if custom inventory
fields have not been defined
Data in Text File or Database Table
- this section of the screen displays up to
fifty fields and the first one hundred records of data in the input
file
Start Over Button
- returns to the Select
File to Import tab
Back Button
- returns to the previous tab
Next Button
- select this button when ready to proceed to
the second page of the Custom Fields
tab, if custom inventory fields are defined
- map fields in the input file to any custom
inventory text or integer fields defined in SEOM
Custom Fields Tab Page 2
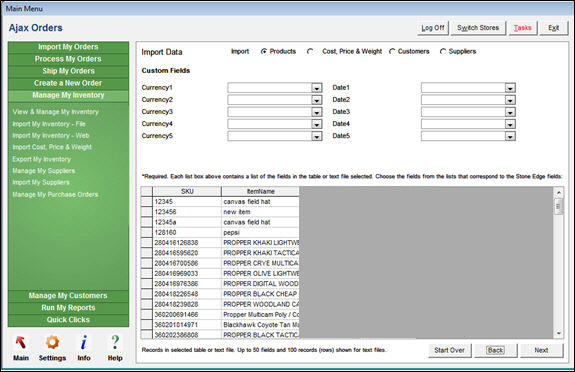
Import Inventory screen:
Custom Fields tab, Page 2
- map fields in the input file to any custom
inventory currency or date fields defined in SEOM
- this tab is not visible if custom inventory
fields have not been defined
Data in Text File or Database Table
- this section of the screen displays up to
fifty fields and the first one hundred records of data in the input
file
Start Over Button
- returns to the Select
File to Import tab
Back Button
- returns to the previous tab
Next Button
- select this button when ready to proceed to
the Web Fields tab
Web Fields Tab
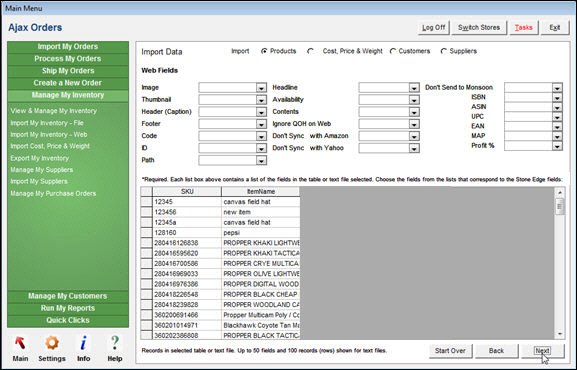
Import Inventory screen:
Web Fields tab
- map fields in the input file to fields in
SEOM
- the fields on this screen may not apply to
your shopping cart system
- refer to the Inventory
Knowledge Base topic for more details
| Image |
Headline |
Don't Send to Monsoon |
| Thumbnail |
Availability |
ISBN |
| Header |
Contents |
ASIN |
| Footer |
Ignore QOH on Web |
UPC |
| Code |
Don't Sync with Amazon |
EAN |
| ID |
Don't Sync with Yahoo |
MAP |
| Path |
|
Profit % |
Data in Text File or Database Table
- this section of the screen displays up to
fifty fields and the first one hundred records of data in the input
file
Start Over Button
- returns to the Select
File to Import tab
Back Button
- returns to the previous tab
Next Button
- select this button when ready to proceed to
the Pricing Fields tab
Pricing Fields Tab
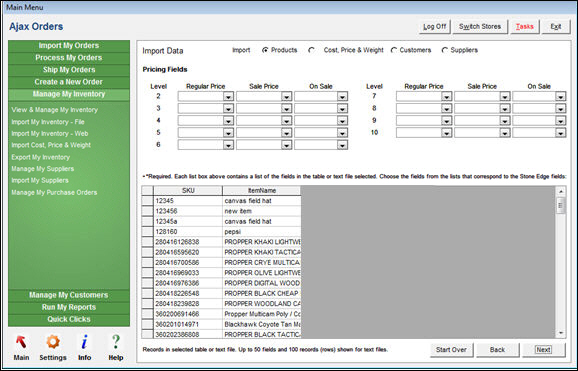
Import
Inventory screen: Pricing Fields tab
- map fields in the input file to fields in
SEOM
- the fields on this screen apply to multi-level
pricing
- refer to the Knowledge Base topic Price
Levels for more information
Data in Text File or Database Table
- this section of the screen displays up to
fifty fields and the first one hundred records of data in the input
file
Start Over Button
- returns to the Select
File to Import tab
Back Button
- returns to the previous tab
Next Button
- select this button when ready to proceed to
the Finish and Import tab
Finish and Import Tab
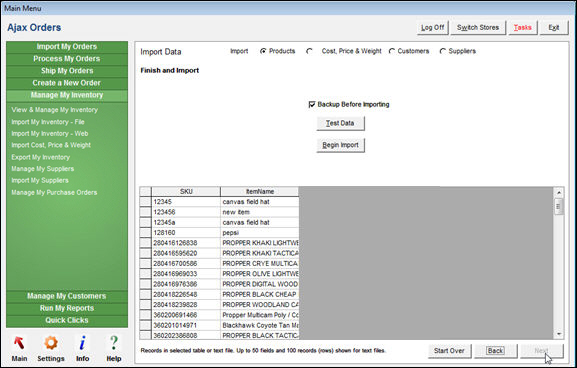
Import Data screen: Finish
and Import tab
Backup Before Importing Check Box
- select this box to make a backup copy of the
affected tables before the import is started
Test Data Button
- select this button to have the program check
for errors before starting the import process
Begin Import Button
- select this button to start the import process
Start Over Button
- returns to the Select
File to Import tab
Back Button
- returns to the previous tab
Additional Information
Created:
6/15/12
Revised:
12/2/14
Published:
04/14/16