
Version 7.1

Version 7.1
Contents of this Topic: Show
This topic outlines the steps to set up the integration between the Enterprise Edition of Stone Edge Order Manager and UPS WorldShip. OMS Standard Edition users should consult the Knowledge Base topic, UPS WorldShip Integration (Standard Edition), for instructions.
OMS easily integrates with UPS WorldShip via an ODBC connection and mapping related fields in each application.
Once those steps are completed, you can lookup the OMS order number in WorldShip and print the shipping label without re-typing the shipping information in WorldShip. At the end of the day, the tracking numbers can be sent back to OMS .
This topic assumes that the Enterprise Edition of Stone Edge Order Manager is installed on the same workstation as WorldShip, and that the OMS store data file is an SQL database.
Create a blank MS Access database. Name it "WorldShip.mdb" and save it in your StoneEdge directory.
Go to File>Get External Data>Link Tables.
At the bottom of the Link window, select ODBC Databases() from Files of type drop-down list.
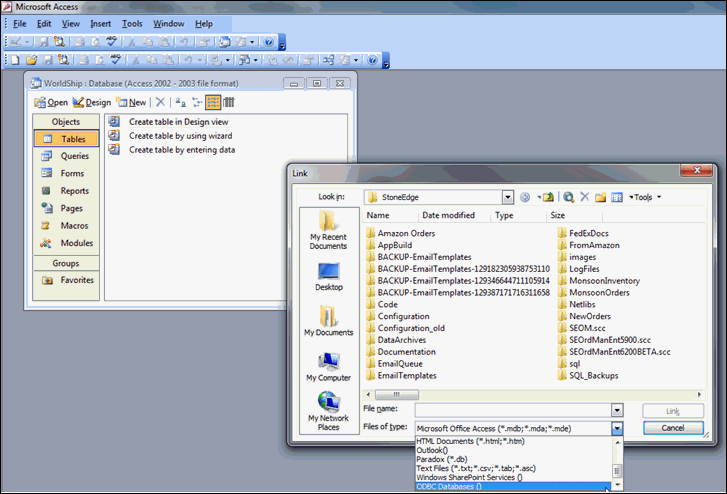
Select the Machine Data Source tab on the Select Data Source screen.
If you are using SQL Authentication, you will also be prompted to encrypt your password.
Select Save Password.

Select the Data Source Name that relates to the OMS SQL data file.
Select OK.
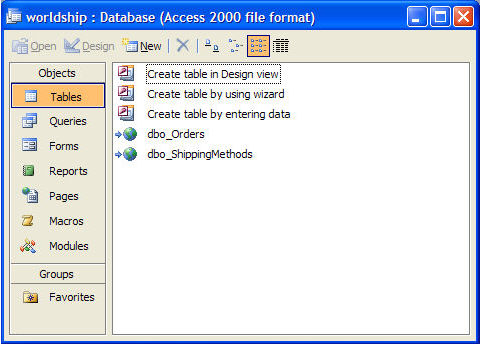
When the Link Tables dialog opens, hold the Ctrl or Shift button and select dbo.Orders and dbo.ShippingMethods.
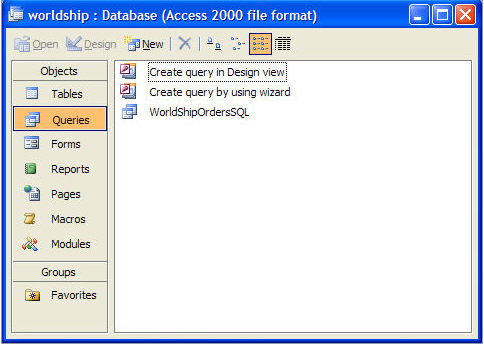
Select OK to see the tables listed in the new intermediary database window.
Navigate to the OMS installation directory (usually in C:\StoneEdge) and select the program file, typically named SEOrdManEnt200*.mdb.
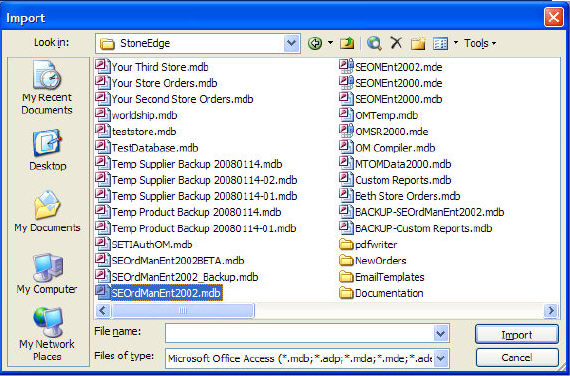
Select Import.
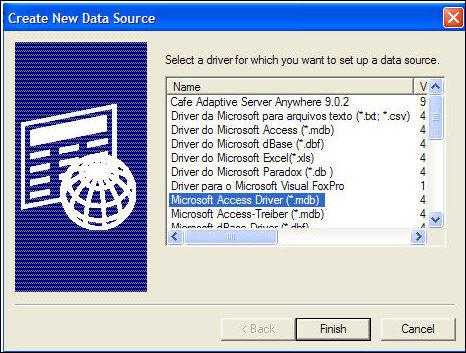
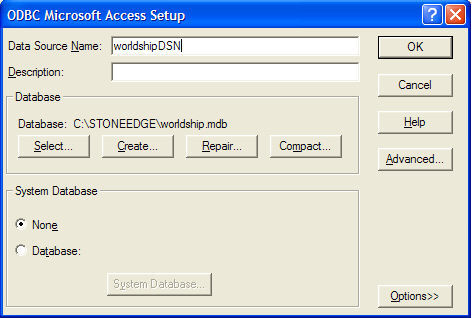
Enter a name for the DSN in Data Source Name.
Select Select.
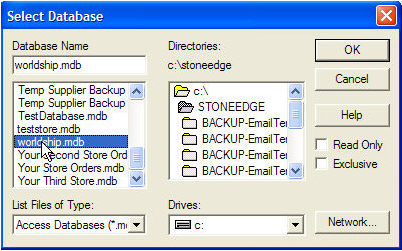
Navigate to the location of WorldShip.mdb and select OK.
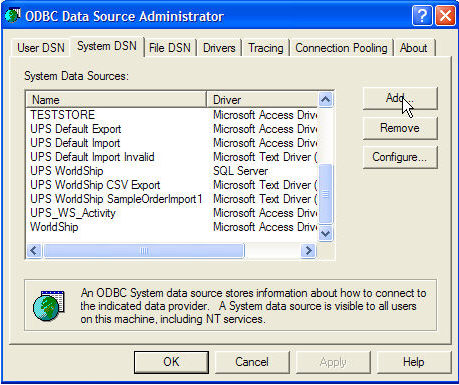
Select OK in the ODBC Microsoft Access Setup screen. The DSN name appears in your ODBC Data Source Administrator window.
WorldShip profiles allows you to set default values to speed shipment processing. To avoid errors sending tracking information back to OMS , it is necessary to set some default values in your WorldShip profile or profiles. Refer to UPS WorldShip Help or Support for assistance beyond the scope of this topic.
Open UPS WorldShip.
Go to Tools > Profile Editor.
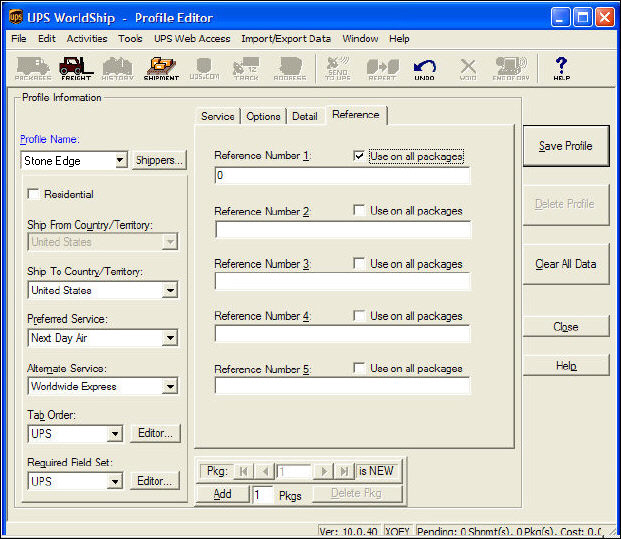
Select an entry from Profile Name and select the Reference tab.
Enter 0 in Reference Number 1.
Select Use on all Packages.
Select the Options tab and ensure Quantum View Notify is cleared.
Select Save Profile.
Repeat this process for any other profiles you may use.
Select Close to return to the main WorldShip screen.
Launch WorldShip if it is not already open.
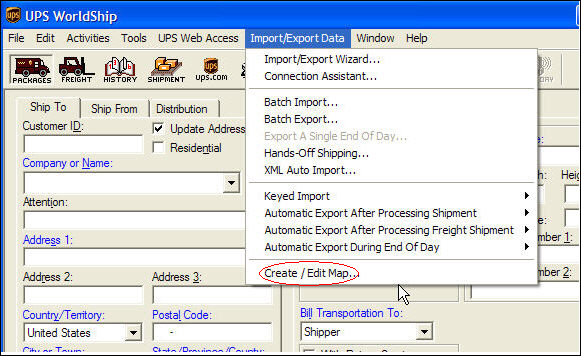
Go to Import/Export Data > Create/Edit Map.
In the New Map section, select Import from ODBC Database.
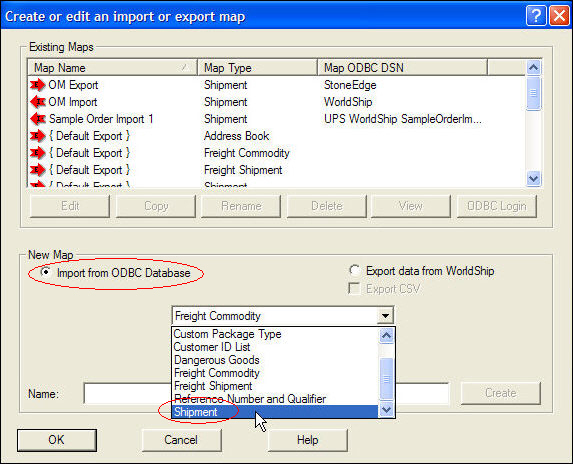
Select Shipment from the drop-down list.
Enter a name for the map in the Name field. (Choose any name, such as WorldShip Import Map.)
Select Create. The Select an ODBC source dialog box opens.
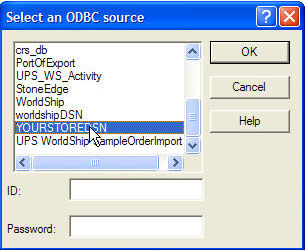
Select the ODBC connection (DSN) for the WorldShip.mdb created at the beginning of this topic.
Select OK.
The Edit 'YOUR MAP NAME' import map screen opens.
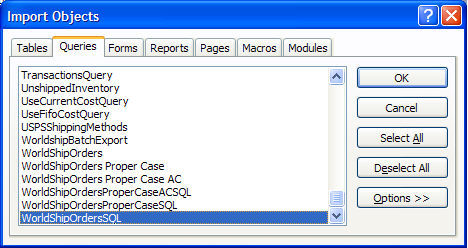
In ODBC Tables, select WorldShipOrders. A list of fields in the table appears below the drop-down list.
In WorldShip Fields, select Package. A list of fields in that category appear below the drop-down list.
Now the process of mapping fields from the WorldShipOrders table in OMS (left side) to corresponding WorldShip Package fields (right side) can begin.
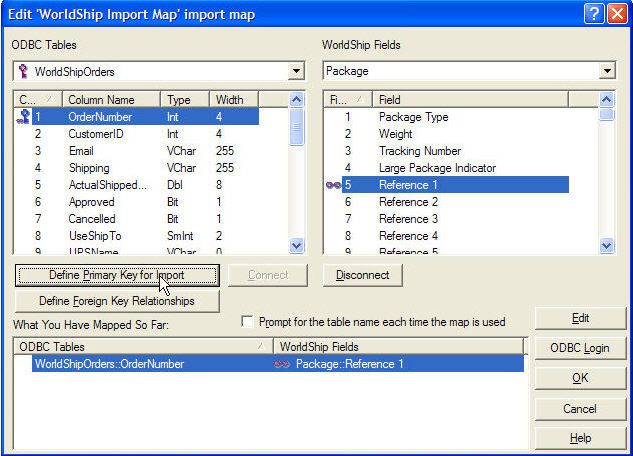
The first field to map is OrderNumber. Before mapping it, you must define this field as the primary key. Select OrderNumber and select Define Primary Key for Import. This sets the OMS order number as the primary identifier for the order record. A small blue key appears next to the OrderNumber field.
While OrderNumber is still selected in the left, select Reference 1 from the list on the right and select Connect. This maps the OMS field, "OrderNumber" to the "Reference 1" field in the "Package" category in WorldShip.
A small red infinity symbol appears next to the fields indicating that they are now linked, and that association is also displayed in What You Have Mapped So Far:.
Continue mapping all of the fields listed in the table below in the same manner. (For each map pairing, be sure to select the correct category from the WorldShip Fields drop-down list - the same field name may exist in more than one category).
OMS Field |
WorldShip Category |
WorldShip Field |
OrderNumber |
Package |
Reference1 |
ActualShippedWeight or UPSWeight Published weight is used if actual weight is not present. |
Package |
Weight |
SourceOrderNumber and |
Package |
Reference2 |
Shipment Information |
Notification Recipient 1Email |
|
Shipping |
Shipment Information |
Service Type |
Cancelled |
Shipment Information |
Void Indicator |
UPSNotification1 |
Shipment Information |
QVN Ship Notification or Return Notification 1 Option |
UPSNotification1 |
Shipment Information |
QVN or Return Notification Option |
CustomerID |
Ship To |
CustomerID |
Ship To |
Email Address |
|
Residential |
Ship To |
Residential Indicator |
UPSCompanyOrName |
Ship To |
Company Or Name |
UPSAttention |
Ship To |
Attention |
UPSAddr1 |
Ship To |
Address 1 |
UPSAddr2 |
Ship To |
Address 2 |
UPSCity |
Ship To |
City or Town |
UPSState |
Ship To |
State/Province/County |
UPSZip |
Ship To |
Postal Code |
UPSCountry |
Ship To |
Country/Territory |
UPSPhone |
Ship To |
Telephone |
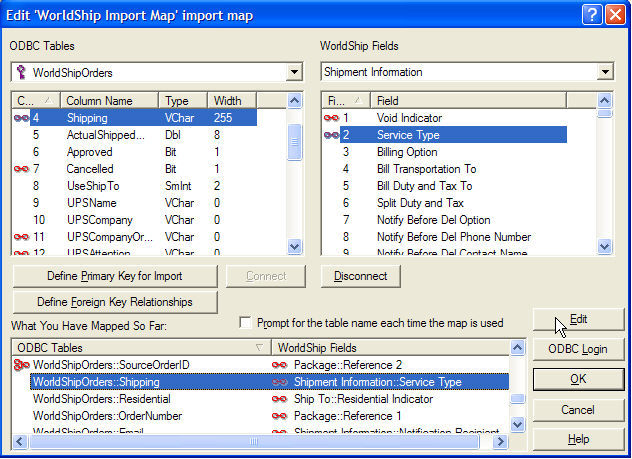
When you have finished mapping all of the fields, select WorldShipOrders:Shipping in the lower window, What You Have Mapped So Far.
Select Edit to map WorldShip service types
to OMS
shipping methods.
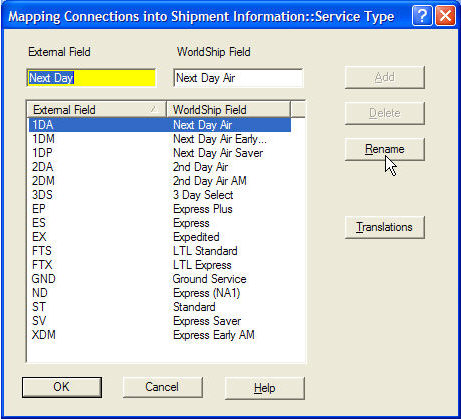
The Mapping Connections into Shipment Information window opens.
Select Translations.
In Select a common map, select Service.
Select OK. This loads the default service options into the External Field and WorldShip Field lists.
The External Field list represents the OMS shipping method names for corresponding UPS services listed in the WorldShip Field list. In this example, 1DA is the OMS default name for WorldShip Next Day Air.
Select a service pairing from the list. In External Field (yellow background), enter the OMS shipping method name for that UPS service type.
Select Rename to save each service type with the new name. (If you make a mistake, select Translations, and then Service, OK to re-load the default service option lists again.)
When you are finished renaming all your service types, select OK.
When all of the translations are completed, select OK. Your view returns to the Create/Edit Map window.
Select OK.
Go to Import/Export Data > Create/Edit Map.
In the New Map section, select Export Data from WorldShip.
Select Shipment from the drop-down list.
Enter a name for the map in the Name field (for example, StoneEdge Export Map).
Select Create.
The Select an ODBC source screen opens.
Select the ODBC connection (DSN) that points to the OMS SQL store file. (This was created when you converted the original OMS MS Access store data file to SQL.)
Select OK.
The Edit 'YOUR MAP NAME' export map screen opens.
Select Tracking from ODBC Tables, and then choose OrderNum from the list below the drop-down.
Select Package from WorldShip Fields, and then select Reference 1 from the list below the drop-down.
Select Connect to link the fields. A small red infinity symbol appears next to the fields indicating that they are now linked. You can then see the linked fields in the What You Have Mapped So Far list at the bottom of the screen.
Repeat steps 7 through 9 until all the required fields in the table shown below have been mapped.
WorldShip Category |
WorldShip Field |
OMS Field |
Package |
Reference 1 |
OrderNum |
Package |
Tracking Number |
TrackingID |
Shipment Information |
CollectionDate |
PickupDate |
Package |
Void Indicator |
IsVoid |
Map only one of the following fields to the Cost field: |
|
|
Package
|
Package Charge |
Cost* |
OR |
|
|
Shipment Information |
Total Shipment and Handling Published Charges (DEFAULT) If your business uses Negotiated Rates or Cost Center Calculator, use Total Shipment and Handling Negotiated Rates Charge or Total Shipment and Handling CCC Rates Charge |
Cost* |
*There are many fields in Worldship that contain cost information and the user should determine which is best for their environment. Some of our customers have had better results using the Package Charge field rather than the Total Shipping and Handling fields.
Select OK twice to return to the main WorldShip screen.
Go to the UPS Import/Export Data menu.
Choose ONE of the following selections:
Automatic Export at End of Day to send tracking numbers to OMS once, at the end of the day
Automatic Export After Process Shipment to send tracking numbers to OMS after processing each shipment
After making your Automatic Export selection, select More. Select the export map that was just created in Select map from list for export.
Select Export. When you return to this menu your export map is displayed with a check mark beside it, indicating that this export map is being used.
Launch WorldShip if it is not already open.
Go to Import/Export Data.
Select Keyed Import.
Select the name of the Import Map created in a previous step in this topic. Note: If the name does not appear on the menu, select More. The name should appear in the list, but if it does not, you will need to create the import map manually. This is common occurrence for network setups of UPS, or if WorldShip was installed in a path other than the default.
The Enter Import Key window opens. Enter an "approved" OMS order number.
Press Enter (do not select the Close button). The shipping information from the order appears in the WorldShip form. Process the order as you normally would.
When the shipping label for that order is printed, enter a new order number in the Enter Import Key dialog box to process another order.
Note: If you return to OMS and make changes to an order (such as approving an order), you will not see the changes in WorldShip until you close and re-open the Enter Import Key dialog box.
Error Message: "Primary Key cannot contain a null value" when exporting tracking information.
WorldShip imports the OMS order number into its Reference 1 field. When WorldShip generates a tracking number, it exports the tracking number and the order number in Reference 1 field back to OMS . If the Reference1 field is empty, WorldShip can't return tracking numbers to OMS .
Possible causes:
Processing orders non-OMS orders through WorldShip: If you process any orders in WorldShip that were not imported from the Order Manager, the Reference 1 field is left blank. When you close the batch in WorldShip, the empty Reference 1 field (NULL) causes the ODBC to generate the Primary Key cannot contain a null value error that prevents it from returning tracking numbers to OMS .
An order has multiple package shipments: If an order has multiple package shipments, OMS 's order number is only associated with the first tracking number for the order. When you close the batch in WorldShip, the ODBC only returns one tracking number because only the first shipment in the order has a value (order number) in the Reference 1 field. Subsequent shipments for the same order have an empty Reference 1 field, causing the Primary Key cannot contain a null value error, preventing tracking numbers from being sent to OMS .
Solution: To avoid this error, the Reference 1 field must contain a numeric value such as 0, so that the tracking number can be returned. You can manually type a numeric value into the Reference 1 field for each order OR set up a Shipper Profile in WorldShip that pre-populates the Reference 1 field with a numeric value. (Note: WorldShip Profile Editor allows you to set up default values for many of the fields in WorldShip when a new order is added.) Using the WorldShip Profile Editor, set up a new profile, add "0" (or any default numeric value) to the Reference 1 field, and select "Use on all packages" option for Reference 1. When processing orders, select the profile with these settings before you begin. (Note: The tracking number is returned to OMS without an associated order number.)
Tracking numbers form is not visible on Process Orders screen: If the Reference 1 field contains text-based information (alpha characters), the tracking number is returned but the tracking numbers form does not appear at the Process Orders screen when you try to view the tracking numbers. This is due to a conversion error when changing the text-based order number field to a numeric value.
Solution: Go to the Main Menu in OMS and press F11 to open the database window. Click on Tables and double-click the Tracking table. Look through the OrderNum fields for any values that contain text or non-numeric characters (such as dashes) and remove those records from the table. Close the Tracking table. Select the Window menu and choose Hide to remove the database window from the screen. Return to the Process Orders form. Tracking numbers should now be visible.
If the following error message is encountered, it is mostly likely caused by the fact that the OMS store data file is an SQL database, which requires additional setup steps besides those outlined in this topic.

UPS WorldShip Shipping Method Translations
UPS WorldShip Integration (Standard Edition)
Created:
Revised: 10/10/14
Published: 04/14/16