
Version 7.0
Version 7.0
![]() Use the Next Topic and Previous Topic arrows,
Use the Next Topic and Previous Topic arrows, ![]() and
and ![]() , in
the Navigation Pane of the Knowledge
Base to read the topics about the Store
Setup Wizard in sequence. (The buttons are actually white on the
black background of the Navigation Pane.)
, in
the Navigation Pane of the Knowledge
Base to read the topics about the Store
Setup Wizard in sequence. (The buttons are actually white on the
black background of the Navigation Pane.)
Contents of this Topic: Show
This Knowledge Base topic discusses the Users & Security section of the Store Setup Wizard.
On the first page of the Users & Security section there are parameters to allow or disallow certain functions to be performed, such as allowing a user to edit or delete a note that has been added to an order, customer, inventory or supplier record. These parameters are all or nothing, across the board - in other words, they are not user-specific. If they are set to No or False, no user will be able to perform these functions regardless of the security group to which they belong. The program will simply not permit the function to be executed.
The second page of the User & Security section is where the security system can be enabled and UserIDs can be assigned to everyone that uses the program. Each UserID is assigned to at least one security group that governs the permissions of its members. Access can be restricted at the form or screen level, or down to the specific button on the form.
Although it is not necessary to have the security system enabled to define Packers and Salespeople, that information is also entered here.

Figure 2: Setup Wizard, Users & Security Page 1
Check the box next to any of the functions listed on this page to enable the function for all users.
The following chart shows the correlation between the setting description and the its corresponding system parameter:
|
Setting on Users & Security Page 1 |
Corresponding System Parameter |
| Inventory adjustments at misc. screens | AllowAdjustInventory |
|
Edit notes |
AllowEditNotes |
| Delete notes | AllowDeleteNotes |
| Edit payment information | AllowEditCCInfo*** |
| Edit transaction details | AllowEditTransactions |
| Delete line items from orders | AllowDeleteLineItem |
| Delete Email Templates | AllowDeleteEmailTemplate |
| Delete entire orders | AllowDeletingOrders |
| Revise the cost of a line item at Orders screen | AllowReviseLineItem |
| Revise the cost of a drop-shipped item at the Orders screen | AllowChangeDropShipCost |
| Change prices at Manual Orders or Orders screens | AllowPriceChanges |
| Approve orders with unresolved Reasons for Review | AllowApprovewithOpenIssues* |
| Approve orders with unresolved drop-ships | AllowApproveUnorderedDropShips |
| Ship orders that have a balance due | AllowApprovewithBalanceDue* |
|
Delete credit card acct. numbers after 30 days or more |
AllowDeleteCreditCardInfo |
|
When displaying credit card numbers within the program, just show the last four digits |
HideAccountNumbers |
|
Cancel orders from customers marked "DoNotShipTo" |
CancelOrderFromDoNotShipTos |
Chart 1
* this parameter can also be set at the Order Processing section, Page 1
*** this parameter is only applicable to payments that are logged, such as a cash or check payment; credit card transactions cannot be edited, despite the name of the parameter, which is carried over from previous versions of the program
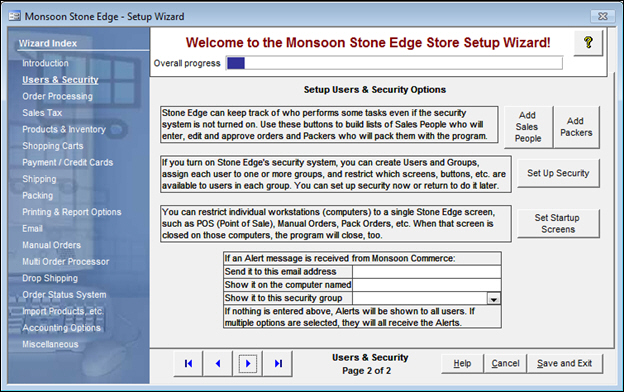
Figure 3: Setup Wizard, Users & Security Page 2
this button will open the List Builder screen; enter the Initials and Name of each individual sales person and click the [Save] button after each definition
if a mistake is made, select the bad entry from the List Entries section and then click the [Delete] button
the List Builder screen is an abbreviated version of the List Maintenance screen
this button will open the List Builder screen; enter the Initials and Name of each individual packer and click the [Save] button after each definition
if a mistake is made, select the bad entry from the List Entries section and then click the [Delete] button
this button opens the Security System screen.
this button will open the List Builder screen
enter the Name of any workstation that should be directed to a specific screen when the program is launched in the Computer Name field, select the screen to which it should be directed from the Startup Screens drop-down list and click the [Save] button after each workstation is defined
if a mistake is made, select the bad entry from the List Entries section and then click the [Delete] button
This feature is not functional presently.
are located at the bottom left-hand side of each page of the store setup wizard and can be used to navigate sequentially through the various sections
the name of the Wizard section and page number can be found between the Navigational Arrows and the Help, Cancel and Save and Exit buttons at the bottom center section of the screen
sections that have many settings will have more than one page in the Wizard; be sure to review them all
opens the Knowledge Base
causes the program to prompt for confirmation before exiting the Store Setup Wizard
click Yes to save the changes before exiting the wizard
click No to abandon the changes and exit the wizard
click Cancel to remain at the Store Setup Wizard and continue making changes
click this button to save all changes before exiting the Store Setup Wizard