
Version 7.0
Version 7.0
![]() Use the Next Topic and Previous Topic arrows,
Use the Next Topic and Previous Topic arrows, ![]() and
and ![]() , in
the Navigation Pane of the Knowledge
Base to read the topics about the Store
Setup Wizard in sequence. (The buttons are actually white on the
black background of the Navigation Pane.)
, in
the Navigation Pane of the Knowledge
Base to read the topics about the Store
Setup Wizard in sequence. (The buttons are actually white on the
black background of the Navigation Pane.)
Contents of this Topic: Show
This section of the Store Setup Wizard contains three pages of settings. The first page is where the user enters company-specific information such as the mailing address, email address, fax number, phone number, Web site URL, and company logo that will appear on invoices and packing slips, etc.
It is possible to use different company information for Manual and Point of Sale ( POS ) orders versus that which is used for Web orders. If multiple shopping carts are contained in the same data file, the program provides the ability to apply different printing and report preferences for each shopping cart , so that they reflect the particular "brand".
There are also additional settings related to the printing of POS reports that can be found on the Printing tab of the Point of Sale Setup screen.
The second page has settings to determine the number of copies of a given report will be printed, which report template will be used, and what fields will be included on the reports. These settings can also be specified at the shopping cart level.
Lastly, the third page in comprised of miscellaneous settings, such as determining which reports are printed after Web orders are imported, and which template they will use, as well as visual preferences, such as line shading or the sequence in which order paperwork will print.
Many system parameters that affect Printing & Reporting are covered on these three pages, however, to see the full list of system parameters, refer to the Knowledge Base page, Report Parameter Group.
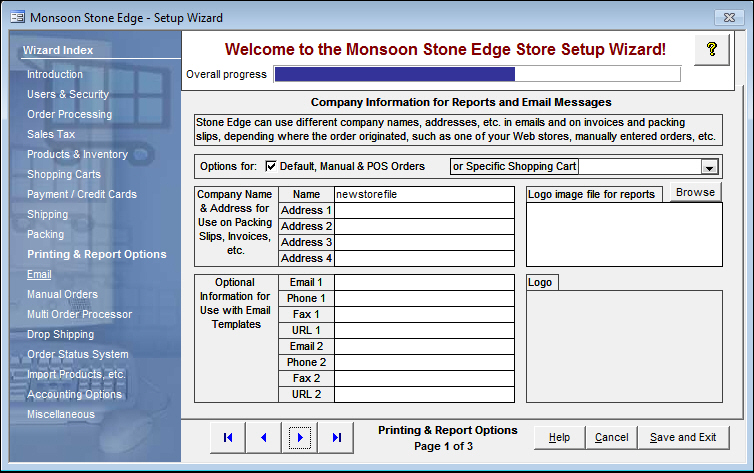
Figure 1: Store Setup Wizard - Page 1, Printing & Report Options
mark this box to set the preferences for orders that are entered via the Manual Orders screen or Point of Sale Interface
sets system parameters in the main parameter groups
select a shopping cart from the drop-down list and set its preferences for printing and reporting
sets parameters in the cart-based special system parameter groups
when the drop-down arrow is selected, the Default, Manual, and POS check box is automatically deselected
the name of Stone Edge store will be pre-populated in this field; this field can be edited
sets main system parameter and cart-based special system parameter CompanyName
enter the mailing address as it should be seen on reports from the particular order source in these fields (Manual/POS or Shopping Carts)
sets main system parameters and cart-based special system parameters CompanyAddress1-4
type in the path to the logo that should be added to the report
logos should be limited to 1" X 1" in size
sets main system parameters or cart-based special system parameter ReportLogoLocation
use this button to navigate to the location of the logo file and populate the Logo image file for reports field with that information
when a logo has been specified in the Logo image file for reports field, it will be displayed here
Set the general program values for company Information by checking the Default, Manual & POS Orders box and complete steps 2 - 5, as applicable.
To set preferences for paperwork from orders that originate from a Specific Shopping Cart, choose the cart from the drop-down list and repeat steps 2 - 5, as applicable. Repeat this process for any other shopping carts that should use different company information than that used by Default, Manual & POS Orders.
Enter the company name in the Name field, if different from the name of the store data file, which is pre-populated in the Name field by default.
Enter the mailing address in fields Address 1 - 4.
Enter email, phone, fax, and URL data in the Optional Information for Use with Email Templates fields, as applicable.
Specify the location of the company logo in the Logo image file for reports by manually typing in the path and file name or by using the Browse button to navigate to its location.
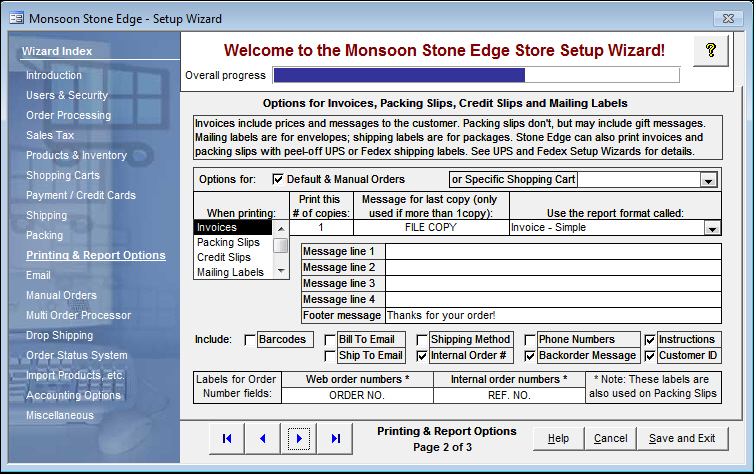
Figure 2: Store Setup Wizard - Printing & Report Options, Page 2
The fields that are visible at this screen depends on the type of report that is currently selected. Some of the fields that are visible in Figure 3, which shows the fields related to Invoices, do not apply to Packing Slips, Credit Slips or Mailing Labels.
Select one of the report types:
Invoices - commonly referred to as sales receipts
Packing Slips - show the list of items that make up the order and is used to pack the items for shipment
Credit Slips - shows the amount of credit that is extended to the customer for goods or services not received or returned
Mailing Labels - simple labels that can be used to address a package, however no postage is included in the label
Then complete the:
Print this # of copies Field - enter the number of copies of the report that the program should generate when the report is printed
Sets system parameters CreditSlipCopies, InvoiceCopies, LabelCopies or PackingSlipCopies
Message for last copy (only if more than one copy is printed) Field; enter a message indicating that the last copy is for the merchant's files
Sets system parameters CreditSlipLastCopyMessage, InvoiceLastCopyMessage or PackingSlipLastCopyMessage
Use the report format called: Drop-down List - select a report template from the list that will be the default template used whenever a particular type of report is printed
Sets main or cart-based special system parameters CreditSlipTemplate, InvoiceTemplate, LabelTemplate or PackingSlipTemplate
only applies to Invoices and Packing Slips
enter text in these lines that will be printed near the bottom of an invoice or packing slip
sets main or cart-based special system parameters InvoiceMessage1-4 or PackingSlipMessage1-4, depending on the selected report type
enter a message that will be displayed at the very bottom of the report, such as "Thanks for your business"
sets main or cart-based special system parameters CreditSlipLastCopyMessage, InvoiceFooterMessage or PackingSlipFooterMessage
The fields listed below only apply to Invoices and Packing Slips and some of these fields are not available on both report types. Check any of the available fields to have them print on Invoices or Packing Slips. For Packing Slips only, choose whether a packing slip should always be printed for each order.
the barcode of the order number will be printed at the top of the Invoice or Packing Slip
sets main or cart-based special system parameters ShowBarcodesOnPackingSlips and ShowBarcodesOnInvoices
print the customer's (purchaser's) billing address on the report
sets main or cart-based special system parameters ShowBillToEmailOnInvoices or ShowBillToEmailOnPackingSlips
print the recipient's address on the report
sets main or cart-based special system parameters ShowShipToEmailOnInvoices or ShowShipToEmailOnPackingSlips
print the name of the shipping method used to deliver the order on the Invoice report
sets main or cart-based special system parameter ShowShipMethodOnInvoices
print the number that Stone Edge has assigned to the order on the report; otherwise the number assigned by the shopping cart will be printed on the Invoice
sets main or cart-based special system parameter ShowRefNumber
print the purchaser's (Sold To) and recipient's (Ship To) phone numbers on the Invoice report
sets main or cart-based special system parameter ShowPhoneNumbersOnInvoices
if an item is backordered, print a message on the report; only valid for Invoices
see main or cart-based special system parameters, InvoiceBackOrderMessage and ShowInvoiceBackOrderMessage
if provided, print the customer instructions on the Invoice
sets main or cart-based special system parameter ShowOrderInstructions
print the customer's ID number in Stone Edge on the Invoice
sets main or cart-based special system parameters ShowCustomerIDOnInvoices
enter the text that should appear as the field label on Invoices
sets main or cart-based special system parameter InvoiceWebNumberLabel
enter the text that should appear as the field label on Invoices
sets main or cart-based special system parameter InvoiceOrderNumberLabel
These fields are only applicable to Packing Slips.
![]()
choose this button to have the program print a packing slip for every order; if there is no Ship To address specified on the order, the program uses the Bill To address as the Ship To address
sets system parameter PackingSlipsForAllOrders to TRUE
choose this option to only print a packing slip for an order if the customer's and recipient's addresses are not the same
sets system parameter PackingSlipsForAllOrders to FALSE
Set the general program preferences for Default & Manual Orders first by checking the box with the same label and complete steps 2 - 9, where applicable.
To set preferences for paperwork from orders that originate from a Specific Shopping Cart, choose it from the drop-down list and repeat steps 2 - 9, where applicable. Repeat this process for any other shopping carts that should use different printing and report options than those used by Default & Manual Orders.
Select a report type in the When printing: section. Repeat the following steps, where applicable, for each report type.
Enter the number of copies to print in the Print this # of copies field.
If you've opted to print more than one copy of a report, enter an optional Message for the last copy (this step does not apply to Mailing Labels).
Select a report format from the Use the report format called: drop-down list. Since you can't see each report before choosing here, we recommend you select the first option in the list for now (Invoice, Packing Slip, Credit Slip, Labels Avery 5160) and modify your selection later, when you're familiar with the different report formats.
Enter the text that should be included on the report in Message lines 1 - 4 and Footer message (this step only applies to Invoices and Packing Slips).
Select the fields that should be included on the report by checking the appropriate boxes in the Include: section (this step only applies to Invoices and Packing Slips).
Enter the value that should be used as the label for the Web Order Numbers field and Internal Order Numbers field on the report (this step only applies to Invoices and Packing Slips).
For Packing Slips, choose whether to print packing slips For all orders or Only if Bill To & Ship To addresses are different, by checking the appropriate box.

Figure 3: Store Setup Wizard - Printing & Report Options, Page 3
select this to have the program print an order summary after Web orders have been imported
sets main system parameter PrintOrderSummaries
select this to have the program print a Pick List of inventory items needed to fulfill the latest orders as a batch of Web orders are imported
sets main system parameter PrintPickLists
select this to have the program print a report of any items that are backordered each time a batch of Web orders are imported
sets main system parameter PrintNewBackorders
choose a template from the drop-down list for each of the corresponding reports, order summaries, pick lists and backorder report
report templates show a variety of information, select the one that best fits your needs
sets system parameters BackOrderSummaryTemplate, PickListTemplate or SummaryTemplate
select this to have every other line shaded on Invoice reports
sets system parameter InvoiceLineShade
check this box to have every other line shaded on Packing Slip reports
sets system parameter PackingSlipLineShade
select this to have every other line shaded on printed Quotes
sets system parameter QuoteLineShade
select this to have every other line shaded in management reports, such as Sales Analysis or Sales by Product, etc.
sets system parameter ManagementReportsUseLineShades
choose a sequence from the drop-down list to determine how the program sorts order paperwork in the batch printing queue
sets system parameter BatchPrintOrder
select this to omit printing the country address field if it contains US, USA or United States
sets system parameter DontPrintUS
To have an order summary report, pick list report or backorder report print automatically after a batch of orders have been imported, check the box of each report type in the After importing Web orders: section of the screen.
Choose the template that will be used for each report type from the corresponding drop-down list.
To make reports easier to read, check the appropriate Use alternate line shading on: box of each report type.
If batch printing will be used, choose the sequence in which paperwork (reports) will be sorted.
The choices are:
In Order Number sequence
In order they are added to the Batch Queue
Alphabetically by the Location of the first line item
To suppress the printing of the Country field when the value is US, USA or United States, check the Don't print US, USA etc. in customer addresses box
Specify the location of the company logo in the Logo image file for reports by manually typing in the path and file name or by using the Browse button to navigate to its location.
use these buttons to scroll sequentially between the pages of the Store Setup Wizard
use the links in the Wizard Index pane on the left-hand side of the screen to skip between sections of the Wizard
the name of the Wizard section and page number can be found between the Navigational Arrows and the Help, Cancel and Save and Exit buttons at the bottom center section of the screen
sections that have many settings will have more than one page in the Wizard; be sure to review them all
causes the program to prompt for confirmation before exiting the Store Setup Wizard
select Yes to save the changes before exiting the wizard
select No to abandon the changes and exit the wizard
select Cancel to remain at the Store Setup Wizard and continue making changes
Created: 5/16/11
Revised: 9/23/14
Published: 04/13/16