
Version 7.0
Version 7.0
![]() Use the Next Topic and Previous Topic arrows,
Use the Next Topic and Previous Topic arrows, ![]() and
and ![]() , in
the Navigation Pane of the Knowledge
Base to read the topics about the Store
Setup Wizard in sequence. (The buttons are actually white on the
black background of the Navigation Pane.)
, in
the Navigation Pane of the Knowledge
Base to read the topics about the Store
Setup Wizard in sequence. (The buttons are actually white on the
black background of the Navigation Pane.)
Contents of this Topic: Show
The Order Status System section of the Store Setup Wizard contains two pages of settings.
The first page primarily relates to the add-on subscription service, the Order Status System ( OSS ), but it is also where the SEOM's Status Update feature is enabled.
The second page of this section of the Wizard is where Status Events and Status Labels are selected. The user can also create their own Status Labels, but be sure to verify the status labels that are accepted by the shopping cart in use, if status updates are to be sent there. It is not possible to create additional Status Events, however.
Status Events are used to trigger updates of the Status Labels assigned to an item or order within SEOM, and optionally at the shopping cart (if the cart accepts status updates) or at the Order Status System. Changes that are made on this screen take effect immediately.
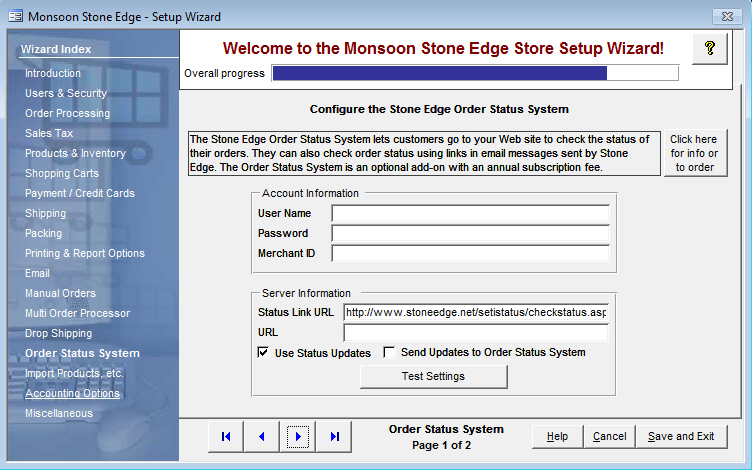
Figure 1: Store Setup Wizard - Order Status System, Page 1
The information in this section of the page pertains to the Order Status System. If you have purchased a subscription to that service complete the following fields, otherwise, leave them blank.
enter the user name that was provided by Stone Edge Technologies Inc.. in the subscription confirmation email
sets system parameter SETIID
enter the password that was provided by Stone Edge Technologies Inc.. in the subscription confirmation email
sets system parameter SETIPassword
enter the merchant identifier that was provided by Stone Edge Technologies Inc.. in the subscription confirmation email
sets system parameter SETIMerchantID
The bulk of information in this section of the page pertains only to the Order Status System, however, the UseStatusUpdates check box applies to any user that wishes to use SEOM's Status Update Feature, with or without the Order Status System. If you have purchased a subscription to the OSS, complete the other fields in this section, otherwise leave them blank.
this field will be pre-populated with the address of the Order Status System where customers can check the status of their orders
do not change this unless instructed to do so by SEOM Technical Support
sets system parameter SETIStatusURL
check this box to enable SEOM's status update feature
this box must be checked in order for status updates to be applied internally, as well as optionally, at the shopping cart or Order Status system
sets system parameter UseStatusUpdates
only check this box if a subscription to the Order Status System has been purchased, otherwise, leave it unmarked
sets system parameter SETISendStatusUpdate
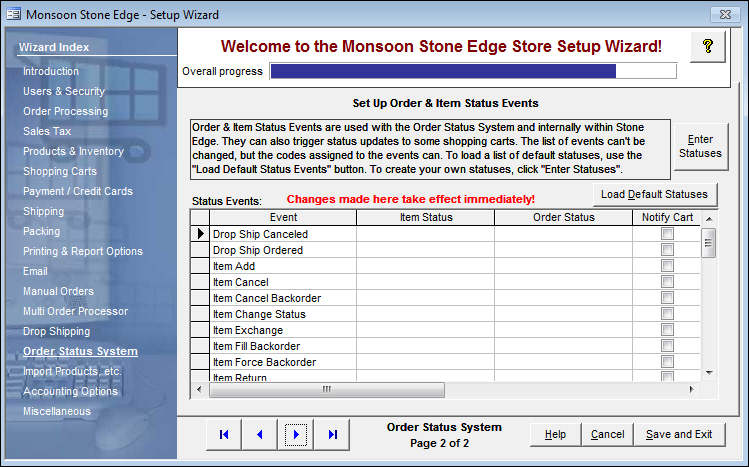
Figure 2: Store Setup Wizard - Order Status System, Page 2
click this button to open the List Builder screen, where new Status Labels can be defined
refer to List Maintenance for more information about using this screen
contains the finite list of pre-defined status events that the program has to offer
it is not possible for the user to create their own Status Events
after the [Load Default Status Events] button is clicked or after the user has defined a custom Status Label via the List Builder screen, select the appropriate status label from the drop-down list that should be assigned to the item when the currently selected status event fires
click on a row in the Item Status column to see the drop-down arrow to make a selection
the currently selected Status Event is indicated by the black right arrow in the left-most column of the Status Events section of the screen
after the [Load Default Status Events] button is clicked or after the user has defined a custom Status Label via the List Builder screen, select the appropriate status label from the drop-down list that should be assigned to the order when the currently selected status event fires
click on a row in the Order Status column to see the drop-down arrow to make a selection
the currently selected Status Event is indicated by the black right arrow in the left-most column of the Status Events section of the screen
check the box in this column to indicate that the program should send status updates to the shopping cart
DO NOT check this box UNLESS your shopping cart is able to accept status updates; doing so will clog the stack controller
if the Setup Wizard is being used for the initial setup of the program, click this button to load all of the pre-defined Status Events that come with the program into this screen
if Status Events have already been loaded into this form and the user has made changes to the Status Label selections for any events, do not click this button as it will load the default values as they are shipped with the program; the program does not provide a mechanism for just backing up the changes that are made at this screen, therefore, if extensive changes are planned, perform the changes off hours after creating a backup copy of the store data file
use these buttons to scroll sequentially between the pages of the Store Setup Wizard
use the links in the Wizard Index pane on the left-hand side of the screen to skip between sections of the Wizard
the name of the Wizard section and page number can be found between the Navigational Arrows and the Help, Cancel and Save and Exit buttons at the bottom center section of the screen
sections that have many settings will have more than one page in the Wizard; be sure to review them all
causes the program to prompt for confirmation before exiting the Store Setup Wizard
click Yes to save the changes before exiting the wizard
click No to abandon the changes and exit the wizard
click Cancel to remain at the Store Setup Wizard and continue making changes
Created: 5/10/11
Revised: 9/5/12
Published: 04/13/16