![]()
Version 7.0
![]()
Version 7.0
![]() Use the Next Topic
and Previous Topic arrows,
Use the Next Topic
and Previous Topic arrows, ![]() and
and ![]() , in
the Navigation Pane of the Knowledge
Base to move sequentially through the topics explaining the POS Setup screen.
(The buttons are actually white on the black background of the Navigation
Pane.)
, in
the Navigation Pane of the Knowledge
Base to move sequentially through the topics explaining the POS Setup screen.
(The buttons are actually white on the black background of the Navigation
Pane.)

Contents of this Topic: Show
Main Menu > Settings > Order Functions > Point-of-Sale Setup
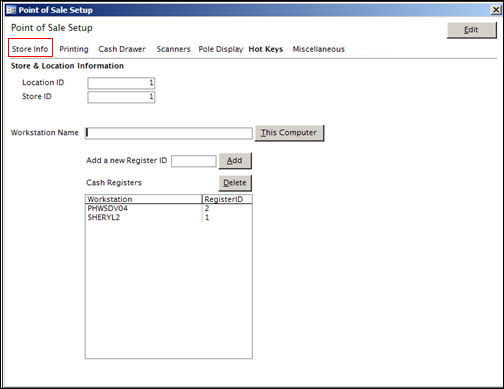
Point-of-Sale Setup: Store Info tab
The Store Info tab contains the data that identifies the workstation, the physical location of the workstation and the store data file used at that location.
Location ID - The Location ID identifies the store’s physical location. If the merchant has several physical locations (i.e., store fronts), each location must have a unique Location ID number. The Location ID must be greater than or equal to 1 and less than or equal to 2,147,483,647 (omitting commas and other punctuation).
Store ID - Because SEOM is capable of supporting multiple data files (i.e., stores) at a single physical location, the user must specify a unique Store ID for each data file. The Store ID must be greater than or equal to 1 and less than or equal to 2,147,483,647 (omitting commas and other punctuation).
Note: The reason for having separate data files is that the user can run two or more distinct businesses with the same SEOM front end by maintaining each business in its own data file. This also applies to the POS system (one physical location selling products for two or more separate businesses). Although it is highly unlikely that one physical location would access multiple data files using the POS interface, it is possible.
Workstation Name - manually enter the computer name of a workstation or use the This Computer button to enter the name of the current workstation in this field
Add Register ID - Each POS workstation must have a Register ID number in each store data file used at the physical location.
Enter the workstation’s network name in the Workstation Name field. If you do not know how to get a computer’s network name, search the Windows’ Help file (via the Program menu) for "computer name" or "network name".
Note: To get the name of the workstation on which you are working currently, click the This Computer button and SEOM fills in the name for you.
Enter a number greater than or equal to 1 and less than or equal to 2,147,483,647 (omitting commas and other punctuation) in the Register ID field. Each register must have a unique Register ID.
Click Add.
The Workstation Name and its Register ID are added to the Cash Registers list.
To change the Register ID of an existing POS workstation, follow steps 1 - 3, entering a different Register ID; the workstation entered into the Workstation Name field is assigned the new id number.
If you attempt to add a Workstation Name and Register ID combination that already exists, the program displays an error message stating that the id number is already in use.
To remove a workstation from the Cash Registers list, click on the Workstation Name in the list and click Delete.
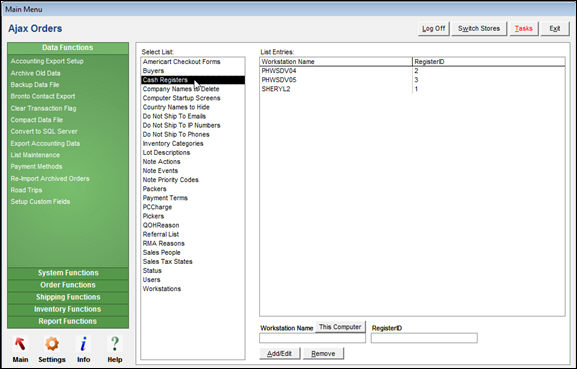
Note: You can also assign Register IDs at the List Maintenance screen which is access by going to the Main Menu > Settings > Data Functions > List Maintenance link
.
![]()
Created: 1/19/12
Revised: 11/13/12
Published: 04/13/16