![]()
Version 7.0
![]()
Version 7.0
![]() Use the Next Topic
and Previous Topic arrows,
Use the Next Topic
and Previous Topic arrows, ![]() and
and ![]() , in
the Navigation Pane of the Knowledge
Base to move sequentially through the topics explaining the POS Setup screen.
(The buttons are actually white on the black background of the Navigation
Pane.)
, in
the Navigation Pane of the Knowledge
Base to move sequentially through the topics explaining the POS Setup screen.
(The buttons are actually white on the black background of the Navigation
Pane.)

Contents of this Topic: Show
The Pole Display tab is used to configure Pole Display hardware for use with the POS system. You can configure the settings for all workstations provided the hardware and settings are EXACTLY the same. If that is not the case, configure each workstation separately.
To configure the settings for all of your POS workstations, do not select in the Configure Single Workstation check box.
To configure each workstation separately, select the Configure Single Workstation check box and then select the name of the workstation you wish to configure from the Select Workstation drop down list. Note: If you change the workstation name before clicking the Apply Changes button or the Save button, your changes are lost.
To make changes, click Edit. When you are in edit mode, click Save to retain your changes or click Cancel to exit edit mode without saving your changes.
To configure the Pole Display settings for the Point-of-Sale system go to:
Main Menu > Settings > Order Functions > Point-of-Sale Setup > Pole Display Tab
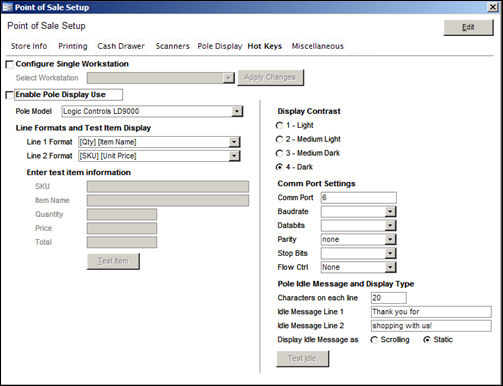

POS Setup: Pole Display Tab
Enable Pole Display Use - If you wish to use a Pole Display, click in the Enable Pole Display Use check box.
Pole Model - Select the specific model of the Pole Display from the Pole Model drop down list. Note: If your Pole Display model is not listed, contact Stone Edge Technologies Inc..
Line Formats and Test Item Display
Line 1 Format - Select the data you wish to display on the first line of the Pole Display.
Line 2 Format - Select the data you wish to display on the second line of the Pole Display.
Enter test item information
To preview the Line 1 Format and Line 2 Format on the pole display, enter values in the fields under Enter test item information and click the Test Item button. Note: The test may not work until after you have configured and saved all other settings.
Display Contrast
Select the intensity level of the display.
COM Port Settings
Enter the number of the COM Port to which the Pole Display is assigned. Consult the manufacturer’s documentation for the proper serial port settings.
Pole Idle Message and Display Type
Characters on Each Line - Set this to the maximum number of characters that the Pole Display can show on a single line of the display. Consult the manufacturer’s documentation for this information.
Idle Message Line 1 - Enter the text you wish to display on line 1 of the Pole Display whenever the POS is inactive.
Idle Message Line 2 - Enter the text you wish to display on line 2 of the Pole Display whenever the POS is inactive.
Display Idle Message As - Select Static to display both line 1 and line 2 as stationary text. Select Scrolling to continually scroll line 1 across the Pole Display (line 2 is ignored).
Test Idle - To preview the idle message on the Pole Display, click the Test Idle button. Note: The test may not work until after you have configured and saved all other settings.
![]()
Created:
Revised: 11/13/12
Published: 04/13/16