![]()
Version 7.0
![]()
Version 7.0
![]() Use the Next Topic
and Previous Topic arrows,
Use the Next Topic
and Previous Topic arrows, ![]() and
and ![]() , in
the Navigation Pane of the Knowledge
Base to move sequentially through the topics explaining the POS Setup screen.
(The buttons are actually white on the black background of the Navigation
Pane.)
, in
the Navigation Pane of the Knowledge
Base to move sequentially through the topics explaining the POS Setup screen.
(The buttons are actually white on the black background of the Navigation
Pane.)

Contents of this Topic: Show
There are two types of Hot Keys on the Point-of-Sale screen. "Function" hot keys appear just above the line items on the POS screen and the "Product" hot keys appear on the Hot Keys tab at the bottom of the POS Screen.
To make changes, click the Edit button. When you are in edit mode, click the Save button to save your changes or click the Cancel button to exit edit mode without saving your changes.
To configure the Hot Keys settings for the Point-of-Sale system go to:
Main Menu>Settings>Order Functions>Point-of-Sale Setup>Hot Keys Tab
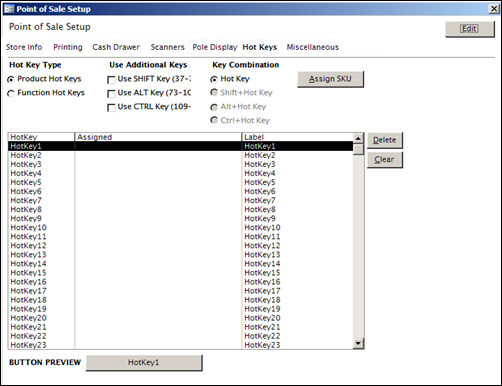
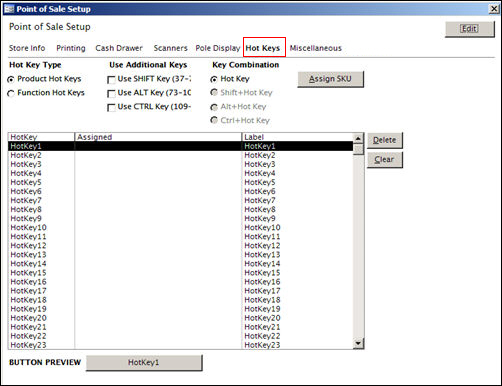
POS Setup: Hot Keys Tab
The product hot key buttons are assigned a SKU and label so that when you click on one, the item is added to the transaction.
You can configure a total of 144 buttons; however, only 36 can appear on the screen at any given time.
When the POS screen is idle, buttons 1 through 36 are displayed.
You can configure how you wish to display the additional buttons on the Hot Keys tab. For example, you can hold down the SHIFT key to see buttons 37-72, the ALT key to see buttons 73-108 and the CTRL key to see buttons 109-144. The buttons are displayed until you release the key.
Under Hot Key Type, select Product Hot Keys.
Select the appropriate options under Use Additional Keys.
If you want to activate buttons 37 through 72, click in the Use SHIFT Key check box.
If you want to activate buttons 73 through 108, click in the Use ALT Key check box.
If you want to activate buttons 109 through 144, click in the Use CTRL Key check box.
Select a Key Combination to display the appropriate group of hot keys in the list box.
Select Hot Key to display the current settings of hot keys 1 through 36.
Select SHIFT+HotKey to display the current settings of hot keys 37 through 72.
Select ALT+HotKey to display the current settings of hot keys 73 through 108.
Select CTRL+HotKey to display the current settings of hot keys 109 through 144.
Click on the hot key you wish to assign in the list box. Note: The HotKey column displays the hot keys in the current group in numeric order. The Assigned column displays the SKU to which the hot key is assigned. The Label column displays the product description. If a hot key is not assigned, there are no entries for it in the Assigned or Label columns.
Click on the Assign SKU button to open the Select SKU to Assign dialog box.
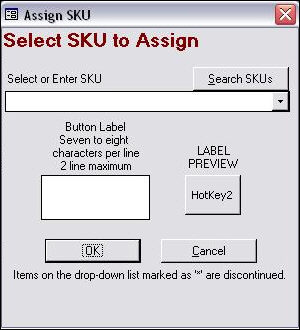
You can select the SKU to which you wish to assign the hot key by selecting a SKU from the Enter SKU drop down list, manually keying a SKU in the field or by clicking on the Search SKUs button.
By default, the program places the item's product description in the Button Label text box. You can edit the description in the text box and see a preview of what it will look like to the right. Force a new line by pressing Ctrl+Enter at the same time on your keyboard.
Click OK to save the assignment.
Under Hot Key Type, select Product Hot Keys.
Select a Key Combination to display the appropriate group of hot keys in the list box.
Select Hot Key to display the current settings of hot keys 1 through 36.
Select SHIFT+HotKey to display the current settings of hot keys 37 through 72.
Select ALT+HotKey to display the current settings of hot keys 73 through 108.
Select CTRL+HotKey to display the current settings of hot keys 109 through 144.
Click on the hot key whose assignment you wish to remove in the list box.
Click on the Delete SKU Assignment button.
Click on the Clear All Hot Keys button. Note: Use this feature with caution as it will clear the SKU assignments for ALL 144 buttons, not just the ones in the list box at the bottom of the screen.
You are prompted to confirm that you wish to remove all assignments. Select Yes; otherwise, select No to cancel the action.
The function hot keys perform system functions, like exiting the POS screen or recalling an order to the POS interface.
Click on the function hot key on the POS screen or press the corresponding function key on your physical keyboard.
You can configure a total of 48 buttons; however, only 12 can appear on the POS screen at any given time.
When the POS screen is idle, buttons 1 through 12 are displayed.
You can configure how you wish to display the additional buttons on the Hot Keys tab. For example, you can hold down the SHIFT key to see buttons 13-24, the ALT key to see buttons 25-36 and the CTRL key to see buttons 37-48. The buttons are displayed until you release the key.
![]() The user can change the function that is assigned to a hot key, but they cannot change to which function key on the keyboard the hot key is assigned (even if the label says otherwise.)
The user can change the function that is assigned to a hot key, but they cannot change to which function key on the keyboard the hot key is assigned (even if the label says otherwise.)
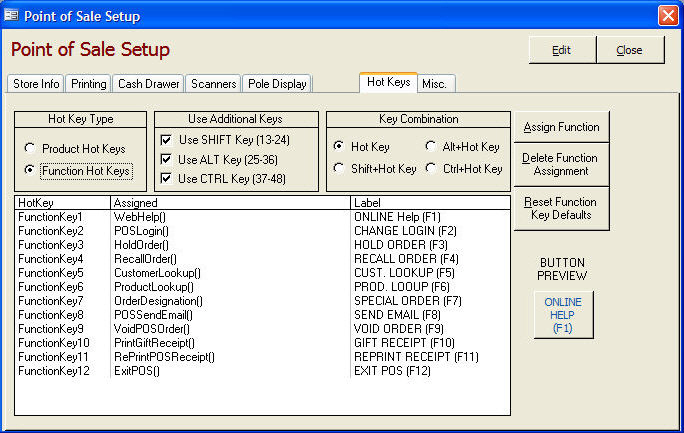
By default the first 13 buttons have been assigned to the following system functions (left to right):
Button 1 – Online Help (F1) – Runs the WebHelp() function
Opens a browser window to the SEOM online Knowledge Base.
Button 2 – Change Login (F2) – Runs the POSLogin() function
Allows the user to log off the system or another user to log on.
Button 3 – Hold Order (F3) – Runs the HoldOrder() function
Places the current on-screen order on hold so that additional sales may be processed. Order many be recalled using the Recall Order button.
Button 4 – Recall Order (F4) – Runs the RecallOrder() function
Allows the user to recall certain types of orders to the POS screen. These include Layaways, Quotes and unapproved POS orders. All other orders can be recalled for reorder, return or reference purposes only.
Button 5 – Customer Lookup (F5) – Runs the CustomerLookup() function
Presents the user with a dialog box used to enter customer information or search for an existing customer record, select a price level or apply tax exempt status to the transaction.
Button 6 – Prod.Lookup (F6) – Runs the ProductLookup() function
Presents the user with a dialog box used to locate inventory items using a variety of criteria.
Button 7 – Special Order (F7) – Runs the OrderDesignation() function
Allows the user to set or change the designation of a transaction. Designations include Layaway, Quote, Hold, Sale and additional user definable labels.
Button 8 – Send Email (F8) – Runs the POSSendEmail() function
Allows the user to send an email to the customer assigned to the transaction provided the customer info contains an email address.
Button 9 – Void/Clear (F9) – Runs the VoidPOSOrder() function
Voids an order in progress and/or clears the screen when working with a recalled order.
Button 10 – Gift Receipt (F10) – Runs the PrintGiftReceipt() function
Allows the user to recall an order and print a gift receipt selected items.
Button 11 – Reprint Receipt (F11) – Runs the RePrintPOSReceipt() function
Allows the user to reprint a receipt.
Button 12 – Exit POS (F12) – Runs the ExitPOS() function
Clears and closes the POS system.
Under Hot Key Type, select Function Hot Keys.
Select the appropriate option(s) under Use Additional Keys.
If you want to activate buttons 13 through 24, click in the Use SHIFT Key check box.
If you want to activate buttons 25 through 36, click in the Use ALT Key check box.
If you want to activate buttons 37 through 48, click in the Use CTRL Key check box.
Select a Key Combination to display the appropriate group of hot keys in the list box.
Select Hot Key to display the current settings of hot keys 1 through 12.
Select SHIFT+HotKey to display the current settings of hot keys 13 through 24.
Select ALT+HotKey to display the current settings of hot keys 25 through 36.
Select CTRL+HotKey to display the current settings of hot keys 37 through 48.
Click on the hot key you wish to assign in the list box. Note: The HotKey column displays the hot keys in the current group in numeric order. The Assigned column displays the SKU to which the hot key is assigned. The Label column displays the product description. If a hot key is not assigned, there are no entries for it in the Assigned or Label columns.
Click on the Assign Function button to open the Select Function to Assign dialog box.
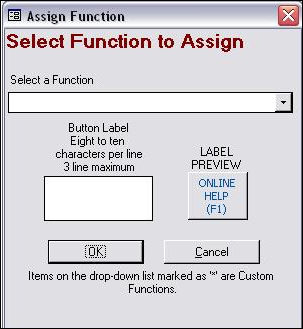
Select a function from the Select a function drop down list. Note: In addition to the standard system functions listed above, the OpenViewInventory() function is also available. This function opens the View Inventory dialog box to give you access to product information.
Developers Only:
Users with advanced programming skills can program their own functions and add them to the Select a function drop down list. Select the following system parameters in the Custom group and do the following:
a. CustomModuleDatabase – Enter the path and file name of the Access database file (.mdb) that contains the VBA code module with your custom code.
b. CustomModuleName – Enter the name of the VBA code module that contains your custom code.
c. CustomStartupCall – Optional: Enter the name of a "dummy" function in your custom module. This causes the module to load when the program starts rather than at the time the function is called.
For your function to appear in the Select a function drop-down list, they must be declared in the module as:
Public Function FunctionName ()
The function cannot have any arguments and must return a Boolean True/False result. To prevent error messages, clear the err object before the custom function ends. Prior to calling the function, a global form variable called POSForm is set. This gives you access to the entire form and its functions. For more details, contact Stone Edge Technologies, Inc.
By default, the program places the function name in the Button Label text box. You can edit the description in the text box and see a preview of what it will look like to the right. You can force a new line by pressing Ctrl + Enter at the same time on your keyboard. Note: It is recommended that you include the appropriate function key, e.g. F3, in the button label.
Click OK to save the assignment.
Under Hot Key Type, select Function Hot Keys.
Select a Key Combination to display the appropriate group of hot keys in the list box.
Select Hot Key to display the current settings of hot keys 1 through 12.
Select SHIFT+HotKey to display the current settings of hot keys 13 through 24.
Select ALT+HotKey to display the current settings of hot keys 25 through 36.
Select CTRL+HotKey to display the current settings of hot keys 37 through 48.
Click on the hot key whose assignment you wish to remove in the list box.
Click on the Delete Function Assignment button.
Click on the Reset Function Key Defaults button. Note: Use this feature with caution as it will clear the function key assignments for ALL 48 buttons, not just the ones in the list box at the bottom of the screen, and it will reset the first 12 buttons to their default functions (listed above).
You are prompted to confirm that you wish to reset the function keys to their default assignments. Select Yes; otherwise, select No to cancel the action.
![]()
Created: 1/18/12
Revised: 3/28/12
Published: 04/13/16