![]()
Version 7.0
![]()
Version 7.0
![]() Users that are upgrading from version 4.4 MUST revisit the Accounting Export Setup process prior to exporting any data - EVEN IF YOU STILL INTEND TO USE THE .IIF FILE INTERFACE.
Users that are upgrading from version 4.4 MUST revisit the Accounting Export Setup process prior to exporting any data - EVEN IF YOU STILL INTEND TO USE THE .IIF FILE INTERFACE.
The changes to the Purchase Orders system and the added support for QuickBooks' XML makes this is a requirement; two new accounts must be created before the system allows the export to occur.
Contents of this Topic: Show
This article assumes that QuickBooks is installed on a workstation where SEOM is installed, a QuickBooks company file is already created, and the Chart of Accounts is established.
There are four broad categories of information that can be exported from SEOM and imported into QuickBooks: Sales, Deposits, Purchasing (Receiving) and Invoicing. They can be exported individually or all at the same time.
![]() Please note that at this time manual adjustments to inventory QOH levels are not automatically exported to QuickBooks. Instead, you must use the Inventory Adjustments report to identify the changes and manually create a journal entry in QuickBooks. We hope to add this functionality in the future.
Please note that at this time manual adjustments to inventory QOH levels are not automatically exported to QuickBooks. Instead, you must use the Inventory Adjustments report to identify the changes and manually create a journal entry in QuickBooks. We hope to add this functionality in the future.
After the instructions in the Knowledge Base topic Accounting Export Setup are completed, data can be exported to QuickBooks as often as the merchant wishes; daily, weekly, or monthly.
There are several methods from which the merchant can choose to export the data:
Export the data to an .IIF file from the Accounting Data Export dialog box. The .IIF file is saved to your Stone Edge directory.
Export the data to a simple text file from the Accounting Data Export dialog box. The text file is saved to your Stone Edge directory. (starting in version 4.3 Beta).
Export the data via the XML API which writes the data directly to the QuickBooks company file. It is possible to preview or print the data that has been selected before it is exported via the Export Data to QuickBooks dialog. (starting in version 4.3 Beta).
The process for exporting data to QuickBooks is essentially the same for all methods once the Accounting Export Setup is complete. Direct XML transfers will begin immediately without any additional action on the part of the user. Simple text files and .IIF file transfers require an additional, manual step to import the data from the newly created text file into QuickBooks.
Go to Main Menu>Settings>Data Functions>Export Accounting Data.
The Accounting Data Export dialog box opens:
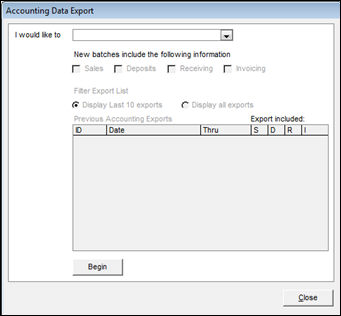
Accounting Data Export screen
Choose the type of data that should be exported: Sales, Deposits, Receiving or Invoicing.
If it is not necessary to preview the data that is selected for export, select Export any new accounting data to file from I would like to. Skip to step 6.
To preview the data before it is exported, select Preview any new accounting data from I would like to.
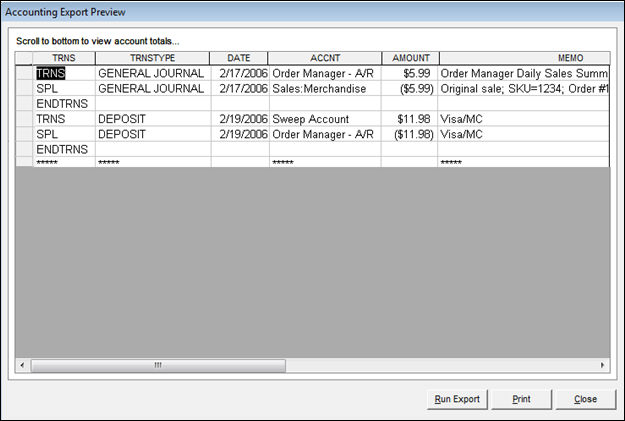
Accounting Export Preview screen
Optional: Select Print to send the data selected for export to the workstation's default printer.
Select Run Export to start the process.
A calendar with the heading Export all new history and transactions thru: opens. Select a date on the calendar and select OK. Data is exported for approved transactions up to and including the date selected.
If it is the first time Deposit information is being exported, the calendar appears a second time with the heading "Select starting date for exporting Transaction". Select a date on the calendar and select OK.
SEOM exports the data directly to QuickBooks.
Go to Main Menu>Settings>Data Functions>Export Accounting Data.
The Accounting Data Export dialog box opens:
Accounting Data Export screen
Choose the type of data that should be exported: Sales, Deposits, Receiving or Invoicing.
If it is not necessary to preview the data that is selected for export, select Export any new accounting data to file from I would like to. Skip to step 6.
To preview the data before it is exported, select Preview any new accounting data from I would like to.
Accounting Export Preview screen
Optional: Select Print to send the data selected for export to the workstation's default printer.
Select Run Export to start the process.
If the .iif file already exists the program prompts for the action to take. If Yes or No are selected, the export proceeds after the file has been archived or deleted.
A calendar with the heading Export all new history and transactions thru: opens. Select a date on the calendar and click OK. Data is exported for approved transactions up to and including the date selected.
If it is the first time Deposit information is being exported, the calendar appears a second time with the heading "Select starting date for exporting Transaction". Select a date on the calendar and select OK.
SEOM exports the data to the file specified in the Accounting Export Setup.
When ready to import the data from the file into QuickBooks, go to File>Utilities>Import>Import IIF Files from the QuickBooks menu bar and navigate to the file that contains the exported sales or deposit data.
If an error occurs during an IIF transfer, the error message will display the line number of the failing transaction. This transaction is not imported to QuickBooks, it is skipped and the remaining transactions are imported. The easiest way to correct such an error condition is to revert to the backup of the company file made before the import was started, locate the failing transaction in the IIF file (using a text editor other than MS Excel), correct it and perform the import of the IIF file again.
Created: 7/13/12
Revised: 9/23/14
Published: 04/13/16