
Version 8 FM
Version 8 FM
Contents of this Topic: Show
The Monsoon Fulfillment Manager includes standard packing slip reports for your use as well as the ability to create custom packing slips. Custom reports must be created in the FM program file rather than the OM program file because the database schema is different. Once the report is created, it must be exported from FM and imported into OM, which then sends it to all warehouses associated with the client (store data file) via the Sync Managers. The report should be saved in the Custom Reports database for safekeeping when the application is upgraded to a newer version. If changes are made to the custom report the process of exporting it, importing it and rebroadcasting the report to all warehouses must be repeated.
If extensive changes are needed, a custom report must be created. Custom reports can be created from scratch by a third party, or you can copy a standard report, save it with a different name, and make the desired changes to it. If a standard report is copied to make the custom report, do not delete any fields in the report or you will encounter compile errors. It is a best practice to hide the fields instead.
Rather than creating a custom report, it is possible to "brand" the a standard packing slip report with company logo and contact information. Simply enter data into the main or cart-specific parameters of the Company parameter group in Monsoon Order Manager. ReportLogoLocation is in the Reports parameter group.
Use the main system parameters when there is only one web store defined in the Monsoon Order Manager store file (client) and use the cart-based parameters when there is more than one web store defined in the Monsoon Order Manager store data file. The values of those parameters are passed to the Monsoon Fulfillment Manager and are used when the packing slip is printed at the warehouse.
Regardless of whether you create a custom report or simply brand a standard report with your company specific information, the values in FM packing slip template parameters are always overwritten by any changes made in corresponding parameters of the Monsoon Order Manager.
Therefore, it is a best practice to make any changes in the Monsoon Order Manager, rather than updating the FM system parameters manually.
If you have multiple web stores in a single store data file, you can choose your packing slip template from the Shopping Cart Business Configuration screen or by setting the appropriate cart-based parameters.
If you only have one web store in the store data file, you can either use the main system parameter groups or the cart-based parameter groups to select your packing slip.
In the Monsoon Order Manager, go to Main Menu>Settings>System Functions>Set System Parameters.
Hold the Shift key while selecting the desktop icon for the Monsoon Fulfillment Manager to open the database window.
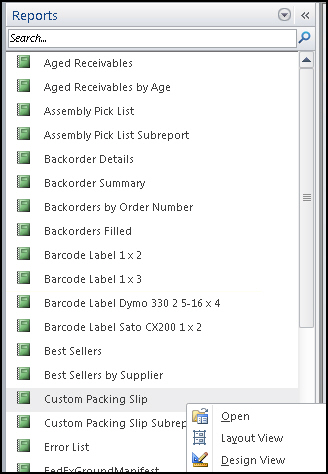
In the list of components on the left, find and select the packing slip report that is to be the template for the custom report.
Go to the File menu and select Save Object As, enter the name for the custom report in Save 'Packing Slip' to: , and select OK. Repeat the process with the subreport.

Select Order Options to return to the database window.
Select the custom report from the list of components on the left.
Right-click and select Design View.
Make the changes to the report and Save it. Do the same with the subreport, when necessary.
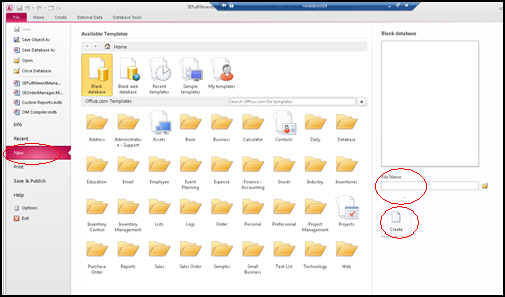
Create a new Access database to house the modified reports so they can be sent to the front office where Monsoon Order Manager is installed. Select File>New, enter a File Name, and select Create.
Export the modified report and subreport to the new database by right-clicking and selecting Export>Access.

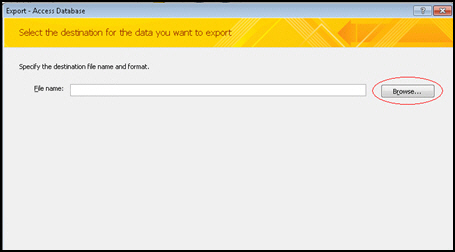
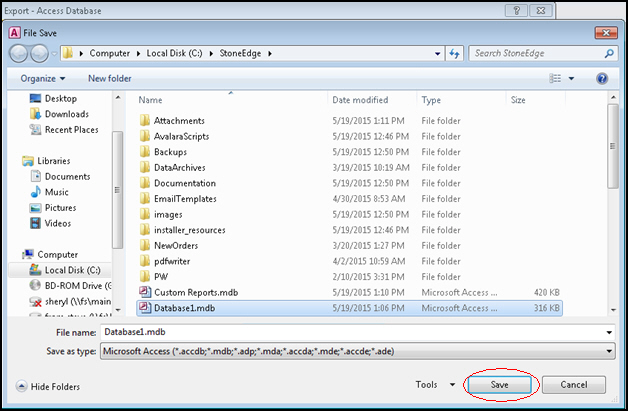
Select Browse and navigate to the location of the new database. Select Save.
Rename the database so it has an extension of .crdb or something which will not be flagged as a potentially harmful file by your e-mail program, and send the file to someone at the front office.
Save the attached database to the local workstation and rename it with the extension of .mdb.
Import the report into the Monsoon Order Manager's custom report database and then into the program file of the Monsoon Order Manager workstation where you are going to configure the shopping cart definition to use the custom packing slip.
The program automatically creates a packing slip updated message with the report information which is then sent to all instances of the Monsoon Fulfillment Manager when the Sync Managers are run.
Go to Main Menu>Settings>System Functions>Shopping Carts.
Select the shopping cart from Carts List.
Select Business Configuration.
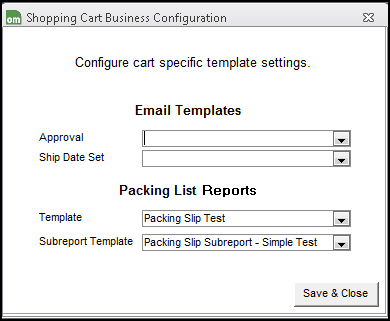
Type in the name of the custom packing slip into Template and its subreport into Subreport Template. In the image below, Packing Slip Test is the name of the custom packing slip, and Packing Slip Subreport - Simple Test is the name of its subreport.
Select Save & Close. Changes made here are also reflected in the corresponding cart-based system parameters.
If the packing slip is created by a third party, it is most likely distributed in an MS Access database.
Rename the file so its extension is something other than .mdb.
Attach the file to an e-mail and send it to headquarters or the storefront.
Save the attached file with the extension of .mdb.
Import the report from the external MS Access database into the Custom Reports database of the Monsoon Order Manager. See the topics Custom Reports Maintenance and How to use the Custom Report Maintenance Feature for more information about the process.
Next, import the report from the Custom Reports database into the program file of the Monsoon Order Manager workstation where the shopping cart definition is configured to use the new report.
Go to Main Menu>Settings>System Functions>Shopping Carts.
Select the shopping cart from Carts List.
Select Business Configuration.
Enter the name of the custom packing slip into Template and its subreport into Subreport Template. In this example, Packing Slip Test is the name of the custom packing slip, and Packing Slip Subreport - Simple Test is the name of its subreport.
Select Save & Close. Changes made here are also reflected in the corresponding cart-based system parameters.
How to Use the Custom Report Maintenance Feature
Shopping Cart Business Configuration
Created: 5/19/15
Revised: 6/19/15
Published: 08/19/15