The Order Manager - ShopSite integration supports importing orders from your ShopSite shopping cart via the Internet in the XML format.
Note: When you import orders using this method, the Order Manager sends ShopSite the highest ShopSite order number that is presently in your Order Manager data. ShopSite responds with all orders with higher ShopSite order numbers. If the Order Manager tells you that there are no new orders to import, but you know that there are new orders in ShopSite, there may be some orders in the Order Manager with "bad" (i.e. too high) ShopSite order numbers. For assistance, contact Stone Edge Technologies at (610) 994-3699 from 9 a.m. to 6 p.m. EST Monday through Friday or email us.
Set System Parameter
Go to the Main Menu>Maintenance Menu>Maintenance tab>Set System Parameters button.
Click on the ShopSite group.
Click on the UseXMLDownload parameter.
Click True.
Click Save.
Click Close to exit the Set System Parameters dialog box.
Note: You can still import orders from text files if necessary by using the Import from Text File button on the Import Orders dialog box.
Import Orders via the Internet
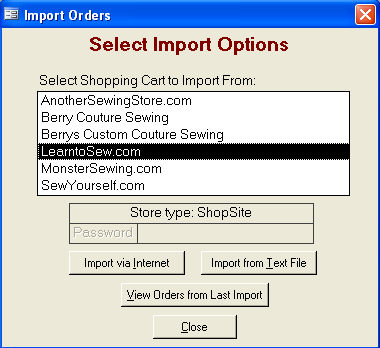
Go to the Main Menu and click the Import Orders button.
The Import Orders dialog box opens:
Click on the appropriate ShopSite shopping cart.
Click on the Import via Internet button.
The Import archival data? dialog box opens. Note: You will only see the message boxes in steps 5 & 6 if you are importing orders for the first time. In the future, if you need to import old orders, go to Main Menu>Maintenance Menu>Import/Export>Import Old Orders.
If the orders that you are importing from your shopping cart have already been processed and shipped, click Yes.
If the orders that you are importing from your shopping cart are new and have not been processed and shipped, click No.
The Select a Date dialog box opens. Click on the last day on which the Order Manager can assume that all orders have been processed and shipped. Any orders dated afterward will be "unapproved" in the Order Manager after they are imported.
If any records in your shopping cart do not contain line items (e.g., you entered a test order), you may see a message box stating that an order does not include any ordered items. Click OK.
When the Order Manager has completed importing all of the orders in your shopping cart, you will see a confirmation message box. Click OK.
If you selected the option to print an order summary after importing orders in the Store Setup Wizard, the Select Printer for Order Summary dialog box opens. Note: The Select Printer for Order Summary dialog box may not open if the system parameter UsePrinterMenu (in the Reports group) is set to False.
You can print to the default printer or you can print to a different printer by clicking the Selected Printer checkbox and clicking the name of the printer in the Select a Printer list box. If necessary, click on a printer tray in the Select a Paper Source list box. Click Print.
If you will always print to the same default location, click the Don’t display this menu any more check box, and it will not open each time you import orders.
Click Cancel to exit the Select Printer for Order Summary dialog box.
Your view returns to the Import Orders dialog box.
Click on the View Orders from Last Import button.
The View Orders dialog box opens, automatically filtered by Orders from Last Import. These are your new orders.

Click Close to exit the View Orders screen.
See Also
Importing from Multiple Shopping Carts into the Same Order Manager Store