

In this Topic: Show
Shipping labels can be printed externally through UPS WorldShip using shipment data stored in the Stone Edge tables. The integration relies on ODBC connections, queries, and the definition of Import and Export maps in WorldShip.
After configuring the two programs to work together, you can enter the Stone Edge order number into the WorldShip interface and the shipment information from Stone Edge is automatically populated. There is no need to manually type in data.
At the end of the day, you can send WorldShip tracking numbers back to Stone Edge, or they can be sent back after each shipment is processed.
This topic outlines the steps to set up integration between a UPS WorldShip standalone installation and a Stone Edge SQL store data file. If you are using an MS Access database as the store data file, please refer to the topic, UPS WorldShip Setup Full Documentation.
Requirements:
Stone Edge Enterprise Edition is up and running on the target PC
Stone Edge database (store file) resides on an SQL server
an ODBC connection to the Stone Edge store data file is defined on the target PC
WorldShip is installed on the target PC
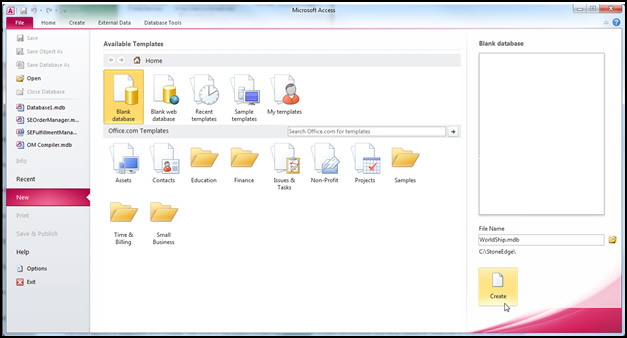
Create a blank MS Access database. Name it "WorldShip.mdb" or something similar, and save it in your StoneEdge directory (e.g. C:\StoneEdge).
Open the new Access database. Select the External Data tab of the ribbon.
.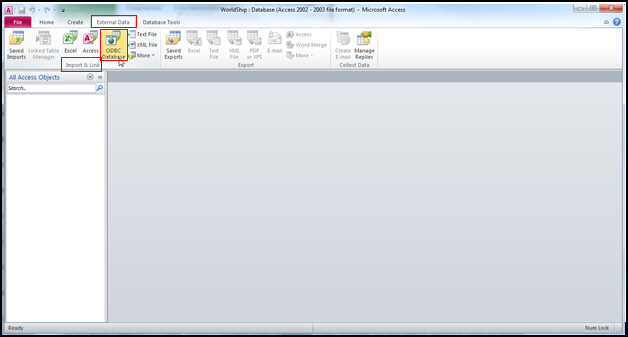
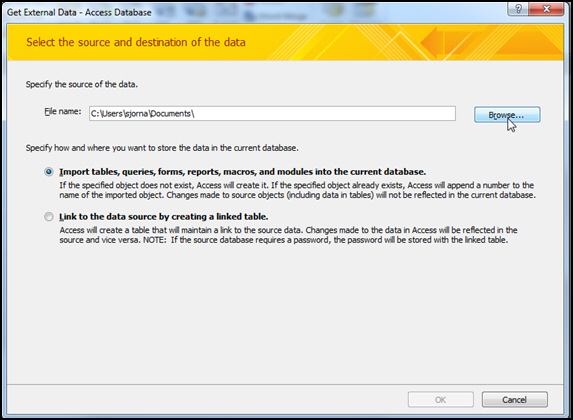
In the Import & Link section, double-click ODBC Database to open the Get External Data - ODBC Database screen.
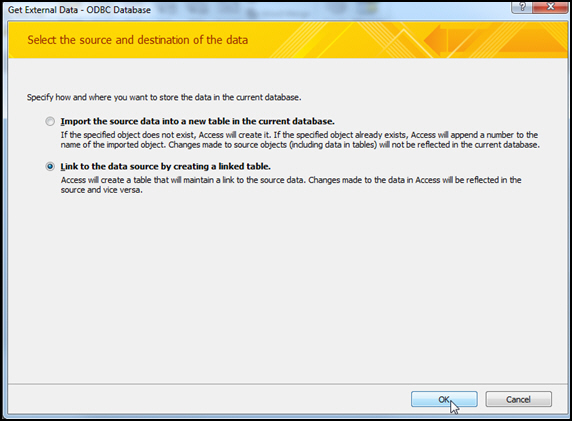
Select Link to the data source by creating a linked table and then select OK.

Select Machine Data Source and choose the ODBC connection to your store data file. If you use SQL Authentication, you are prompted to encrypt your password. Select Save Password.

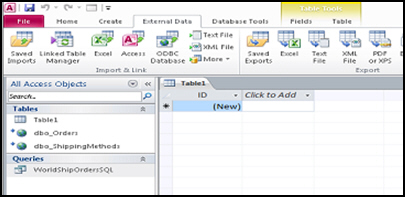
The Link Tables screen opens. Scroll down the list of tables until you see dbo.Orders.
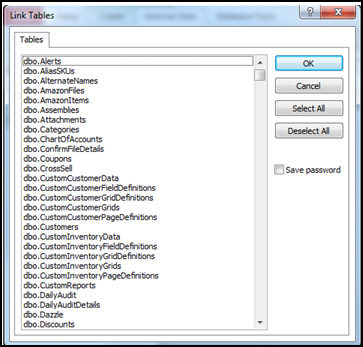
While holding the Ctrl or Shift buttons, select dbo.Orders and scroll down the list and also select dbo.ShippingMethods.
Select OK.
The database window now shows the linked tables.

Browse to the location of the Stone Edge program file (i.e. SEOrdMan.mdb, SEOrderManager.mdb).
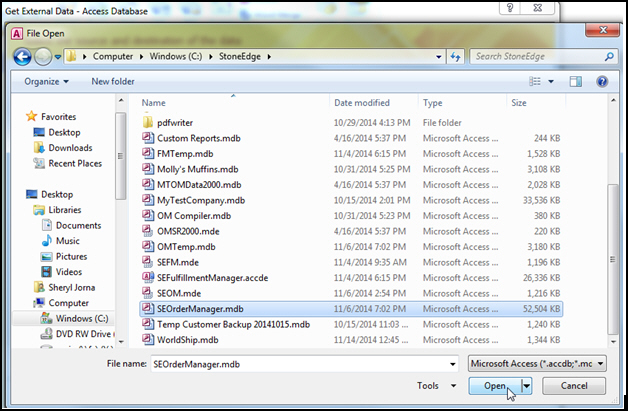
Select the program file from the list, and click Open.

Select OK. The Import Objects window opens.

On the Queries tab, select WorldShipOrdersSQL.
Select OK. The WorldShipOrdersSQL query now shows up in the list of queries in WorldShip.mdb.
The steps to create a DSN depend on the operating system of the PC:
If you are using a PC with a 32-bit operating system, go to Control Panel>System and Security>Administrative Tools>Data Sources. The ODBC Data Source Administrator window opens.
If you are using a PC with a 64-bit operating system, you need to create the ODBC for the MS Access database from by executing C:\Windows\SysWOW64\odbcad32.exe. 'Right-click the executable and select Run as Administrator. The ODBC Data Source Administrator window opens.
Select the System DSN tab and click Add.
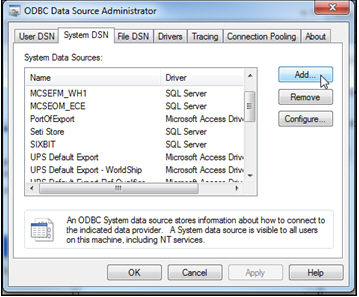
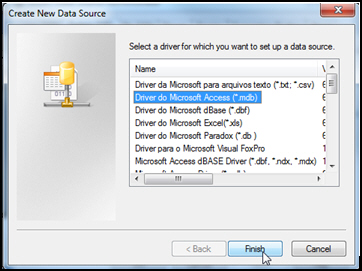
The Create New Data Source window opens.
Select Microsoft Access Driver (*.mdb) and click Finish.
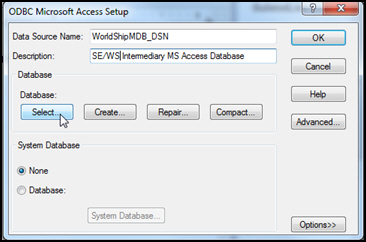
Type in an arbitrary name for the DSN in the Data Source Name field, and click Select.
The Select Database window opens. Navigate to the location of WorldShip.mdb.
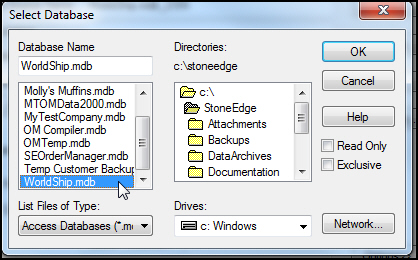
Select OK. You are returned to the ODBC Microsoft Access window and the path to the Database: is filled in.
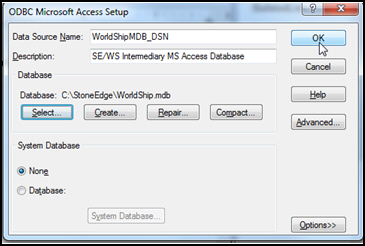
Select OK.
The new DSN appears in the ODBC Data Source Administrator window.

Open UPS WorldShip.
On the Tools tab, select Create/Edit Profile.

Select your profile from the Profile Name drop-down menu and select the Reference tab. If you have not setup a profile yet, do so now.
In the Reference Number 1 field, enter 0.
Select the Use on all Packages box.
Select the Options tab and ensure the Quantum View Notify box is cleared.
Select Save Profile F10.
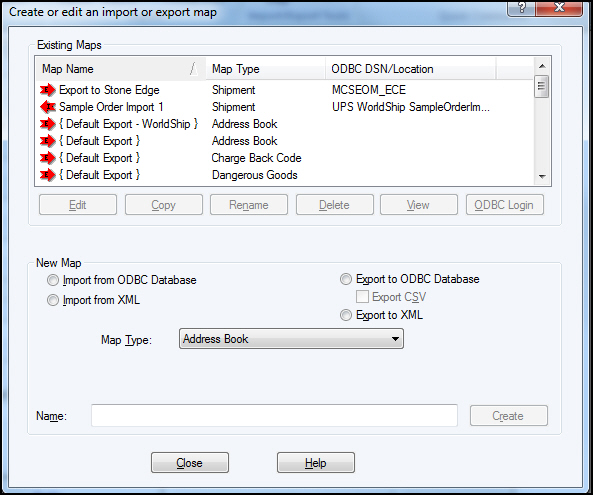
Select the Import-Export Data tab and choose Create/Edit Map.
In the New Map area, select Import from ODBC Database.

Select Shipment from the drop-down list for the map type.
Enter a name for the map in the Name field. (e.g. Import from Stone Edge.)
Select Create. The Select an ODBC source box opens.
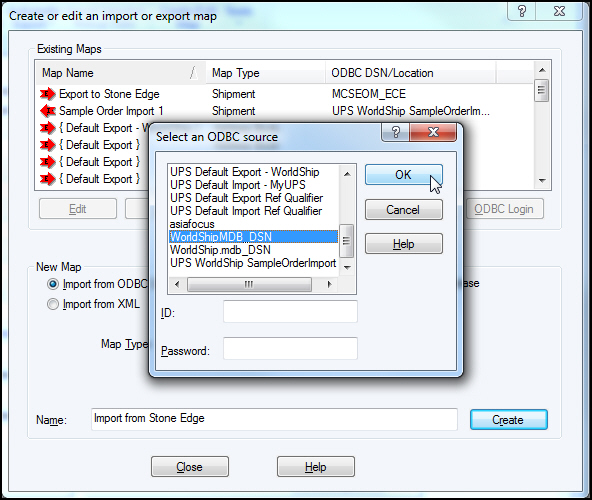
Select the ODBC connection (DSN) for the intermediary Access database created earlier from the list. An ID and Password are not necessary.
Select OK. The Edit "name of your map" import map window opens.
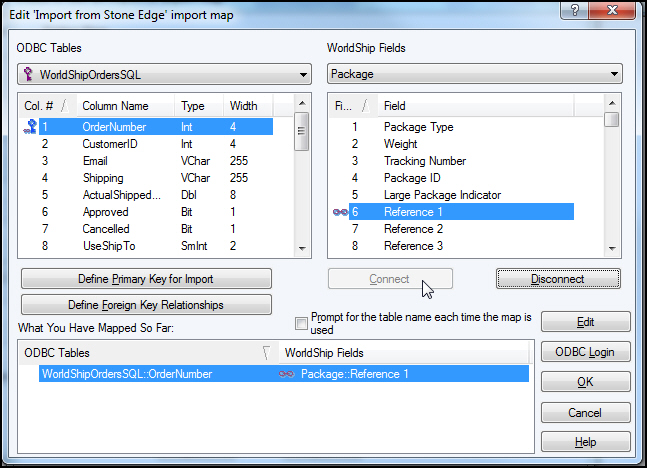
Select WorldShipOrdersSQL from the drop-down list under ODBC Tables.
Select OrderNumber under Column Name.
Select Define Primary Key for Import. This sets the Stone Edge order number field as the primary identifier for the order record. A small blue key appears next to OrderNumber.

Select Package from the drop-down list under WorldShip Fields.
Select Reference 1 from the WorldShip Field List.
Select Connect. A small red infinity symbol appears next to the fields indicating the Order Number is now linked to Reference 1. You can see the linked fields in the What You Have Mapped So Far list at the bottom of the screen.
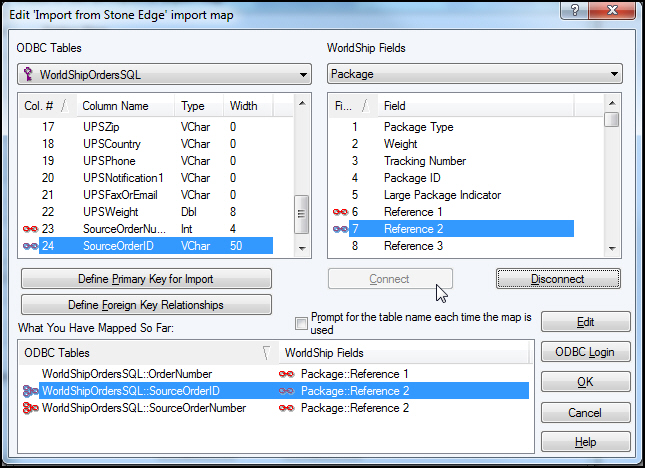
Optional: Map Stone Edge SourceOrderNumber and SourceOrderID fields to WorldShip Reference 2 field.
Select SourceOrderNumber from Column Name under ODBC Tables.
Select Reference 2 from Field under WorldShip Fields. Select Connect. A small red infinity symbol appears next to the fields indicating they are now linked. You can see the linked fields in the What You Have Mapped So Far list at the bottom of the screen.
Select SourceOrderID from Column Name under ODBC Tables.
Select Reference 2 from Field under WorldShip Fields. Select Connect. A small red infinity symbol appears next to the fields indicating they are now linked. You can see the linked fields in the What You Have Mapped So Far list at the bottom of the screen.
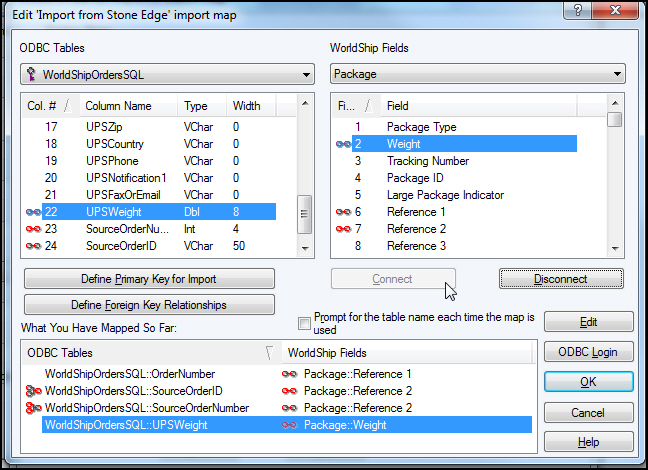
Select ActualShippedWeight or UPSWeight from Column Name under ODBC Tables, and Weight from Field under WorldShip Fields. Only map one of the Stone Edge fields to the WorldShip Weight field. The UPSWeight field contains the published weight if the actual weight is not present.
Select Connect. A small red infinity symbol appears next to the fields indicating they are now linked. You can see the linked fields in the What You Have Mapped So Far list at the bottom of the screen.
Select Ship To from the drop-down list under WorldShip Fields. Select CustomerID from Field.
Select CustomerID from Column Name under ODBC Tables.
Select Connect. A small red infinity symbol appears next to the fields indicating they are now linked. You can see the linked fields in the What You Have Mapped So Far list at the bottom of the screen.

Select Email Address from Field under WorldShip Fields.
Select Email from Column Name under ODBC Tables.
Select Connect. A small red infinity symbol appears next to the fields indicating they are now linked. You can see the linked fields in the What You Have Mapped So Far list at the bottom of the screen.

Select Company Or Name from Field under WorldShip Fields.
Select UPSCompanyOrName from Column Name under ODBC Tables.
Select Connect. A small red infinity symbol appears next to the fields indicating they are now linked. You can see the linked fields in the What You Have Mapped So Far list at the bottom of the screen.

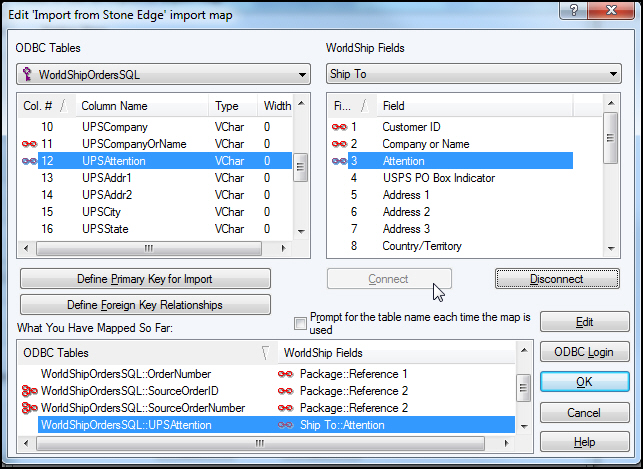
Select Attention from Field under WorldShip Fields.
Select UPSAttention from Column Name under ODBC Tables.
Select Connect. A small red infinity symbol appears next to the fields indicating they are now linked. You can see the linked fields in the What You Have Mapped So Far list at the bottom of the screen.
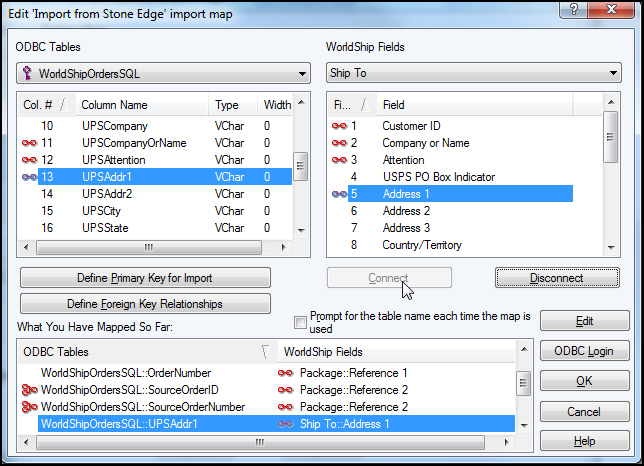
Select Address 1 from Field under WorldShip Fields.
Select UPSAddr1 from Column Name under ODBC Tables.
Select Connect. A small red infinity symbol appears next to the fields indicating they are now linked. You can see the linked fields in the What You Have Mapped So Far list at the bottom of the screen.
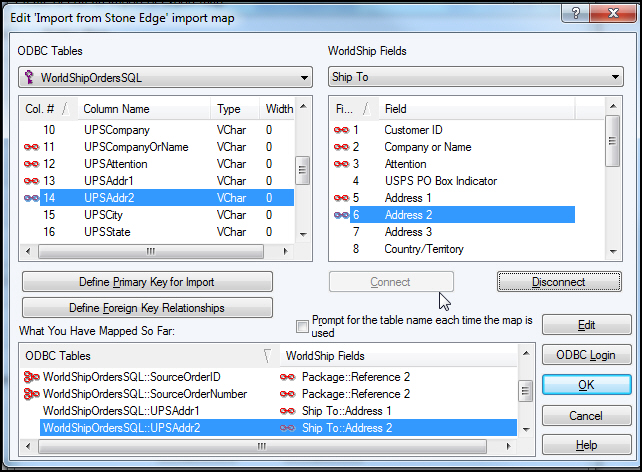
Select Address 2 from Field under WorldShip Fields.
Select UPSAddr2 from Column Name under ODBC Tables.
Select Connect. A small red infinity symbol appears next to the fields indicating they are now linked. You can see the linked fields in the What You Have Mapped So Far list at the bottom of the screen.
Select City or Town from Field under WorldShip Fields.
Select UPSCity from Column Name under ODBC Tables.
Select Connect. A small red infinity symbol appears next to the fields indicating they are now linked. You can see the linked fields in the What You Have Mapped So Far list at the bottom of the screen.
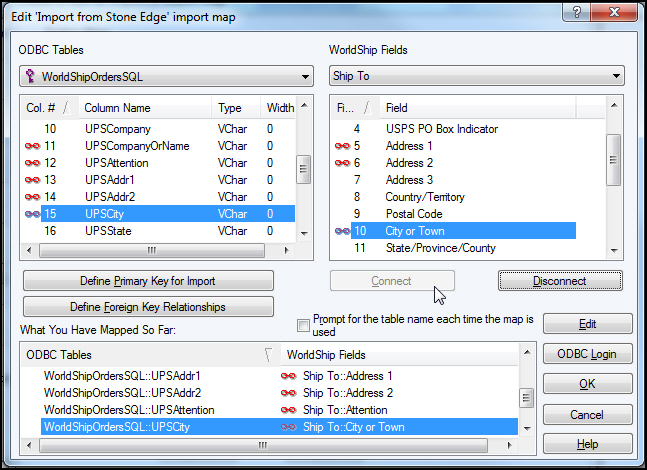
Select State/Province/County from Field under WorldShip Fields.
Select UPSState from Column Name under ODBC Tables.
Select Connect. A small red infinity symbol appears next to the fields indicating they are now linked. You can see the linked fields in the What You Have Mapped So Far list at the bottom of the screen.

Select Postal Code from Field under WorldShip Fields.
Select UPSZip from Column Name under ODBC Tables.
Select Connect. A small red infinity symbol appears next to the fields indicating they are now linked. You can see the linked fields in the What You Have Mapped So Far list at the bottom of the screen.

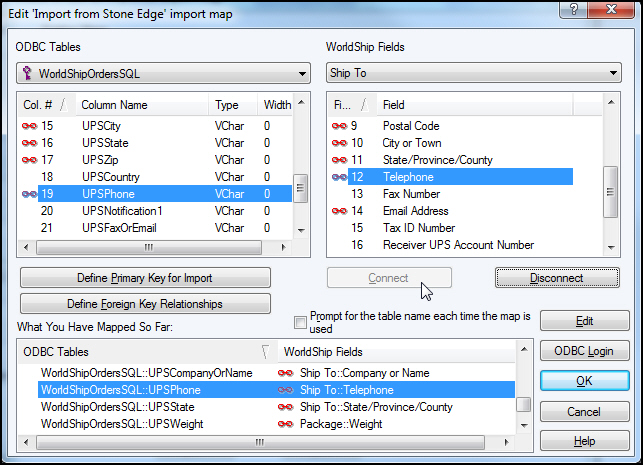
Select Telephone from Field under WorldShip Fields.
Select UPSPhone from Column Name under ODBC Tables.
Select Connect. A small red infinity symbol appears next to the fields indicating they are now linked. You can see the linked fields in the What You Have Mapped So Far list at the bottom of the screen.
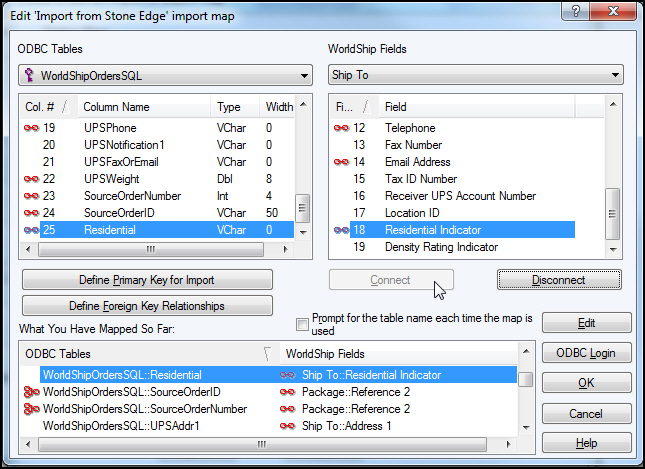
Select Residential Indicator from Field under WorldShip Fields.
Select Residential from Column Name under ODBC Tables.
Select Connect. A small red infinity symbol appears next to the fields indicating they are now linked. You can see the linked fields in the What You Have Mapped So Far list at the bottom of the screen.
Select QVN Option from Field under WorldShip Fields.
Select UPSNotification1 from Column Name under ODBC Tables.
Select Connect. A small red infinity symbol appears next to the fields indicating they are now linked. You can see the linked fields in the What You Have Mapped So Far list at the bottom of the screen.

Select QVN Ship Notification 1 from Field under WorldShip Fields.
Select UPSNotification1 from Column Name under ODBC Tables.
Select Connect. A small red infinity symbol appears next to the fields indicating they are now linked. You can see the linked fields in the What You Have Mapped So Far list at the bottom of the screen.

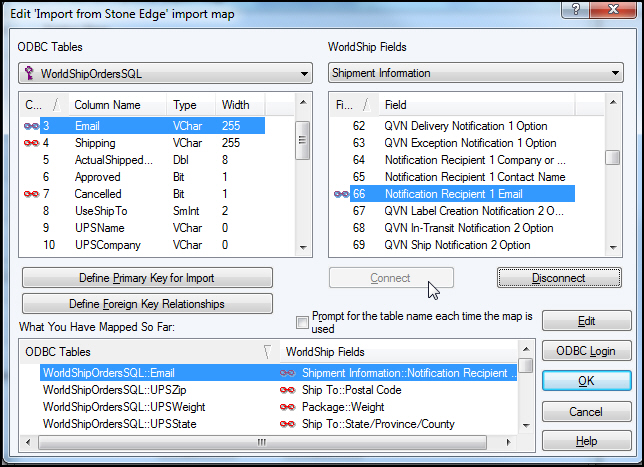
Select Notification Recipient 1 Email from Field under WorldShip Fields.
Select Email from Column Name under ODBC Tables.
Select Connect. A small red infinity symbol appears next to the fields indicating they are now linked. You can see the linked fields in the What You Have Mapped So Far list at the bottom of the screen.
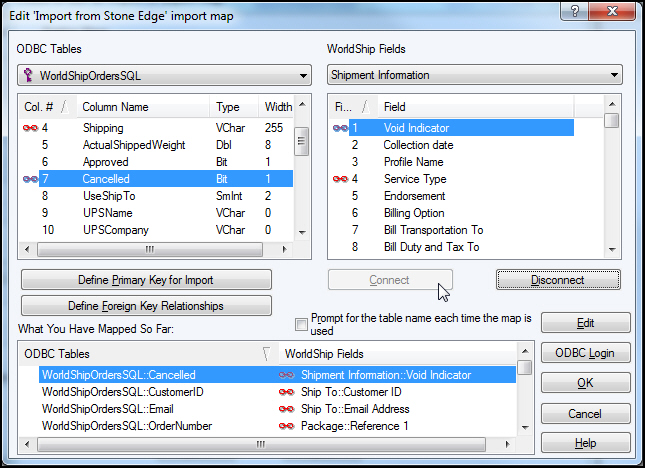
Select Void Indicator from Field under WorldShip Fields.
Select Cancelled from Column Name under ODBC Tables.
Select Connect. A small red infinity symbol appears next to the fields indicating they are now linked. You can see the linked fields in the What You Have Mapped So Far list at the bottom of the screen.
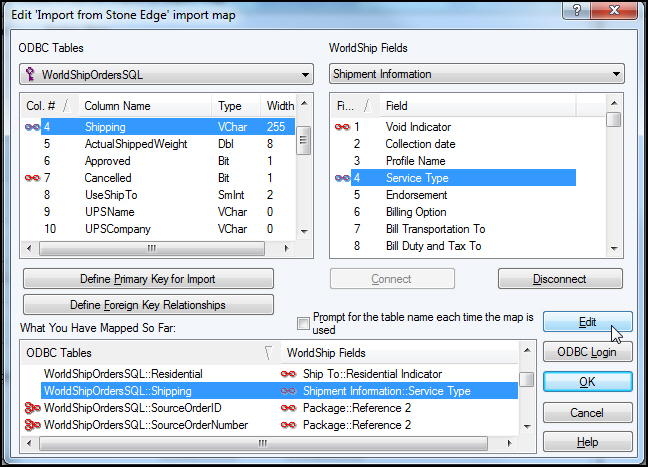
Select Service Type from Field under WorldShip Fields.
Select Shipping from Column Name under ODBC Tables.
Select Connect. A small red infinity symbol appears next to the fields indicating they are now linked. You can see the linked fields in the What You Have Mapped So Far list at the bottom of the screen.

After mapping the Shipping field, highlight the mapping in What You Have Mapped So Far. There are a couple additional steps to map Service Type names in WorldShip to those you have setup in Stone Edge.
Select the Edit button.
The Mapping Connections into Shipment Information:Service Type window opens. Select Translations.
![]()
In the Select a common map box, select Service. Click OK. This loads the default service options into the External Field and WorldShip Field lists.

The External Field list represents the Stone Edge names for corresponding WorldShip services listed in WorldShip Field. (i.e. 1DA is the Stone Edge default name for WorldShip Next Day Air.)
Select a service type from WorldShip Field. In External Field, type the Stone Edge shipping method name for that WorldShip service type.
Select Rename.
Repeat this process for every UPS shipping method you have defined in Stone Edge.

When finished renaming all your service types, select OK. If you make a mistake, click Translations, and then Service, OK to re-load the default service option lists again.
When all of the fields are properly renamed, select OK. You are returned to the Create/Edit Map screen.
Select OK to return to the Edit "import map name" import map screen.
Select OK to return to the Create or edit an import or export map screen, where your import map is now listed.
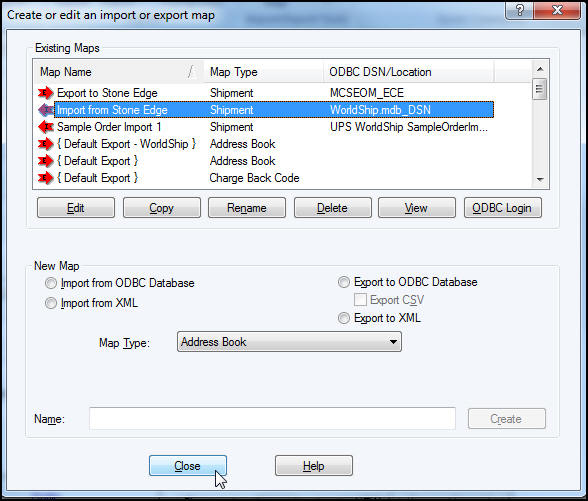
Select Close to exit Create or edit an import or export map screen.
Open UPS WorldShip.
Select the Import-Export Data tab and select Create/Edit Map.
In the New Map area, select Export to ODBC Database.
Select Shipment from Map Type.
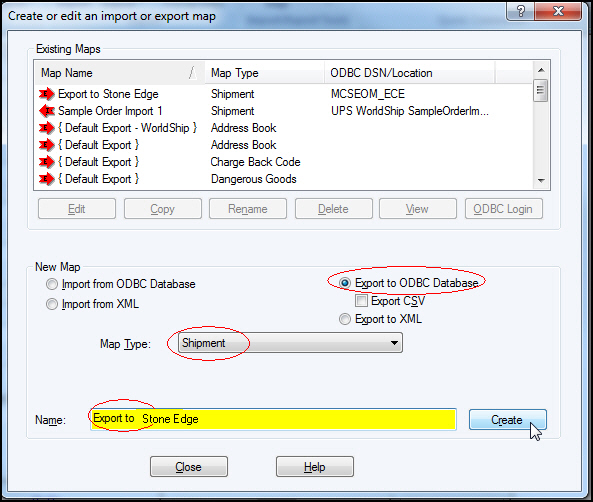
Enter a name for the map in the Name field (e.g. OM Export Map).
Select Create.
The Select an ODBC source box opens. Select the ODBC source (System DSN) that points to the Stone Edge store data file, created when you set up the Stone Edge Enterprise edition.

Select OK. The Edit "name of your map" export map window opens.
Under WorldShip Fields, select Package from the drop-down list.
In the Package Field List, select Reference 1.
Under ODBC Tables, select Tracking from the drop-down list.
In the Tracking Field List, select the Stone Edge field, OrderNum. This relates the Stone Edge field, OrderNum, to the WorldShip "Reference 1".
Select Connect to link the fields. A small red infinity symbol appears next to the fields indicating they are now linked. You can also see the linked fields in the What You Have Mapped So Far list at the bottom of the screen.

Map WorldShip Fields>Package>Tracking Number to ODBC Tables>Tracking>TrackingID.
Select Connect.
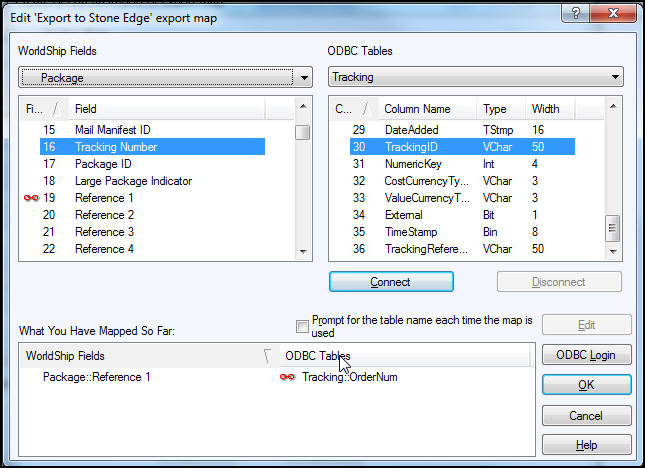
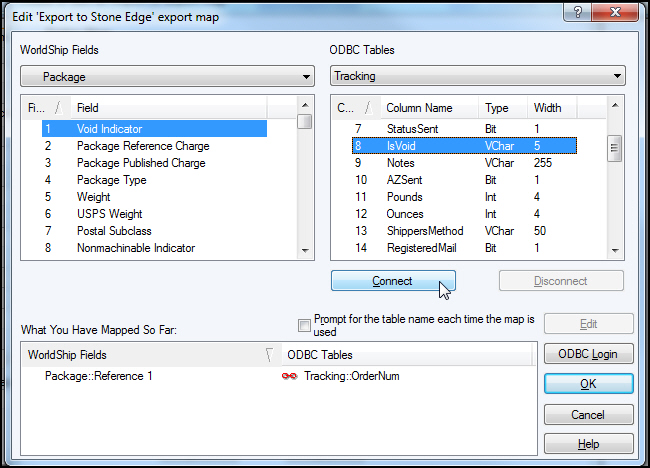
Map WorldShip Fields>Package>Void IndicatorTracking> Number to ODBC Tables>Tracking>IsVoid.
Select Connect.
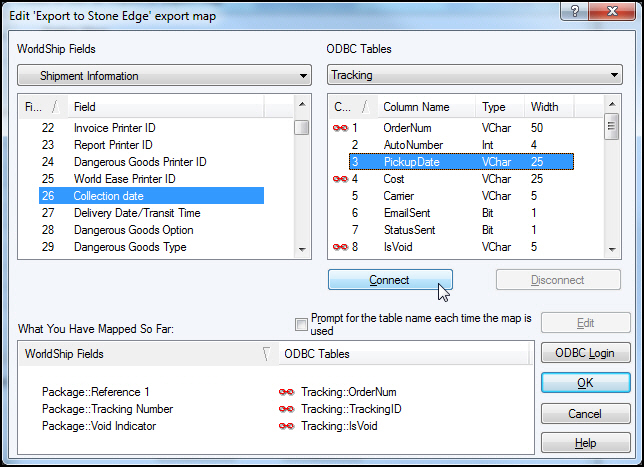
Map WorldShip Fields>Shipment Information>Collection date to ODBC Tables>Tracking>PickupDate.
Select Connect.
If you do not use Negotiated Rates skip to step 21. If you do use Negotiated Rates, map WorldShip Fields>Shipment Information>Total Shipment and Handling Negotiated Rates Charge to ODBC Tables>Tracking>Cost.
Select Connect.

If you use Negoiated Rates, skip to step 23. If you do not use Negotiated Rates, map WorldShip Fields>Shipment Information>Total Shipment and Handling Negotiated Rates Charge to ODBC Tables>Tracking>Cost.
Select Connect.
Select OK.
Select Close.
Select the Import-Export Data tab.
Choose ONE of the following options:
select Automatic Export at End of Day to run this function once, at end of day
select Automatic Export After Process Shipment to run this function after processing each shipment. (The Automatic Export After Process Shipment option is ONLY recommended for users with a standalone installation of Stone Edge. If you have a networked installation of Stone Edge with
 Note: If more than one export
is enable, no data is exported.
Note: If more than one export
is enable, no data is exported.
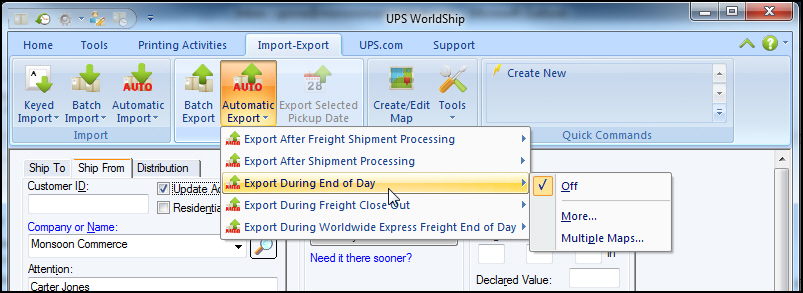
After selecting your Automatic Export option, select More.
In the Select map from list for export window, select the export map you just created.
Select Export. When you return to this menu your export map has a check mark beside it indicating the export is active.
Open UPS WorldShip.
Select the Import-Export tab.
Select Keyed Import.
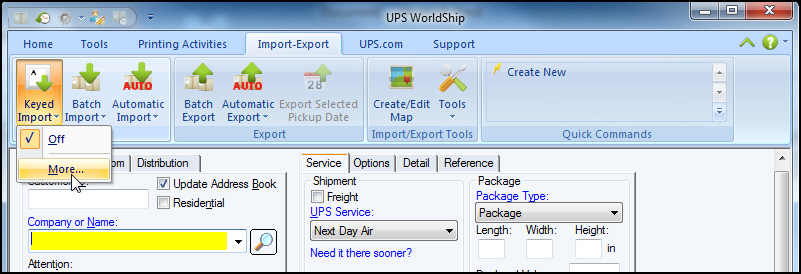
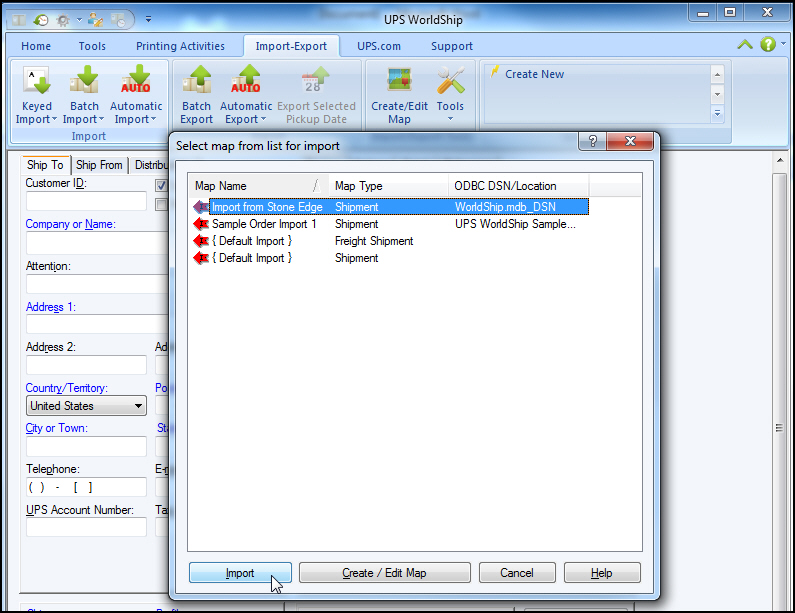
Select More. The Select map from list for import screen opens.
Select the name of your Import Map created earlier, and select Import.
The Enter import key window opens.
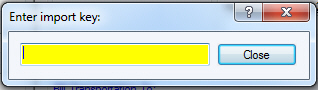
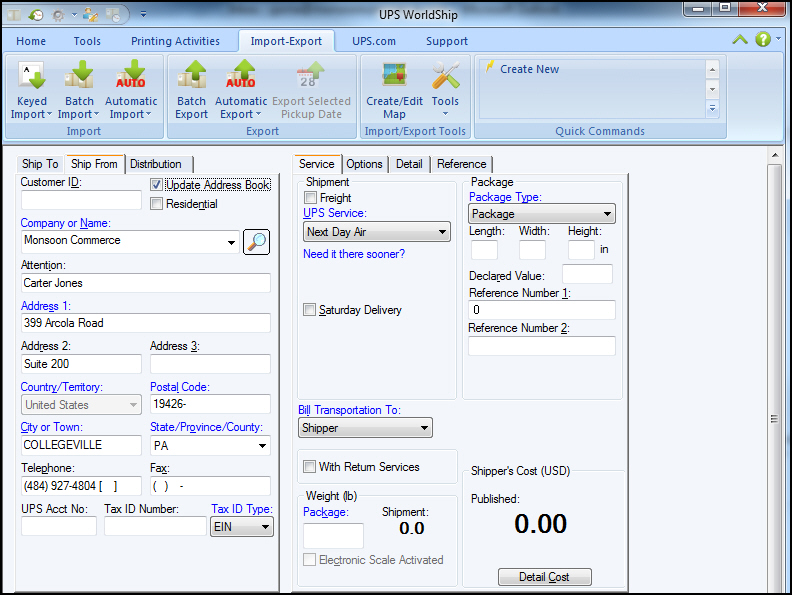
Enter an "Approved" Stone Edge order number and press Enter (do not click Close).
The shipping data from the Stone Edge order appears in the WorldShip interface.

Process the shipment according to your business practices.
When you have printed the shipping label, enter another approved order number in Enter import key to process another shipment.
Note:
If you return to Stone Edge and make changes
to an order (such as approving an order), you do not see the changes in
WorldShip until you close and re-open the "Enter
import key" screen.
ODBC errors may occur if the SQL Server is not configured properly.
Creating a trusted connection between the server and the computers running World Ship may resolve some of the errors.
For further assistance, contact Stone Edge Tech Support.
Creating ODBC Connections in Microsoft Windows 7
Windows 64-Bit Operating System Considerations
UPS WorldShip Setup Full Documentation
Created: 11/14/14
Updated: 11/14/14
