![]()
Version 7.0
![]()
Version 7.0
Contents of this Topic: Show
The Import Orders screen is where the user transfers order information from a shopping cart into SEOM. This is accomplished directly via the internet or by a text file, exported from one or more of the integrated shopping cart types.
Refer to the Shopping Cart Matrix to identify integrated shopping carts and the specific functions each cart supports.
Shopping carts systems not in that list can still integrate with SEOM by purchasing a "Generic" shopping cart license. In this case, the user is responsible for creating and maintaining the integration scripts, based on the program specifications found in the Developer's Guide Developer's Guide.
To access the Import Orders screen, go to :
Main Menu>Process My Orders>Import My Orders
Main Menu> What would you like to do?>Import My Orders button
![]() Before
orders can be imported into SEOM,
at least one shopping cart system must be defined.
Before
orders can be imported into SEOM,
at least one shopping cart system must be defined.
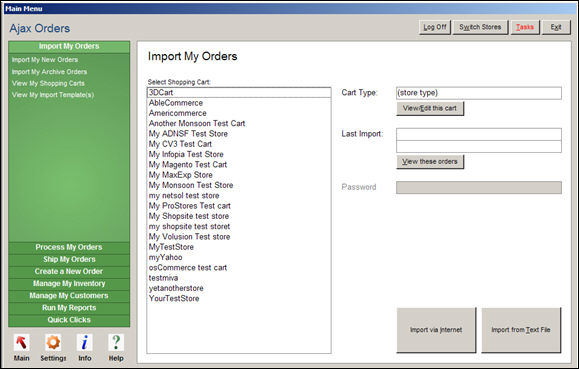
Import My Orders
this section contains the names of all shopping carts the user has defined within SEOM
after selecting a shopping cart from the list, click this button to begin a direct XML order import
this button can only be used if the shopping cart system supports direct XML imports, see the Shopping Cart Matrix for specific information about a given cart
place the order text file from the supported shopping cart system in the New Orders folder, specified in the system parameter NewOrderLocation
click this button to start the text file import of order information
see the Shopping Cart Matrix for specific information about a given shopping cart system
click this button to open the Orders screen with the Orders from Last Import quick filter applied and review the orders that were imported most recently
Open the Import Orders screen:
Main Menu>Process My Orders>Import My Orders
Main Menu> What would you like to do?>Import My Orders button
Select the appropriate shopping cart from Select Shopping Cart.
Click Import via Internet to start the import.
If this is the first time that order information is being imported from the web store, refer to First Import for more information about responding to the program prompts.
When the import process has been completed, the program provides a visual summary of the results. Click OK.
Depending on the setting of the system parameter, UsePrinterMenu, the Printer Menu screen appears so you can select the printer (and tray) where the order paperwork and reports are printed.
(Optional) Select View Order from Last Import to review the most recently imported orders.
Obtain the text file from the web store and place it in the NewOrders folder. To determine the path to the NewOrders folder, view system parameter, NewOrderLocation.
Open the Import Orders screen:
Main Menu>Process My Orders>Import My Orders
Main Menu> What would you like to do?>Import My Orders button
Select the appropriate shopping cart from Select Shopping Cart.
Click Import via Text File to start the import.
If this is the first time that order information has been imported from a Web site, refer to First Import for more information about responding to the program prompts.
When the import process has been completed, the program provides a visual summary of the results. Click OK.
Depending on the setting of the system parameter, UsePrinterMenu, the Printer Menu appears so you can select the printer (and tray) where the order paperwork and reports are printed.
(Optional) Select View Order from Last Import to review the most recently imported orders.
If you receive a warning message during order import which states that full credit card information was passed from the shopping cart:
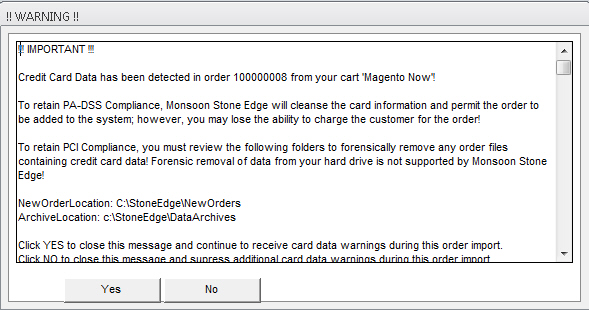
This behavior may be the result of a customer using a stored credit card number in a non-PCI compliant version of the shopping cart.
Created: 3/14/12
Revised: 11/22/13
Published: 04/13/16