![]()
Version 7.0
![]()
Version 7.0
Contents of this Topic: Show
The Email Template Editor is used to modify the standard SEOM email templates supplied with the program or to create completely new email templates to meet the business needs.
Regular text and email "tags" are added to the new template, which the user previews, using actual data from their store file.
Using Email Templates in SEOM is similar to using the "mail merge" function of Microsoft Word for letters and envelopes, except they create the body of an email instead.
Different email templates can be designed for different purposes and the program can be instructed when to use each one via the Store Setup Wizard. For example, when the program generates a confirmation email for an order or group of orders, it will pull pertinent information from each order, and based on the designated email template, insert customer-specific information into the "finished" email that is sent to the customer.
SEOM assumes that the production Email Templates folder is found in the same location as the store data file. If new templates are created or changes are made to templates in an Email Templates folder that is not in the same location as the data file, those templates will not be displayed in the list of templates where email can be sent. For example, if in a networked configuration of SEOM
The production Email Templates folder should be backed up regularly, along with the store data file, for disaster recovery purposes. It is recommended that the user keep on-site and off-site copies of critical SEOM files, which are identified by the CTRL+Shift+C key combination at the Main Menu.
The Email Template Editor is accessed by:
Main Menu>Settings>Report Functions>Email Template Editor
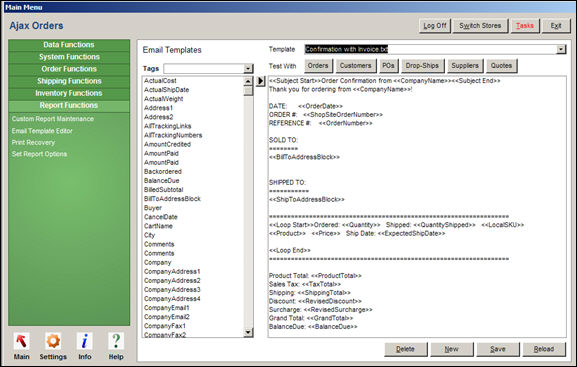
Email Template Editor screen
all email templates located in the production Email Templates folder are listed here (typically C:\StoneEdge\EmailTemplates, but the program assumes that it is in the same directory as the store data file)
choose the existing template to be changed and its attributes are populated in the right-hand pane
when the form is initially opened, a list of every possible email tag is displayed
make a selection from the Tags drop-down list to show only a specific "type" of email tag
position the cursor where a tag is to be inserted in the text of the email template
double-click the appropriate tag in the list to insert it into the template
Use this row of buttons to test the proposed changes to a template, prior to the changes being saved.
Use the appropriate button to test the changes with the correct type of information for the specific tag "type". For example. use the Orders button to test the template with data from order records, the Customers button to test with data found in customer records, and so on.
the right-most pane of the screen is where the body of the email template is entered or displayed
over-type or copy and paste the text of the email into this field and add the desired email tags at the appropriate locations
make a selection from the Template drop-down list and select this button to remove the selected template from the program
the program prompts the user for confirmation before it deletes the template from the system; click OK to proceed or Cancel to abandon the change
this button is not visible unless system parameter AllowDeleteEmailTemplate is set to TRUE.
the program to prompts the user to provide a name for the new template, which is then entered in the Template drop-down list
enter the text of the new email template and insert the desired tags into the body of the template; select Save to create the template
exiting the Edit Email Templates screen prior to saving the template will result in the loss of the changes made in the current editing session
Tags that can be used in an Email Template are surrounded by << >> markers which represent placeholders in the body of the email; when the email is generated, actual data is substituted into the text before it is sent.
Some email tags merely pull a single value from a field in the program tables, while others allow the user to enter a string of text between a starting and ending tag or loop through a range of values.
Certain tags can only be inserted into the body of an email when it is sent from a related location in the program. For example, an email tag for a Purchase Order field will not be available to an email that is being sent from the Customers screen.
In addition, the data contained in similarly named tag fields may be different, depending on the category to which it belongs. For instance, the Purchase Order "Comments" tag will contain different information than the Orders "Comments" tag.
Rather than changing the standard email templates that are provided with the program, it is recommended that the user create a new template by copying an existing standard template and saving it with a new name. Otherwise, be sure to make a backup copy of a standard template before changing it.
To build the template from scratch:
Select New.
Enter a name for the new template when prompted, and select OK.
Optional: Select the Miscellaneous filter from the Tags drop-down list to limit the list.
Select the Subject Start tag from the list and double-click to add it to the body of the email text in the right-most pane.
Type in the text of subject line as it should appear next to the <<Subject Start>> tag.
Double-click the Subject End tag from the list to insert it at the end of the subject line.
For example, if the company name is My Web Orders and first line of the email template looks like this:
<<Subject Start>>Order Confirmation from <<CompanyName>><<Subject End>>
the resulting subject line of the email sent to the customer will be:
Order Confirmation from My Web Orders
Continue to add tags and/or text to the template body until the all desired text and tags are entered.
Select Save to create the template, which now appears in the Template drop-down list at the top of the screen.
To test the current template, select one of the Test With: buttons located above the body of the email template. The choice of which button is used depends on the types of tags included in the email template; therefore it may be necessary to test the template with more than one button.
To create a template based on a standard email template:
Select the base template from the Template drop-down list. The AllFields.txt template contains all of the possible email tags, making it a good candidate to copy.
Select the email template pane, select all or a portion of the template and copy it to the clipboard.
Select New and enter a name for the new template. Select OK.
Select anywhere in the email template body pane and paste the data from the base template into the new template. Select Save.
Continue editing or making changes to the template text and/or tags as necessary. Select Save to retain the changes.
Select one of the Test With: buttons located above the body of the email template to test the changes with real data in the store file. The choice of which button to use depends on the tags included in the email template; it may be necessary to test the template with more than one button.
Note: Any text between the tag markers << >> in the editor window is a tag that is replaced with actual data when the email is sent.
The data contained in some tags is only available to be inserted into the body of an email that is sent from a related location in the program. For example, a Purchase Order field tag will not be available in an email sent from the View Customers screen.
Also, data in a similarly named tag field may be different depending on the category to which it belongs. For instance, the Purchase Order "Comments" tag would contain different information than the Orders "Comments" tag.
Note: The EmailFromName and EmailFromAddress tags allow you define what name and address appear in the From: field in email using that template. To use them, insert the tag (or tags) at the top of template, then add a comma and the name or email address. For example:
<<EmailFromName,George Smith>> <<EmailFromAddress,george@smithco.com>>.
The SubjectStart and SubjectEnd tags allow you to define what appears in the Subject: field in email using that template. To use them, insert the opening tag next to the text you want to appear in the Subject line, then insert the closing tag. For example:
<<Subject Start>>Order Confirmation from <<CompanyName>><<Subject End>>.
To preview the template, select one of the Test With: buttons directly above the body of the email template. It is important to test a template with the proper type of data. For example, tags related to orders or suppliers will not work if you test the template with customer records.
The Email Templates screen changes slightly once a Test With: button is selected. The other buttons are grayed out and a Back to Edit button appears. The tags in the body of the email template are replaced with valid data.
Use the navigation arrows to scroll through the collection of records and view the sample output for each one.
Select Back to Edit button to continue tweaking the changes made to the template.
When satisfied with the test results, select Save. Or, to cancel the changes and start over with a fresh copy of the current template, select Reload.
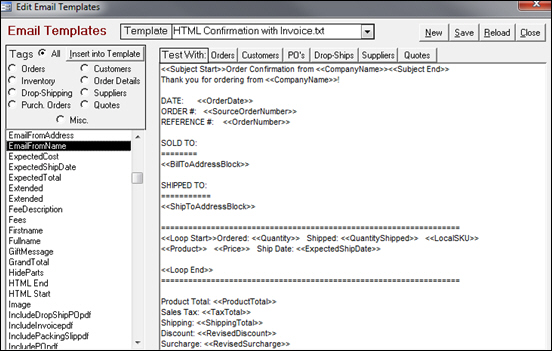
To add HTML to a plain text email template, use the Email Template Editor or the Edit Message tab of the Send Email screen.
For example, select the standard email template, HTML Confirmation with Invoice.txt from the Template drop-down list of the Send Email screen.
Select Edit Template.
Scrolling down, we see the beginning of the HTML portion of the template.
To add HTML to a template that does not already contain HTML content, add the <<HTML Start>> and <<HTML End>> tags in the body of the template.
Type the full HTML source code in between those tags, including any SEOM field tags that the program should replace with data from your store data file.
Any text that is not within the <<HTML Start>> and <<HTML End>> tags is processed as plain text and sent as the text-only version of the email.
In most cases, you will want to repeat the entire plain text message of the template within the <<HTML Start>> and <<HTML End>> tags.
The fields in blue text in the example below are fields that exist in the tables of the SEOM store data file. When the program generates the email, those fields are populated with actual data from customer, inventory, order or supplier records, depending on the tags that are used in the email template.
The line in green at the bottom of this example shows how to insert a company logo into the HTML section of the email template, using the <<img src>> tag. The image file should reside on a Web server.
<<OrderDate>>
Dear <<OrderName>>,
Thanks for ordering from <<CompanyName>>.
We appreciate your business!
- The Staff at <<CompanyName>>
<<HTML Start>>
<p><<OrderDate>></p>
<p>Dear <<OrderName>>,</p>
<p>Thanks for ordering from <b><<CompanyName>></b>.</p>
<p><i>We appreciate your business!</i></p>
<p>- The Staff at <img src="http://www.stoneedge.com/images/stomediumsm.gif'">
<<HTML End>>
An additional resource for help coding HTML is WebMonkey.
To insert live tracking links from your shipping company's Website into email messages sent to your customers, use the tag called AllTrackingLinks, which inserts a list of all tracking links associated with the current order in the email message.
Use the tag LatestTrackingLink to insert only the most recently added tracking number in the email message.
Created: 3/7/11
Revised: 9/23/14
Published: 04/13/16