![]()
Version 7.0
![]()
Version 7.0
Contents of this Topic: Show
The Custom Field Setup screen is accessible from Main Menu > Settings > Data Functions > Setup Custom Fields.
All editions of SEOM (Standard, PlusPOS and Enterprise) provide the ability to create basic custom fields for the purpose of storing additional data.
Custom fields can be created for the following record types:
orders
order details
customer
product (inventory)
supplier
The Custom Field Setup screen is used to configure the appearance and functionality of these basic custom fields.
Once configured, the custom fields are visible on the Custom Fields tab of the main screen of the appropriate record type.
In addition to the basic custom fields, the Enterprise Edition of SEOM offers an Advanced Custom Fields feature for customer and inventory records, which is outside the scope of this article. Refer to its Knowledge Base topic for more information.
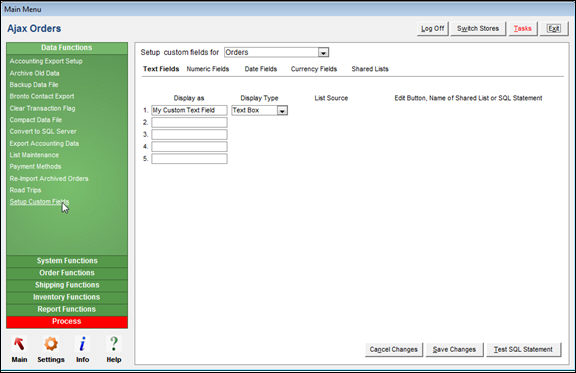
Custom Field Setup: Custom Text Fields tab
The Setup custom fields for drop-down list determines the type of custom field to be defined. The possible choices are: Orders, Order Details, Customers, Products, and Suppliers.
Cancel Changes abandons any changes made at this screen prior to Save Changes being clicked.
Save Changes creates the field with the selected attributes.
The Test SQL Statement button is used to simulate the effect of an Structure Query Language statement entered as the criteria for a custom field.
The fields on the tabs described below are the same regardless of which kind of custom field is being defined (Orders, Order Details, Customers, Products, or Suppliers).
As the name suggests, the Text Fields tab contains five fields (1-5) under Display as where you can enter the names of custom text fields.
Once a name has been entered into the first text field and you click Enter or Tab, additional fields such as the Display Type and List Source, become visible. Refer to the figure below.
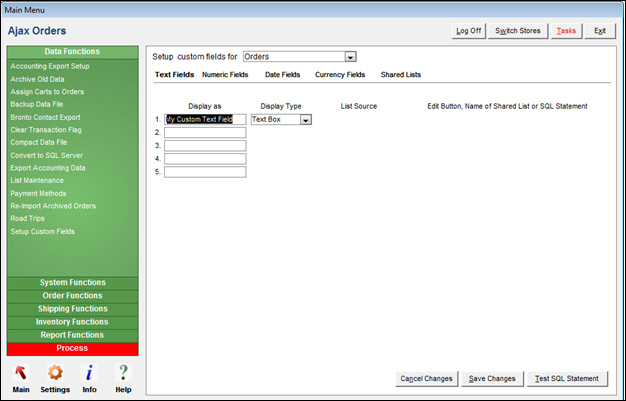
Example of Custom Text Field Setup screen: Custom Text & Numeric Fields tab
Display Type is where you select the type of control used for the custom data field.
The choices for Text custom fields are:
Text Box - enter data as a single line of text
Combo Box - select an existing entry presented in a drop-down list or enter the data as a single line of text
List Source is only visible if Combo Box is the selected control.
The choices for entries in List Source are:
Unique list for this field - if this is selected, a button labeled View/Edit List appears. Click on that button to view or enter appropriate values in the list to be used for this custom field. Refer to the section, Creating a Unique List, for more information.
Shared List - if this is selected, you can choose from previously created "shared" lists to populate the list. Refer to the section, Shared Lists Tab, for more information.
SQL Statement - enter an SQL statement in the field which becomes visible in the Edit Button, Name of Shared List or SQL Statement section, to populate the list
As the name suggests, the Numeric Fields tab contains five fields (1-5) under Display as where you can enter names for custom numeric fields.
Once a name is entered into the first numeric field and you click Enter or Tab, additional fields such as the Display Type and List Source, become visible.
Display Type is where you select the type of control used for the custom numeric field.
The choices for Numeric custom fields are:
Text Box - manually enter data as a single line of text
Combo Box - select an existing entry presented in a drop-down list or enter the data as a single line of text
Check Box - select one or more options from a list, which indicates a true or false condition
List Source is only visible if Combo Box is the selected control.
The choices for entries in List Source are:
Unique list for this field - if this is selected, a button labeled View/Edit List appears. Click on that button to view or enter appropriate values in the list to be used for this custom field. Refer to the section, Creating a Unique List, for more information.
Shared List - if this is selected, you can choose from previously created "shared" lists to populate the list. Refer to the section, Shared Lists Tab, for more information.
SQL Statement - enter an SQL statement in the field which becomes visible in the Edit Button, Name of Shared List or SQL Statement section, to populate the list
As the name suggests, the Date Fields tab contains five fields (1-5) under Display as where you can enter names for custom date fields.
Once a name is entered into the first date field and click Enter or Tab, additional fields Date Format and Example become visible.
Date Format, is where you select how the custom field is displayed.
The formatting choices for Date custom fields and their Examples are:
d-mmm-yyyy (6-Dec-2010)
mmm-dd-yyyy (Dec-6-2010)
General Date (12/6/2010)
Long Date (Monday, December 06, 2010)
Medium Date (06-Dec-10)
Short Date (12/6/2010)
In the figure below, we see that the Custom Date & Currency tab contains five empty rows (1-5) under the column labeled Display as, where a user may enter the names of custom fields to be created for either data type (Date or Currency).
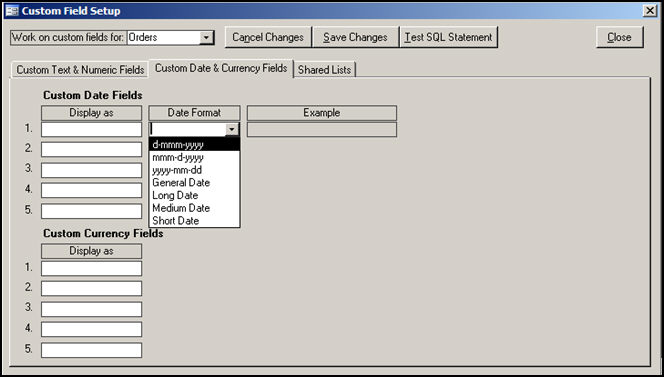
Example of the Custom Field Setup screen: Custom Date & Currency Fields tab
There are no additional format choices to be made for Currency custom fields.
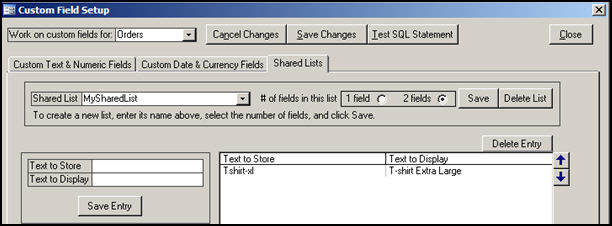
The Shared Lists tab is where the user defines a new, or updates an existing list, that may be shared by multiple custom fields.
Example of the Custom Field Setup screen: Shared Lists tab
Select the list to edit from the Shared List drop-down box in the upper left-hand side of the screen, or type in a name to create a new list.
If you are creating a new list:
Select the # of fields in this list radio buttons: 1 field or 2 fields. Select the adjacent Save button to create the list.
To add the first item in the list, enter a value in the Text to Store text box on the left-hand side of the tab. If you are creating a two-field list, enter a value in the Text to Display field, as well. The Text to Display field is grayed out in the figure above because the 1 field radio button is was selected. In the case of a 2-field list, the Text to Store values are not displayed, but are used by the program in the background.
Select Save Entry directly below the Text to Store and the Text to Display fields. The new entry or entries will appear in the list box to the right, under the appropriate column heading (also labeled Text to Store and Text to Display), as shown in the figure below.
Custom Field Setup screen: Shared Lists tab and two-field list
Repeat steps b. and c. for each additional item to be added to the list.
If you are editing a list:
Items can be added or deleted to or from an existing list, but the name of the list itself cannot be changed. In order to do that, delete the entire list and create a new list with the desired name. (Select it from the Shared List drop-down and select Delete List.)
To add a new item to the existing list, enter the new value in the Text to Store text box. If you are creating a two-field list, enter a value in the Text to Display field as well.
Select Save Entry directly below the Text to Store and the Text to Display fields on the left-hand side of the tab to retain the information. The new entry will then appear in the list box to the right of the tab.
To delete a list item, select it in the list box to the right and select Delete Entry.
Use the up and down arrow buttons to the right of the window to change the order in which the list entries should be displayed.
When finished making changes, select Save Changes located at the top of the screen, and then select OK.
Select View/Edit List that corresponds to the appropriate custom field. The Custom Field Setup screen changes, as shown below:
Custom Field Setup screen: Creating a unique list of values for the custom field
Choose one of the # of fields in this list radio buttons: 1 field or 2 fields.
Select Save.
To add an item in the list, enter a value in the Text to Store text box. If you are creating a 2-field list, also enter the Text to Display, in the text box which is grayed out in the image above. In the case of a 2-field list, the Text to Store values are not displayed on the Custom Fields tabs, but they are used internally by the program.
Select Save Entry, which is directly below the Text to Store and Text to Display fields. The new entry appears in the list box on the right.
Repeat steps five and six for each additional value to be added to the unique list.
To delete a list item, select it in the window to the right and select Delete Entry.
Use the up and down arrow buttons to the right of the window to change the order in which the list entries are displayed.
Select Done button to return to the Custom Text & Numeric Fields tab view of the Custom Field Setup screen. The custom field that was created with a unique list will now appear on the Custom Fields tab of the appropriate record type (Order, Customer, Inventory or Supplier).
If your shopping cart is able to include custom order data along with the standard order information when orders are imported into SEOM, you might want to add a custom order field (of the same name) to the program so that data can be seen on the Custom Fields tab of the (View) Orders screen.
If the shopping cart does not use XML to export data to other applications it will be necessary to check with the vendor or in the back-end of the web site (administrative section) to identify the custom fields that are available.
If, however, the shopping cart uses XML to transfer data to outside applications, then it may be possible to identify the custom fields by examining the XML which is sent to SEOM, by following the instructions below:
Open SEOM on the computer that you use to import orders.
At the Main Menu, press Ctrl+Shift+ C simultaneously to display the Connection Information screen.
Note the location of the Data Archives folder. The default path is c:\ stoneedge\data archives, but that can be altered by the user.
This folder contains XML files that contain the details of the order information coming from shopping carts. Right-click on the most recent order file for the appropriate shopping cart system and select Open with...Word Pad.
Examine a web order to determine whether it includes any fields that are not currently visible on the View Orders screen. Note the field's XML tag, e.g. <Custom Question>. This is the field name.
Enter the field name in the appropriate custom field type text box on the Custom Field Setup screen, as described in the beginning of this article.
Created: 3/1/12
Revised: 9/23/14
Published: 04/13/16